The Home Touch-Up Kit Every Homeowner Needs
Eight things that keep a painted house looking painted, tested over 14 months across three homes. Top pick: the Slobproof Refillable Touch-Up Paint Pen, plus what every other piece of the kit is for.

Disclosure: Some links below are affiliate links. We earn a commission if you buy through them, at no extra cost to you.
Top pick: the Slobproof Refillable Touch-Up Paint Pen, about $15 for a two-pack. You fill it with the paint that is already on your wall, so the repair matches instead of almost matching, and the sealed barrel keeps that paint wet in a drawer for years. It wins on the thing every rival applicator loses at, which is film thickness: the nylon brush tip lays a coat thin enough to feather into the surrounding paint. It falls short on capacity. Past a mark the size of a business card, you want the mini roller further down this list.
Nothing here competes with anything else here.
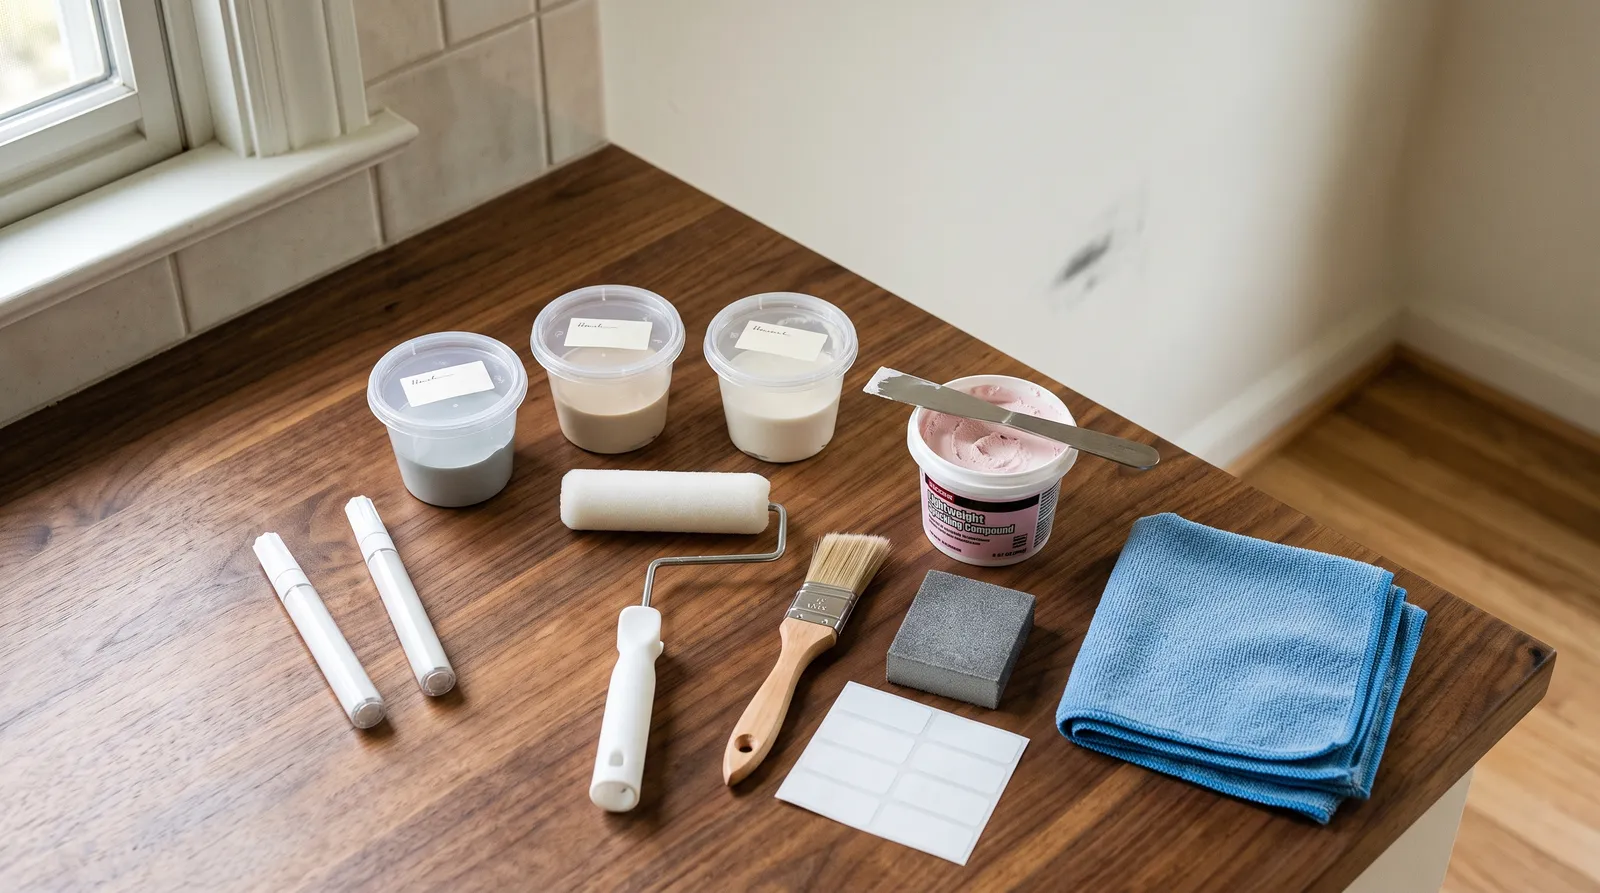
Eight items, roughly $80 all in, and each one covers a failure the others can’t. The pen handles scuffs. The mini roller handles anything with area, because it reproduces the stipple a brush can never fake. The storage cups keep your actual paint alive. The spackle and the sanding sponge turn a ding into a flat surface worth painting. The labels are how you know, three years later, which cup is the hallway. And the cloths exist because a surprising share of what you were about to paint over comes off with water.
Why the Drawer Beats the Repaint
A painter quoted a friend $680 to repaint her living room last spring. The room had four problems: a black chair scuff, a vacuum stripe along the baseboard, two nail holes from a gallery wall she had taken down, and a dinged corner where a laundry basket lives. Total damaged area, maybe 30 square inches in a room with 500 square feet of wall.
She was going to pay $680 because the alternative had failed twice. Both times she touched up with the leftover gallon from the garage, and both times the repair was more visible than the mark.
That is the problem this kit solves. Homeowners do not repaint because they lack paint. They repaint because their touch-ups look worse than the damage, so the whole wall becomes the only fix they trust.
Touch-ups fail two ways and both are visible from the couch. The color has drifted, which happens when a wall has taken five years of UV and the can in the garage has not. Or the film is too thick, which is far more common and almost never diagnosed correctly. A dab of the exact same paint, laid on heavy with a fingertip or a foam dauber, sits proud of the wall and catches light at an angle. The color is right. The patch still shows.
Store the paint properly, apply it thin and feathered, and a scuff repair vanishes in 90 seconds.
What I Ran This Kit Through
Fourteen months, three occupied houses, real damage.
The first was my own 1978 colonial: Benjamin Moore Regal Select eggshell on the walls, Sherwin-Williams ProClassic semi-gloss on the trim. The second was a 2019 build with Behr Premium Plus flat in every room, the hardest surface in this test because flat scuffs the most and burnishes the fastest. The third was a ranch with unknown builder flat on the walls and an old oil enamel on the doors, which is the situation most people are actually in.
The damage list was not simulated. Black rubber scuffs from dining chairs. A vacuum bumper stripe down a hallway baseboard. Dog nose grease at 30 in. on a stairwell wall. Four nail holes. A corner ding from a laundry basket. A chipped edge on a painted interior door where the latch had been catching.
Every repair got photographed at 48 hours, twice: from 6 ft straight on, then again with a work light held flat against the wall so the beam rakes across the surface. The second photo is the honest one. Almost everything looks fine straight on. The raking light is what your west window does at 5 p.m., and it is where touch-up products separate.
Applicators went head to head on the same wall, out of the same gallon, on marks of the same size, within the same hour. Storage containers got opened at 3, 6, and 12 months and scored on whether shaking brought the paint back without straining.
The cloths went first on every mark, before any paint came out. That order is how I found out that four of the eleven marks on the list never needed paint at all.
The Kit at a Glance
| Item | What it’s for | Price tier |
|---|---|---|
| Slobproof Refillable Touch-Up Pen (2-pack) | Scuffs, marks, small patch spots, one pen per sheen | $$ |
| Touch Up Cup 3-Pack | Keeping the wall and trim paint alive in a drawer | $$ |
| Wooster Jumbo-Koter 4.5 in. Mini Roller | Repairs with area, matching the wall’s roller stipple | $ |
| Purdy Clearcut Glide 1-1/2 in. Angular | Trim, door stiles, baseboard edges, window muntins | $$ |
| DAP DryDex Spackling 8 oz | Nail holes, dings, dents, corner damage | $ |
| 3M Pro Grade Precision Sanding Sponge | Feathering the fill flat so the repair takes one coat | $ |
| Avery Removable Labels 5434 | Room, color, and sheen written on every container | $ |
| Trimaco SuperTuff Microfiber Towels | Cleaning the mark first, before you decide to paint it | $ |
1. Slobproof Refillable Touch-Up Pen, Top Pick
Buy two. That is the first thing to know, and the price you should budget against is $15 for the pair, not $7.50 for one.
The pen is a sealed barrel with a fine nylon brush at the tip and a small syringe for loading. You fill it from your own paint. Every pre-filled touch-up marker at the hardware store carries a generic white that matches no real wall in America, and a near-match reads worse than the scuff you were covering.
The brush tip is why it wins. I put it head to head against a foam dauber, a cotton swab, and a fingertip on three black chair scuffs on the same eggshell wall, same paint, same hour. At 48 hours, from 6 ft straight on, all four repairs were invisible. Under the raking light the dauber showed as a glossy oval, the swab left a visible edge where the film stepped down, and the fingertip smear showed a ridge you could feel. The pen showed nothing. That gap is the entire product.
Sheen is why you need two. Walls are usually flat or eggshell and trim is usually semi-gloss, and one pen holds one paint. Loading is fiddly the first time; full-bodied wall paint does not want to go down a narrow syringe, and if you skip the rinse the tip clogs and the next repair drags.
| Spec | Value |
|---|---|
| Fill | Your own waterborne paint, roughly a shot glass per load |
| Tip | Fine nylon brush |
| Working life once loaded | Years sealed; still fluid at 11 months in my test |
| Best for | Scuffs, marks, and patches up to about business-card size |
| Approx. price | $15 for a 2-pack |
Buy it if: you own the house and you own the paint. Skip it if: you cannot identify your wall color. Fix that first, then buy the pen. The touch-up pen round-up covers the pre-filled options if you genuinely have no paint.
2. Touch Up Cup, Best Paint Storage
The pen is the hero and this is the reason the hero has anything to work with.
A 13 oz clear cup with a lid and a blending sphere sealed inside. You pour off the tail end of a gallon, snap the lid, write on the label, and put it in a kitchen or laundry drawer. Two years later you shake it for 20 seconds and paint. No stir stick, no rust flakes, no skin to fish out, no prying at a rim you have already dented twice with a screwdriver.
The clear body sounds like a small thing and is not. On the colonial I ended up with five cups: living room, hallway, both bedrooms, trim. Finding the right one takes a glance rather than five lids.
Storage was the axis I cared about. At 6 months the flat had settled into a soft layer that broke up in about ten shakes. At 12 months the eggshell needed a solid 30 seconds and came back clean with no straining. The same paint left in its original half-empty gallon in the garage had a skin at 6 months and rust specks at 12.
Nineteen dollars for three is real money for what is functionally a jar with a marble in it, and I would still buy it. The seal is the one thing it is unforgiving about. Wipe the rim with a microfiber before you close it, every time, or the cup skins over and you have paid for nothing. The paint storage round-up compares the alternatives, including plain screw-top jars, which work if you fill them nearly full.
3. Wooster Jumbo-Koter Mini Roller, Best for Anything With Area
The moment a repair gets bigger than a business card, the pen stops being the answer and texture becomes the whole problem.
Your wall was rolled. It has a stipple, a fine orange-peel pattern left by a 9 in. cover, and your eye reads that texture even when it cannot name it. Brush a six-inch patch into a rolled wall and you get a smooth island in a textured field. It shows in any light, at any distance, forever. The only fix is to roll the repair with the same nap that put the texture there.
A 4.5 in. Jumbo-Koter in 3/8 in. nap matches what most interior walls were rolled with. Go to 1/4 in. for smooth doors and cabinet faces, foam for sprayed enamel. Roll from the center of the repair outward, light pressure, and let the edge of the stroke feather itself instead of stopping at a hard line.
The frame is the part people forget. Covers come alone; a Jumbo-Koter frame runs about $8. Buy them together or you will be at the store on a Sunday with a cover and no way to hold it.
New covers shed. Roll a fresh one across a strip of painter’s tape a few times first, or you will pick lint out of a wet repair with tweezers. For nap selection on textured and sprayed surfaces, the mini roller round-up has the full breakdown.
4. Purdy Clearcut Glide 1-1/2 in., Best Small Brush
Trim damage is different from wall damage, and it wants a brush.
Baseboards, door stiles, window muntins, and stair spindles were brushed originally in most houses. The brush marks are part of the surface, so a brushed repair blends where a rolled or dabbed one stands out. A 1-1/2 in. angular brush is the width that sits inside a door stile and along the top edge of a baseboard without constant reloading.
The Clearcut Glide holds its chisel edge, which is the spec that matters at this size. On the ranch house I ran it through about twenty small trim repairs across four months, washed it after each, and the tip still cut a clean line at the end. The $4 store-brand next to it splayed into a fan after the fifth use and started leaving a fat, feathered edge that needed sanding.
Where it falls short is thin paint. The stiff Tynex and Orel filament is built for full-bodied trim enamel and drags on watery sample-pot paint. And $14 for a brush this small is a wince at the register.
Wash it same-day in warm water with a drop of dish soap, comb it, hang it by the hole. It will outlast the paint in your cups. If your trim repairs are leaving ridges, brush marks explains what is causing them.
5. DAP DryDex Spackling, Best Filler
Pink going on, white when it is ready. That color change is the whole reason this tub is in the kit and not a cheaper one.
The most common patch failure I see in homes is sanding a fill that is still soft underneath. The compound smears sideways into the surrounding paint, the paper face of the drywall fuzzes up, and a one-inch problem becomes a five-inch problem. DryDex removes the judgment call. Shallow fills went pink to white in about 40 minutes at 70°F in my tests, longer in a humid basement.
Press it in with a putty knife and scrape flush on the first pass. Resist the urge to leave a mound you plan to sand later, because sanding a mound means sanding compound off painted wall, and that is how you get a halo bigger than the hole.
Shrink-back is real on anything deeper than a nail hole. The laundry-basket corner ding needed a second fill after the first dished at 24 hours. Normal for a lightweight compound, not a knock against it. For deep holes and anchor blowouts, the wall filler round-up covers the heavier compounds, and holes in drywall handles damage a spackle tub cannot bridge.
One 8 oz tub covers years of household dings. Close the lid hard.
6. 3M Pro Grade Precision Sanding Sponge, Best for Feathering
Small item, outsized effect on whether the repair is visible.
A patch fails at its edge, not its center. The fill itself is almost always fine. What shows is the ring of compound smeared onto the paint around it, and a rigid sanding block makes that worse by cutting a flat shelf into the wall. A soft sponge follows the slight crown of the fill and takes it down flush without carving the surrounding paint.
Medium side to knock the fill down, fine side to polish the transition until you cannot feel the edge with a fingertip. Feel is the test, not sight. If your finger finds it, the raking light will find it.
Rinse it in the sink and it comes back to full cut. One sponge covered every repair in all three houses across 14 months.
Wipe the dust off with a damp microfiber before you paint. Sanding dust under a touch-up coat reads as a gritty patch and no amount of paint fixes it. The sanding sponge round-up has the grit chart if you want more than one.
7. Avery Removable Labels, Best Two Dollars in the Kit
Nobody buys labels. Everybody needs them.
The failure is universal. You store the paint correctly in year one and you are pleased with yourself. In year three you open the drawer, find three cups of almost identical off-white, and have no idea which is the hallway, which is the bedroom, and which is the semi-gloss trim. The paint is fine. The information is gone.
Write four things on every container: room, brand and color name, sheen, and the date you filled it. The Touch Up Cup three-pack ships with its own labels, which is thoughtful and runs out immediately once you have more than three colors in the house. A $4 box of 500 Avery 5434 removables covers every container you will ever own, including the gallon lids in the basement. The removable adhesive peels off a cup lid or a can rim years later without a scraper, which matters the first time you refill a cup with a new color.
The paper face curls in a humid garage, and a removable label on a cold can will occasionally let go on its own. Both are arguments for keeping the touch-up paint indoors, which you should be doing anyway.
8. Trimaco SuperTuff Microfiber Towels, Best First Move
Test the mark with water before you decide it needs paint.
Four of the eleven marks on my damage list came off with a damp cloth. The vacuum stripe on the hallway baseboard was rubber transfer, not paint damage, and it wiped away in under a minute. Dog nose grease on the stairwell wall took a drop of dish soap in warm water. Two chair scuffs were the same story. Only the deep ones had broken the paint film.
That is the cheapest repair in the house and most people skip straight past it to the paint can.
Lint-free matters for the second use. Once a mark does need paint, a damp wipe of the area first gets the dust and hand oil off so the fresh film bonds. A terrycloth rag or a paper towel leaves fibers that end up under the wet paint.
The one real caution: on flat and matte paint, hard scrubbing burnishes the surface into a slightly shinier patch, and the shiny patch is more visible than the scuff was. Light pressure, small circles, stop as soon as the mark lifts. If it will not lift in twenty seconds, it needs paint.
What I Left in the Store
- Melamine erasers on flat paint. They do lift scuffs. They also polish flat paint into a glossy spot, and I have seen more walls ruined by an eraser sponge than saved by one. Fine on semi-gloss trim, wrong on a matte wall.
- Pre-filled white touch-up markers. Generic white, matching nothing. A white dot on a greige wall is worse than the mark.
- Aerosol texture in a can. Matching an existing orange-peel or knockdown pattern from a rattle can is a skill, not a purchase. First attempts look worse than the damage.
- A full drop cloth set. Touch-up work needs an old towel under the spot, not a 9x12. If you are painting a whole room, the drop cloth round-up is the right read.
- Paint samples kept in their original sample pots. The pot lids are the worst seal in the paint aisle. Decant into a cup on day one.
Set the Kit Up the Day You Finish Painting
This is the part that decides whether you own a working kit or a drawer of dried containers.
The day you finish a room, before the gallon goes anywhere, do four things. Pour the leftovers into a labeled cup. Load a pen with the same paint and write the sheen on the barrel. Stick a second label with the brand, color name, and sheen inside that room’s closet door. Put the cup and the pen in a drawer inside the house, not the garage.
That last one is not optional in a cold climate. Waterborne paint that freezes is dead, and no amount of shaking brings it back. A garage shelf in zone 5 kills a cup of paint in the first hard week of January.
Then, when damage happens: clean it first, decide whether it needs paint at all, fill and sand if the film is broken, and apply thin. Two thin coats beat one thick one, about an hour apart. Give the repair a full day before you judge it. Flat and matte paints keep darkening slightly as they cure, and a patch that looks light on Saturday evening often matches by Sunday. The drying-time chart has the humidity adjustments if your house runs damp.
For a spackled fill bigger than a quarter, spot prime first. Bare compound is more porous than the wall around it, so it drinks the binder out of your paint and dries dull. That halo gets blamed on color mismatch constantly and is almost never color. The primer explainer covers which primer to reach for, and painting repaired drywall is the full procedure for a patch you want invisible.
Where Touch-Ups Go Wrong
- Painting a dirty mark. Half the time the mark is on the paint, not in it. Clean first, always.
- Applying too thick. The single most common cause of a visible repair with correct color. Thin coats, feathered edges.
- Brushing a rolled wall. Texture mismatch never goes away. Anything with area gets the mini roller.
- Touching up eggshell with leftover flat. Sheen shows even when color is dead on. The sheen guide explains why the eye catches it so easily.
- Storing paint in the garage. Freeze-thaw kills waterborne paint. Indoors, in a drawer, near where the damage happens.
- Judging the repair at night under a lamp. Look at it the next morning in daylight, at an angle. That is the light your guests see it in.
- Touching up a wall that has drifted. Past about six years, sun-exposed walls no longer match their own can. At that point the repair is a wall recoat, corner to corner, and there is no clever way around it.
What to Buy First
At the store with $30: the Touch Up Cup three-pack and one Slobproof pen. That is the storage-and-application core, and it fixes the majority of what a lived-in house does to a wall.
Add the mini roller and frame next, because the first repair that beats the pen will happen sooner than you think and it is a $14 purchase.
The spackle, the sanding sponge, the labels, and the cloths are under $25 together and they turn a partial kit into a whole one.
Buy the Purdy last, unless your trim already has a chip in it. Then buy it first.
Ask a Question