How to Fix Holes in Drywall
Match the patch to the hole size: spackle for nail dings, mesh tape for fist-size, California patch for baseball-size, full backer cut for anything bigger.

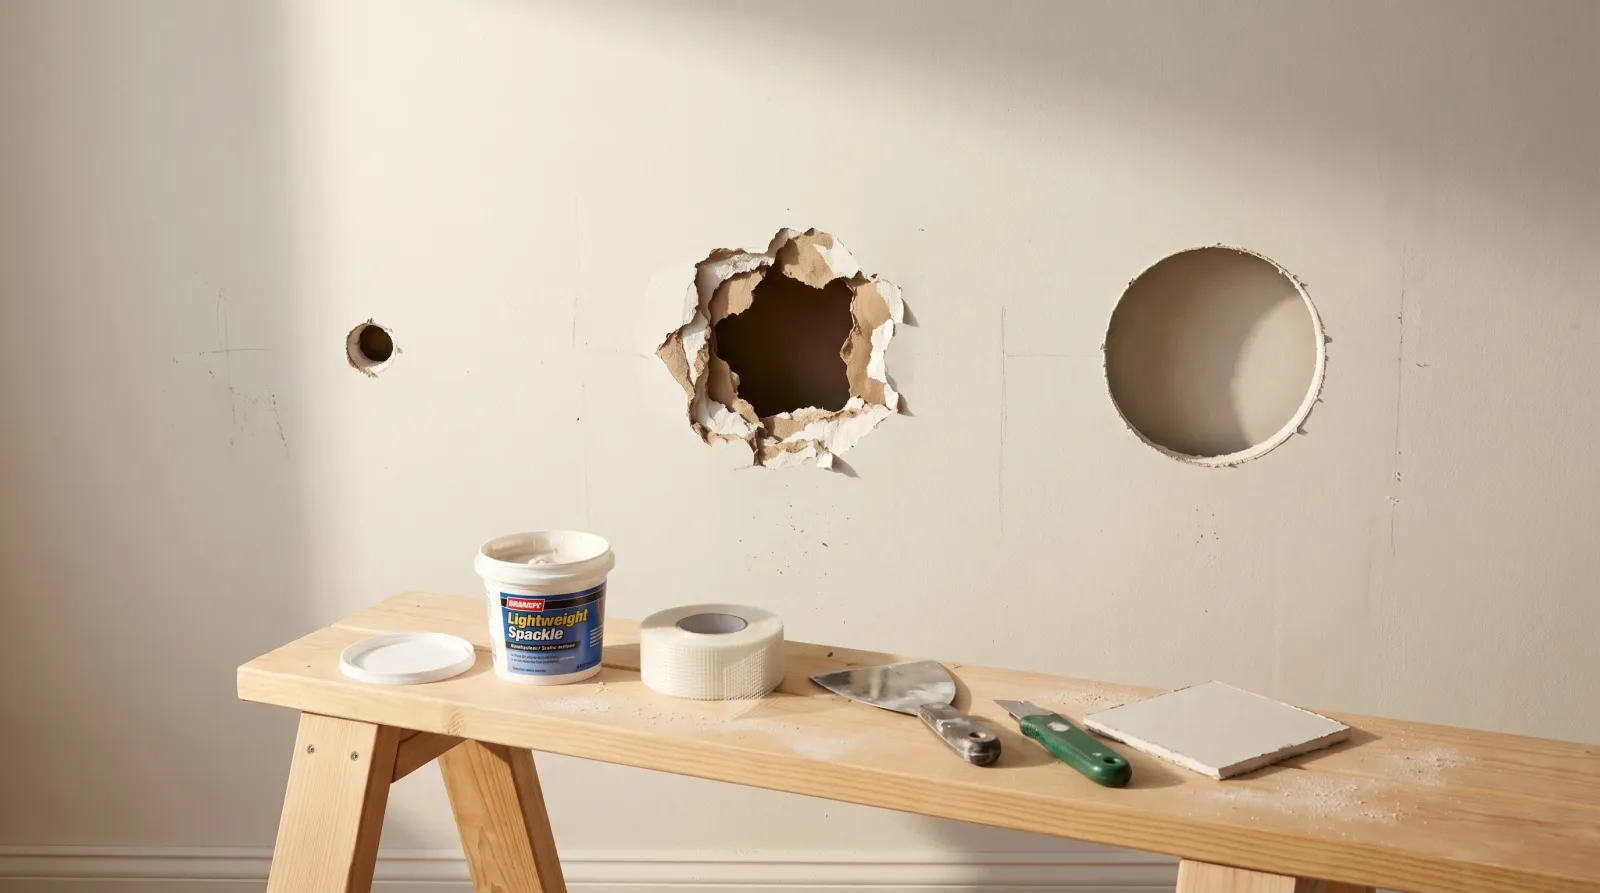
Four hole sizes, four different repairs. A nail dimple gets spackle and 90 seconds. A doorknob hole gets a California patch and an hour. Bigger than a softball needs a wood backer and a real drywall plug, or the patch telegraphs through your paint by next summer. Match the method to the hole.
Does This Match What You’re Seeing?
Four shapes of damage cover most calls:
- Pin / nail / screw holes. Clean round dot, no broken paper around the rim. Picture-hangers, anchor pulls, taped-up posters.
- Fist-size punch. 2 to 4 inches across, ragged paper edges, you can see darkness inside. Door knob with no stopper, kid throwing a controller, moved furniture.
- Baseball-to-softball hole. 4 to 6 inches, sometimes square if a drywall saw was involved (water leak inspection, electrician pulling wire).
- Bigger than a softball. 6 inches and up, or a corner blown out. Doorknob with framing behind it, plumbing access, ceiling sag.
Crumbling around the rim, dark staining, or a soft mushy edge means water got there first. Stop. Fix the leak, let the wall dry to under 12% moisture meter reading, then patch. Patching wet drywall is patching twice.
How Serious Is This?
Cosmetic. Drywall doesn’t hold the house up. The studs do. A hole in drywall is a same-afternoon fix as long as the framing behind it is intact and dry.
Two times it stops being cosmetic: the hole is in a fire-rated wall (garage-to-house, multi-family party wall), or the hole exposed knob-and-tube wiring or a leaking pipe. Fire-rated wall: match the original board type (Type X, usually 5/8”) and tape the seams properly. Wiring or plumbing: handle that first, patch second.
Why This Is Happening (root Cause)
Drywall is gypsum sandwiched between paper. The paper is what gives it tensile strength. Once the paper face is broken (punctured, torn, sliced), the gypsum behind crumbles under any sideways pressure. That’s why a doorknob makes a hole bigger than the knob itself. The impact breaks the paper for an inch in every direction, and the gypsum behind crumbles back to wherever the paper is still intact.
This matters for the patch. You’re restoring the paper-and-gypsum sandwich across an area wider than what you see. Spackle alone has zero tensile strength. It cracks the first time the wall flexes, which is why nail-hole spackle works on nail holes (no flex) and fails on a punch-through (lots of flex). Bigger holes need either mesh tape across the gap, or an actual piece of drywall paper bridging the void.
The other reason holes come back: whatever caused them is still there. Doorknob holes without a stopper become doorknob holes again. Name the cause or budget for the same patch next year.
The Fix
Step 1 — Pin and Nail Holes (under 1/4 Inch)
Lightweight spackle. DAP DryDex or 3M Patch Plus Primer, either one. Scoop a pea-size dab on your fingertip, push it into the hole, drag flush with the wall using the side of your finger or a 1-inch putty knife. Don’t pile it on. Proud spackle means sanding, and sanding means dust. Dry time 30 minutes for a clean wipe.
Sand only if you feel a ridge. 220-grit, two passes, done. Spot-prime with the same wall paint or a dab of PVA primer, then paint. Three coats of wall color is overkill for a pinhole; one coat over primer is enough.
Step 2 — Fist-Size Holes (1 to 4 Inches): Mesh Tape Patch
You need a self-adhesive fiberglass mesh patch, the aluminum-backed kind sold as “wall repair patch” in any hardware store. 4-inch and 6-inch squares. Pick a patch wider than the hole by at least an inch on every side.
Trim any loose paper around the hole flush with a utility knife. Don’t pull on it; you’ll widen the hole. Press the patch over the hole, smooth flat. The aluminum backer spans the gap, the mesh edges grab the wall surface.
Spread 20-minute setting-type joint compound (Easy Sand 20 or 45) over the patch with a 6-inch knife. First pass: thin coat, just cover the mesh, feather 4 inches past the patch on every side. Let it set 25 minutes (not dry, set: that’s a chemical cure, not evaporation, and that’s why it’s stronger than premixed mud for patches). Second coat: 10-inch knife, feather 8 inches past the patch. Third coat if the edge is still readable in sidelight, same knife, feather wider.
Sand the feathered edges with a sanding sponge between coats only if there’s a ridge. Final sand with 220-grit, light pressure. Prime, paint.
Step 3 — Baseball-Size Holes (4 to 6 Inches): California Patch
This is the trick worth knowing. Buy a drywall scrap (or use cutoff from a previous project) that’s bigger than the hole. Same thickness as your wall: 1/2 inch in most homes, 5/8 inch in garages and ceilings.
Cut a square of drywall about an inch wider than the hole on every side. Now, on the back of the square, score and snap the gypsum 1 inch in from each edge, but leave the front paper intact. Peel the gypsum away from the front paper border. You end up with a small drywall block in the center with a 1-inch paper flap all the way around. That paper flap is your built-in tape.
Cut a matching square opening in the wall, sized to the gypsum block, not the paper. Test fit. Butter the back of the paper flap and the rim of the wall hole with premixed joint compound. Press the patch in: the gypsum block fills the hole flush, and the paper flap lays flat against the wall surface. Smooth the flap flat with your knife, pushing mud out from under it.
Two more coats of compound, each feathered wider than the last. 6-inch knife, then 10-inch. Sand, prime, paint. The California patch holds because the paper flap takes the tensile load across the original hole. No mesh, no backer board, no screws.
Step 4 — Anything Bigger Than a Softball: Backer-And-Plug
Above 6 inches, the patch needs framing-equivalent support behind it, or it’ll flex and crack out. Cut the hole square with a utility knife or drywall saw: clean edges, sized to fall on a stud if there’s one nearby. Measure the opening.
Cut a strip of 1×3 furring or 1/2-inch plywood about 4 inches longer than the opening height. Slide it inside the wall, hold it tight against the back of the drywall along one edge of the hole, and run two drywall screws through the existing wall into the strip. Repeat on the other side. Now you have a backer.
Cut a drywall plug to the opening size, same thickness. Drop it in. Screw it to the backers, 4 to 6 drywall screws around the perimeter, set the heads just below the paper face. Tape the four seams with fiberglass mesh or paper tape. Three coats of compound, feathered wide. The seam joints are where this kind of patch fails. Feather wider than you think, and use a 12-inch knife for the final pass.
For ceiling holes over 8 inches: same fix, but use 5/8-inch drywall to match the original ceiling. A 1/2-inch patch in a 5/8-inch ceiling sits proud and reads from across the room.
Safety and Dust
Wear an N95 when sanding joint compound. Gypsum dust is fine and it goes everywhere. Eye pro too, especially for ceiling patches. Sanding compound overhead with bare eyes is its own special punishment.
Hang a damp drop cloth across the doorway if you’re patching in a finished room. Sand with a sponge instead of paper where you can; less airborne dust, less cleanup. If the original wall was painted before 1978, test for lead before you start scraping or sanding loose paint around the hole.
Never mix joint compound with bleach, ammonia, or any household cleaner in the same bucket. Don’t sand compound that’s been treated with a mold spray until it’s fully dry. Wet compound plus active spray = a slurry that won’t cure properly.
Texture Match Before Paint
If your wall has texture (orange peel, knockdown, popcorn), a smooth patch reads as a smooth patch under any sidelight. Spot-prime the patch first with PVA drywall primer. Then hit it with a matching aerosol texture from the hardware store. Spray a test card from 18 inches; adjust distance until the spatter pattern looks like the surrounding wall. Knockdown texture also needs a quick wipe with a wide drywall knife about 60 seconds after spraying to flatten the high points.
Let the texture dry 4 hours minimum, then prime over it again before topcoat. Two prime coats sounds excessive. It isn’t. Texture spray dries chalky and sucks up wall paint unevenly without a sealing primer between.
Recommended Product
DAP DryDex Spackling for pin and nail holes. The pink-goes-on, white-when-dry indicator sounds gimmicky and isn’t. It tells you when the patch is sand-ready, which on a typical pinhole is the difference between sanding at 25 minutes and waiting 90 for nothing. Lightweight, doesn’t shrink on a single-pass fill, cleans up with water.
For everything bigger, use USG Easy Sand 20 or Easy Sand 45 setting-type compound, mixed from the bag. Setting compound chemically cures in the time printed on the bag regardless of humidity. Premixed tub mud takes 24 hours and shrinks. Setting compound takes 20-45 minutes and barely shrinks at all, which is why every drywall finisher I know uses it for patches even when they finish seams with the premix.
Prevention
Doorknob holes: install a hinge-pin stop or a wall-mounted bumper. $4 at the hardware store, takes two minutes. The cheap rubber tip-stops that screw into the baseboard fail when somebody opens the door fast. The hinge-pin and wall versions actually hold.
Settlement cracks in corners reopen seasonally. Mesh tape and a wider feather buy you 18-24 months instead of 6. If they keep coming back, the joint is moving and a paintable caulk in the corner (not compound) flexes with the wall.
Picture hangers: use brass pin hangers for anything under 5 pounds. Pinhole-sized, patches in 30 seconds. Big anchor pulls happen because somebody used an oversized anchor for a 2-pound frame.
When to Call a Pro
- The hole exposes black mold on the back of the drywall or on the studs (over 10 square feet, EPA territory).
- The wall is a fire-rated assembly (garage-to-house, multi-family party walls) and you’re unsure how to maintain the rating.
- The damage runs along a structural crack, not a settlement crack. Stair-step cracks in masonry or diagonal cracks across multiple walls in the same direction mean the house is moving; patch is cosmetic.
- Ceiling holes over 12 inches, especially with a sag or a brown stain. There’s water above the ceiling and the patch is the last thing to address.
- Pre-1978 home with chipping paint around the hole. Lead test the loose paint before sanding anything.
Related
Frequently asked questions
Can I just paint over a small nail hole?+
Do I need to prime a patch before painting?+
Will the patch crack again?+
What about holes in textured walls?+
- Spackle vs joint compound
- How to paint new drywall
- Fixing lap marks after touch-up