How to Paint a Bonus Room or Loft
Painting a bonus room with sloped ceilings and knee walls? Here is the order, the sheen, and the angle tricks that keep a loft from looking patchy and lopsided.

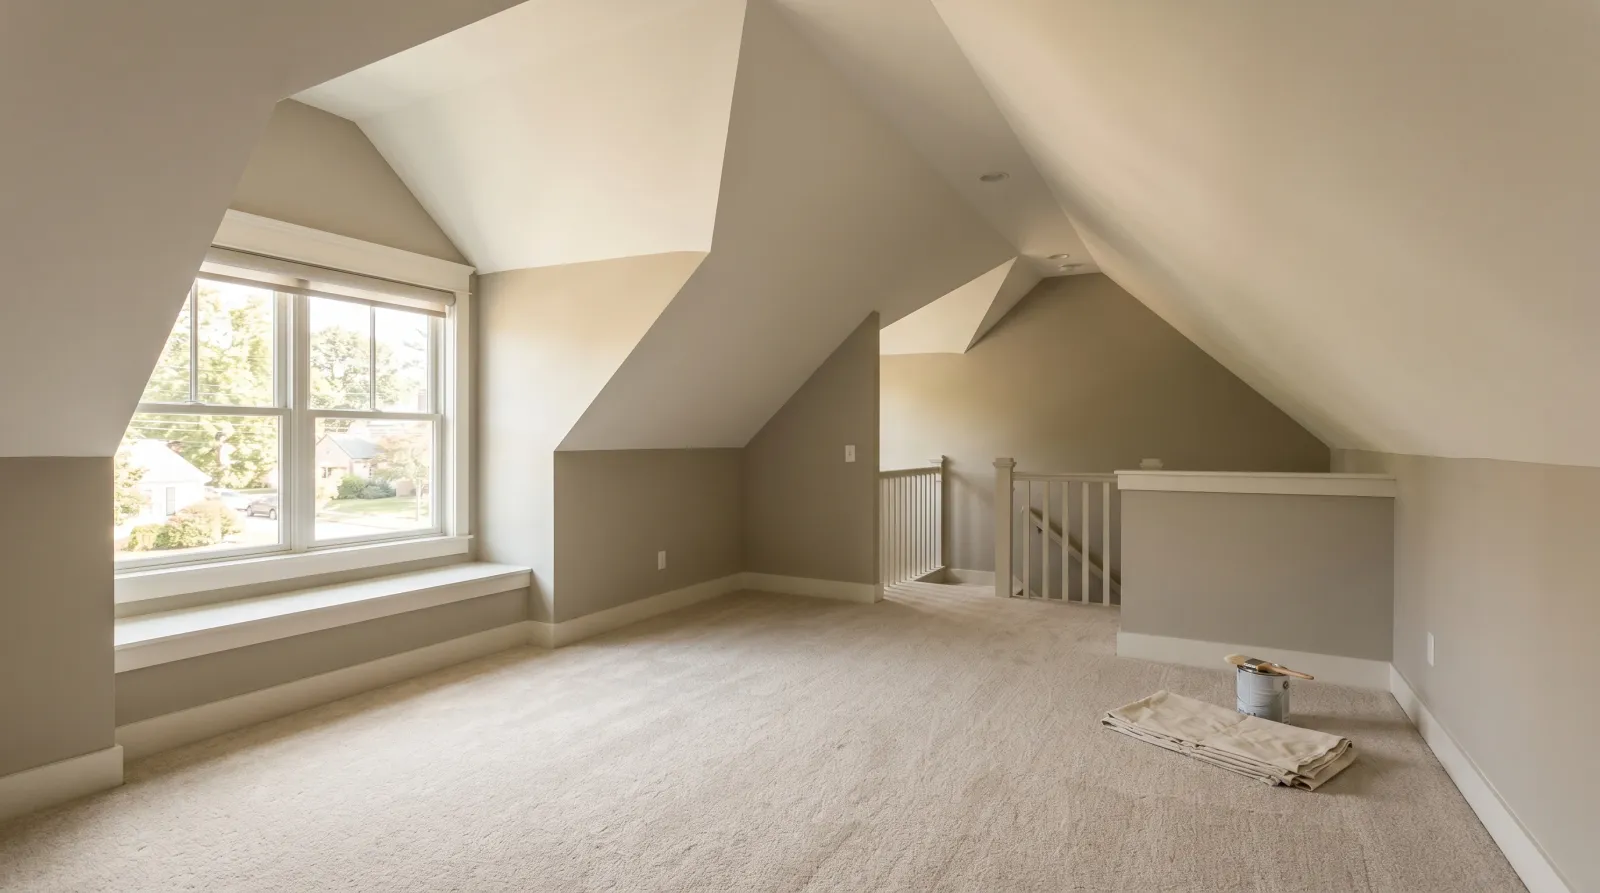
Okay, so you have a bonus room. The space over the garage, or the finished attic, or the loft with the ceiling that comes down to your knees on both sides. You want to paint it and you have noticed it is not a normal box. There are slopes. There are short stubby walls. There is probably a dormer poking out and a weird flat bit at the top. And every painting guide you find is written for a plain four-walls-and-a-ceiling room.
Here is the thing: a bonus room is a normal room that grew some angles. The paint goes on the same way. What changes is the order you tackle the planes in, and a couple of tricks for not making the angles fight each other. Get the order right and the room calms down instead of looking like a folded paper airplane.
What You’ll Get
A bonus room or loft where the walls, kneewalls, and sloped ceiling read as one calm space instead of a jumble of surfaces. The angles stop shouting. The room looks finished and, weirdly, bigger.
Honest Take on Difficulty and Time
This is a notch harder than a plain bedroom, mostly because of reach and the number of angle changes you have to cut in by hand. A typical 300-square-foot bonus room takes a first-timer about 14 working hours over a long weekend.
The math sneaks up on you. The floor might be 300 square feet, but once you add both sloped ceilings, the kneewalls, and the dormer, you are painting closer to 600 square feet of surface. That is why a room the size of a small bedroom drinks an extra half-gallon.
The reach is the other thing. You will spend real time on a ladder and an extension pole, working over your head at an angle. It is tiring on the shoulders. Pace yourself and do the overhead planes first while your arms still work.
If you want the plain version of the basics (cutting in, loading a roller, the W-shape), the start-to-finish room guide covers all of that step by step. This guide assumes you know those and focuses on the angles.
What You’ll Need
Paint and Primer
A gallon and a half of wall paint in eggshell or matte. Matte is the smart default here. Bonus rooms run low on light and the sloped planes catch hard side light, which shows every ripple. A flat-to-matte finish swallows those. Glossier paint puts them on display.
If you are keeping the very top of the ceiling a separate color, grab a gallon of flat ceiling paint. Most bonus rooms look better with the slope painted the same color as the walls, so you may not need this at all. More on that below.
A quart of semi-gloss trim paint for the dormer casings, the baseboards, and any trim where the kneewall caps off.
A quart of stain-blocking primer (Zinsser BIN or KILZ Original) for the rafter knots and any old water stains. Bonus rooms are right under the roof, so a past leak leaves a brown ring that will ghost through your fresh paint if you do not block it first. See the best primer round-up for which blocker to grab.
For the full sheen conversation, the sheen guide walks through matte versus eggshell versus satin.
Tools
The one tool that makes this project doable is a long extension pole, 4 to 8 feet. That pole is how you reach the slope and the peak from the floor instead of building a scaffold. A 2.5-inch angled brush for all the cutting in, a 9-inch roller, two sleeves, a tray, painter’s tape, and a couple of canvas drop cloths.
Bring light. A headlamp or a clip-on work light. Bonus rooms are notoriously dim, and you cannot see a thin spot you cannot light. Roller and pole picks are in the best rollers round-up.
Step 1 — Clear the Room and Patch the Angles
Pull everything to the center of the room and sheet it. The carpet usually cannot come out, so lay canvas drop cloths over it, especially along the kneewall base where drips love to land.
Patch every nail hole and, on the ceiling slopes, look for gaps where the drywall meets the rafters. Older finished attics shift and crack along those seams. Press spackle in, scrape flush, let it dry, sand with the 220 sponge.
Watch out for the kneewall access door, the little hatch into the eave storage. Tape around it or pull it off its hinges. Paint glues it shut otherwise and you find out in six months when you need the holiday boxes.
Step 2 — Spot-Prime Knots and Stains
Before any color goes up, deal with the things that bleed. Walk the ceiling with your work light and find every exposed knot in the rafters and every old water stain near the eaves.
Hit those spots, and only those spots, with Zinsser BIN or KILZ. Two thin coats on a real water stain. The blocker stops the brown tannin and the stain from ghosting up through your finish weeks later, which they will do if you skip this. The fix article on blocking knots from bleeding explains why latex alone never holds them back.
Watch out for thinking the stain is gone because it dried lighter. It is not gone. It is waiting. Block it.
Step 3 — Paint the Sloped Ceiling and Trim First
Do the hard, overhead, fresh-arms work first. Start with the slopes.
Cut in the peak line and any angle changes with the brush. Then load the roller, mount it on the extension pole, and roll up the slope following the run of the rafters, not across them. Rolling with the angle keeps any roller texture lined up instead of crosshatched. One coat of ceiling paint often covers; add a second if the old color shows through.
Then the trim. Dormer casings, window frames, baseboards, and the cap on top of the kneewall if it has one. Use the 2.5-inch angled brush, two thin coats, semi-gloss. Trim is fiddly and there is a lot of it in an angled room, so knock it out while you are sharp.
Watch out for the peak. Where two slopes meet at the top, you are working straight overhead. Cut that in by hand from the ladder first, then roll up to it. Do not try to roll the peak itself with the pole; you will skip and spatter.
Step 4 — Cut In and Roll the Kneewalls and Walls
Now the lower planes. The kneewalls (the short walls where the slope meets the floor) and the full-height vertical walls.
Cut in every angle change with the brush: where kneewall meets slope, where wall meets ceiling, around the dormer. There are more of these lines than in a normal room, which is most of the extra time. Work one plane at a time and roll into the wet cut-in before it dries, or you get a visible band where brush meets roller.
Roll the kneewalls first since they are awkward and low, then the tall walls in the W-shape. Two coats. The first coat will look patchy on the big sloped surfaces under that side light. Do not panic, that is normal, the second coat evens it out.
Watch out for the kneewall height. You end up half-crouched. A small platform or a couple of planks at the right height saves your back and steadies your roller hand.
Method Note: One Color or Two
You have two valid paths, and the choice shapes how the whole room feels.
One color, slope and walls together. Paint the sloped ceiling the same color as the walls. This is the move for most bonus rooms. It erases the angle lines, the eye stops counting planes, and a chopped-up loft suddenly reads as one bigger room. Pick a warm light neutral and the low ceiling stops feeling low.
Two colors, white slope. Keep the slope a soft white and color only the vertical walls. This works when the room has good light and tall walls, and you want the ceiling to feel airy. It can also chop a small loft into pieces, so it is the riskier pick in a tight space.
When in doubt in a small or dim bonus room, go one color. The two-tone walls guide covers the contrast version if you decide the room can carry it.
Step 5 — Pull the Tape and Reset
Pull the tape while the last coat is still slightly tacky, at a 45-degree angle, slow. Bone-dry paint chips along the tape edge.
Vacuum the carpet, take the drop cloths outside and shake them, wash your brushes and sleeves under warm water until it runs clear. Put furniture back in 24 hours. Hang anything on the slope (it happens) after 48.
Common Mistakes
- Skipping the stain block on rafter knots and old leaks. They ghost brown through your finish weeks later. Spot-prime with BIN or KILZ before any color goes up, not after.
- Rolling the slope crossways. Roll up the slope with the run of the rafters. Cross-rolling leaves a crosshatched texture that catches the dormer light and looks streaky from across the room.
- Painting the walls before the slope. Drips and overspray from the overhead work land on finished walls. Do every overhead plane first, then come down to the kneewalls and walls.
- Going glossy to look “clean.” Side light from a single dormer turns satin and semi-gloss into a flaw-finder on big sloped planes. Matte or eggshell hides the ripples. Save the shine for trim.
- Forgetting the kneewall access hatch. Tape it or remove it. Painted shut, it traps you out of your own eave storage.
- Under-buying paint. The slopes and kneewalls add surface the floor size never warned you about. Buy 1.5 gallons for a 300-square-foot room, not 1.
Cure Schedule
| Time after the second coat | What’s safe |
|---|---|
| 1 hour | Pull the tape |
| 4 hours | Touch dry, don’t bump it |
| 24 hours | Furniture back in place |
| 48 hours | Hang shelves or art on the slope |
| 7 days | Wipe scuffs with a damp cloth |
| 30 days | Full cure, scrubbable |
Maintenance and Touch-Ups
A bonus room used as a playroom, gym, or guest space takes more abuse than a bedroom. Matte walls hold up 5 to 8 years before a refresh; a scrubbable matte buys you the longer end of that.
For scuffs, wipe with a damp microfiber cloth first. Most marks are dirt. For a real ding, spackle, sand, and dab leftover paint with a small piece of roller so the texture matches the surrounding wall. Keep a labeled quart of each color, because matching a bonus room color years later is a headache nobody enjoys.
Cost Breakdown
| Item | $ |
|---|---|
| Wall paint, 1.5 gallons matte | $75 |
| Ceiling paint, 1 gallon flat (if two-tone) | $30 |
| Trim paint, 1 quart semi-gloss | $20 |
| Stain-blocking primer, 1 quart | $20 |
| Brushes, roller, tray, sleeves | $35 |
| Tape, drop cloths, spackle | $30 |
| Total | $180–$210 |
One color throughout drops the ceiling-paint line and lands closer to $180. Top-shelf paint (BM Aura, SW Emerald) pushes it toward $260.