How to Seal Bleeding Knots in Wood
Knots bleed through latex and even alkyd primer within weeks. BIN shellac on the knot, Cover Stain on the field, then topcoat. Here's the cheap sequence that actually holds.

You painted fresh pine trim last spring. By July, every knot in the run has a yellow-brown halo bleeding through the white. The boards aren’t failing. The knots are. This is the most common callback on interior trim work, and the fix is cheaper and simpler than the YouTube comment section will tell you.
Two products, two thin coats on the knot, one full coat of alkyd primer across the field. That’s the whole job.
Does This Match What You’re Seeing?
Three things look similar on a painted board. They want different fixes.
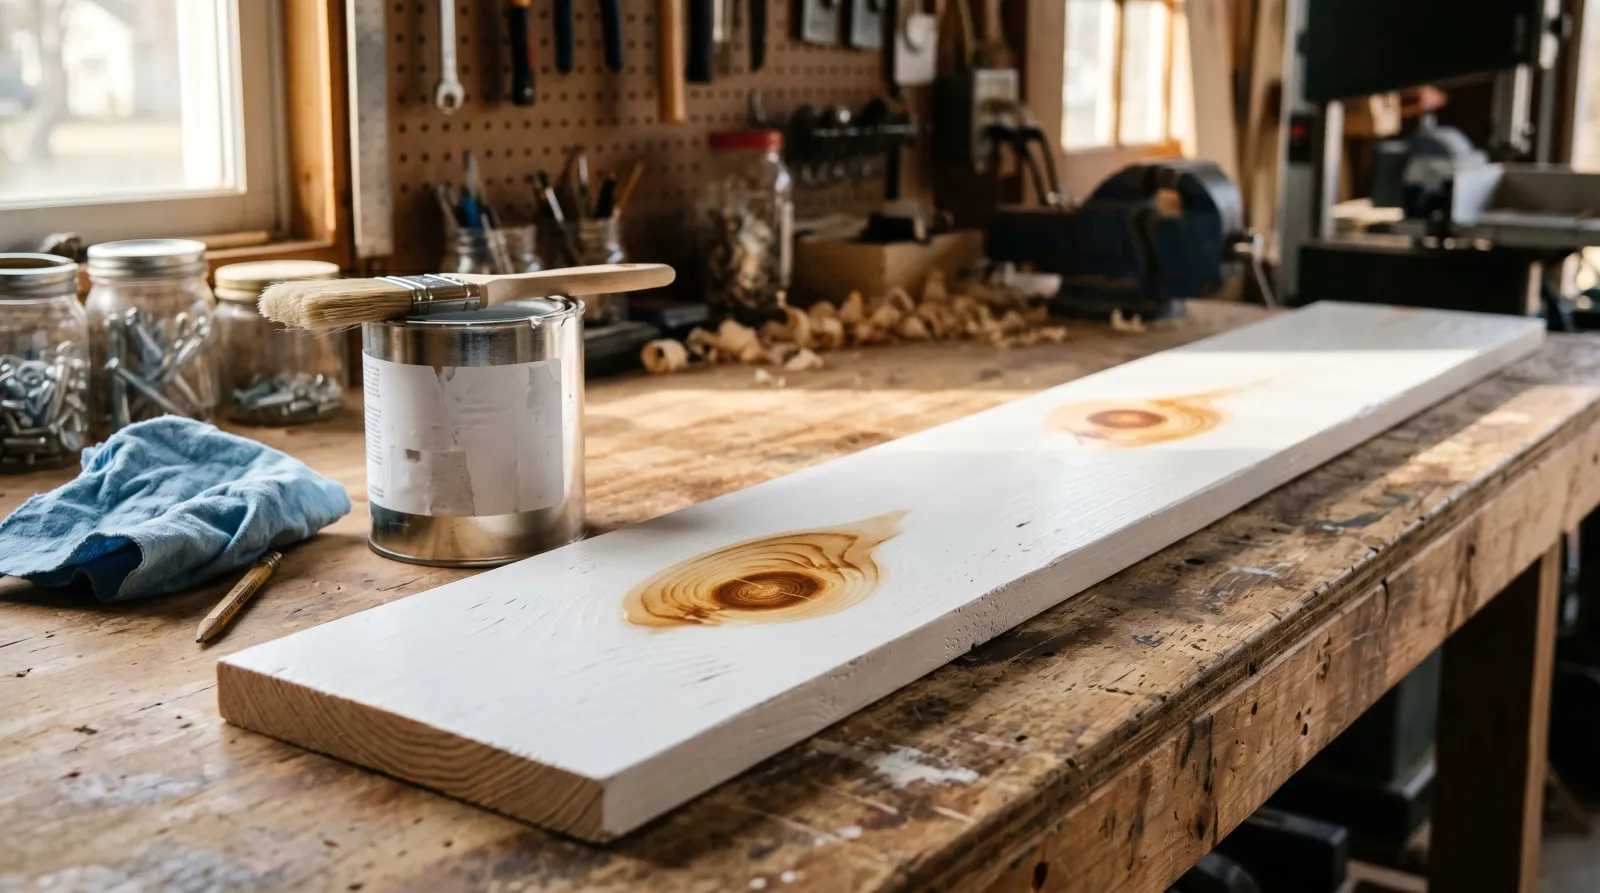
- A sharp amber or brown circle right over a visible knot, sometimes with a halo a half-inch out. That’s pine or cedar tannin bleed. This page.
- Diffuse yellowing across whole stretches of trim, no knot underneath. That’s resin yellowing in old oil paint. Different problem. See the yellowing trim guide.
- A brown spot with a hard edge that’s actually raised slightly off the board. That’s a sap pocket that opened after painting. Same primer fix, but the wood needs to be scraped and filled first.
Run a fingernail across the bleed. If the surface is smooth and the stain is in the paint film, you have classic tannin migration. Move on.
How Serious Is This
Cosmetic, not structural. The trim isn’t rotting and the paint isn’t releasing. The board behind the bleed is doing exactly what pine boards have always done, which is move resin around when it warms up. Your finish coat just doesn’t know how to stop it.
You can repaint over the bleed with latex and watch it come right back in six weeks. Or you can spot-prime the knots with shellac and the room reads clean for ten years. Same afternoon either way.
Why Knots Bleed Through Paint
Pine, fir, cedar, and spruce all carry pitch and resin pockets where branches met the trunk. After the board is milled and dried, those pockets keep migrating sap toward the surface whenever the wood warms up. Direct sun, a south-facing window, a radiator nearby, even a warm afternoon in a finished room. The resin is partly water-soluble and partly oil-soluble, and a lot of it is colored amber to brown.
Latex paint over a knot does two bad things. The water in the wet film dissolves the water-soluble fraction of the resin and pulls it up into the topcoat. Then the cured latex film stays slightly permeable to vapor, so every time the board warms up and exhales, more resin migrates through and stains the surface from underneath. The hotter the room, the faster the bleed. South-facing window trim is the worst case. North-facing baseboard you might not see it for two years.
Alkyd primer slows it down. The mineral spirits don’t dissolve the water-soluble part as fast, but they do mobilize the oily fraction. So Cover Stain and KILZ Original buy you maybe a year on a knot, then the bleed shows up anyway. Painters figured this out fifty years ago. Shellac is the answer because of what it’s mixed with. Denatured alcohol, a solvent the resin doesn’t respond to the same way, plus a binder that dries to a glassy film the tannin can’t pass through. Two thin coats and the migration stops.
There’s a knot-conditioner industry built on selling small bottles of what is basically the same chemistry at a premium. Skip the upsell. The white can on the shelf next to it is the real product, and it costs about a third as much per ounce.
The Fix
Step 1. Sand the Knot Smooth and Wipe With Alcohol
Knock down any raised grain with 150 grit, then wipe the knot and the wood half an inch around it with a clean rag wet with denatured alcohol. The alcohol lifts surface resin and gives the shellac a clean substrate to bond to. If the knot is actively weeping sap, keep wiping until the rag comes back dry, then wait a few hours for any deep resin to stop migrating.
If the knot won’t stop weeping after a day in a heated room, the sap pocket is open. Scrape it back to dry wood with a sharp chisel, fill with two-part epoxy wood filler, sand flush, then move on. Don’t try to seal an actively weeping knot with shellac. The film won’t bond to wet resin and you’ll see the failure inside a month.
One field shortcut. If you’re working on a fresh trim package and the knots look dry but the wood feels cool, throw a heat gun at each knot from six inches away for thirty seconds. That pulls any borderline resin to the surface where you can wipe it off before priming, instead of after.
Step 2. Two Thin Coats of BIN on the Knot Only
Zinsser B-I-N is the white-label can. Stir it, don’t shake hard. Bubbles take forever to flash out of shellac. Pour a small amount into a paper cup. With an artist’s brush or a small chip brush, paint just the knot and a quarter-inch of wood around it. Thin coat, not heavy.
Touch-dry in 15 minutes at 70°F. Recoat in 45 minutes. Two thin coats on the knot hold better than one heavy one — the second coat seals any pinholes the first one left behind. A quart of BIN runs about twenty dollars and spot-primes hundreds of knots, which is why doing the whole board in shellac is wasted money.
Ventilate. The alcohol fumes are sharp until the film flashes. Open a window or run a fan. Never mix denatured alcohol, BIN, or any other solvent product with bleach, ammonia, or hydrogen peroxide near an open flame. The vapor is flammable on its own and the combinations make it worse.
Step 3. One Full Coat of Cover Stain Across the Whole Board
Now the field. Zinsser Cover Stain alkyd primer over the entire board, including back over the shellacked knots. Brush or roll it on as one normal coat, working with the grain. Touch-dry in two hours, recoatable in eight at 70°F.
Cover Stain is cheaper per gallon than BIN, sticks beautifully to bare pine, and gives your topcoat a uniform surface to grip. The reason to use both products instead of one is cost. BIN on the whole board would cost three times as much and you only need shellac chemistry where the knots are. The rest of the board just needs a clean, sealed primer surface, and Cover Stain does that for half the money.
If you’re priming raw MDF baseboard mixed in with the pine, Cover Stain handles both. Don’t switch primers mid-run. Pick the alkyd, hit the whole field after the knot spots have flashed off.
Step 4. Two Coats of Topcoat
Once Cover Stain is dry, any interior trim paint works on top. Semi-gloss alkyd or waterborne alkyd for trim and doors, eggshell for shiplap walls, satin for cabinetry. Two coats, four hours between. Cut in with a 2-inch sash brush, feather the edge into the wet, lay off in long strokes with the grain.
The knot is now locked under two layers. Shellac sealing the resin directly, alkyd primer giving the topcoat a clean field to bond to. Done right, you won’t see a halo when the afternoon sun hits the board.
Recommended Product
Zinsser B-I-N Shellac-Base Primer. The proven sealer for knot bleed and the cheapest insurance on a trim job. A quart is enough for an entire trim package in a normal-size house. Don’t substitute a “knot sealer” specialty bottle — it’s almost always the same product at a markup.
Find it on Amazon · Zinsser brand review
Prevention
Pine knots will always want to bleed. You can’t stop the chemistry, you can only seal it under a film the resin can’t pass through. Two thin coats of BIN on every visible knot, every time you paint raw or stripped softwood trim. That’s the prevention.
One mistake to skip. Don’t pre-seal knots with linseed oil, lacquer, or polyurethane “to lock them in” before priming. They don’t stop tannin migration and they create adhesion problems for the shellac on top. Shellac alone, twice, on the knot. That’s it.
When to Call a Pro
- Whole-house knotty pine ceilings or paneling getting painted out for the first time. Spray-applied BIN on a textured wood ceiling is a different job than spot-priming trim — get a contractor with an airless and a respirator setup.
- Exterior cedar siding with active knot bleed and weathered finish. The fix on exterior cedar involves power-washing, mildewcide, and sometimes a backprime cycle that isn’t worth doing yourself on a two-story house.
- Pre-1978 painted trim that’s chipping or chalking under the bleed. Lead test first, don’t dry-sand. EPA RRP rules apply if the home is being sold or rented.