How to Fix Yellow Bleed Through White Paint on Knotty Pine
Tannin bleed through white paint on knotty pine is a chemistry problem. Here is why the pine resin migrates and the shellac-primer sequence that stops it.

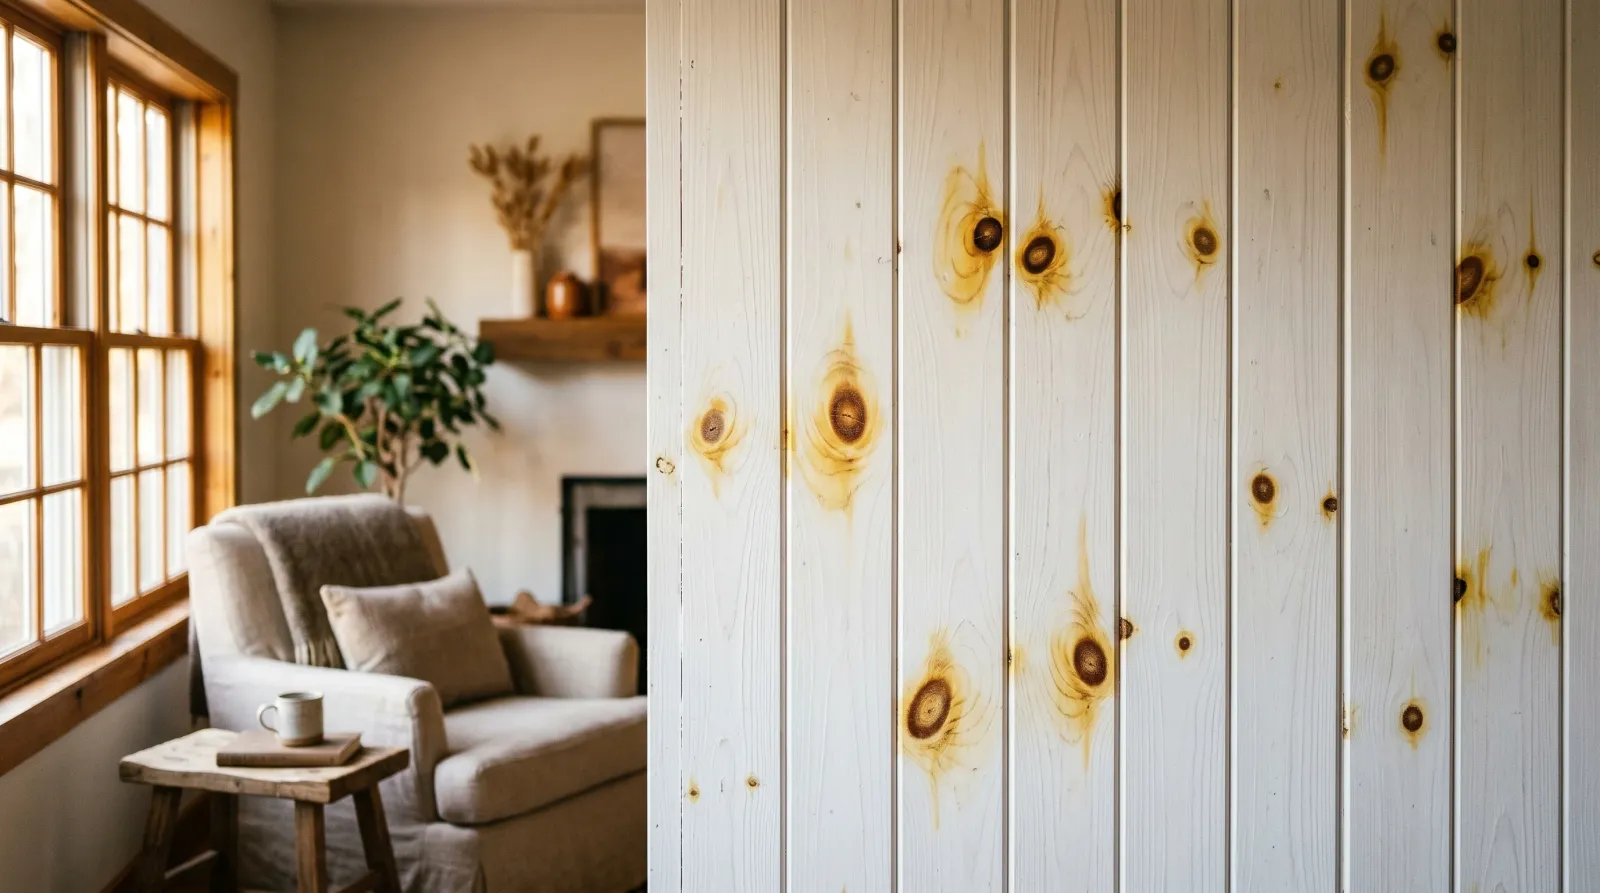
You painted the knotty pine white, it looked clean, and then a week or two later every knot grew an amber halo that wasn’t there when the brush left the board. The film didn’t fail. The wood is bleeding through it. This is one of the most predictable problems in painting, and once you see why it happens, the fix stops feeling like guesswork.
Does This Match What You’re Seeing?
Look at where the discoloration sits and how it’s shaped. Pine bleed has a signature.
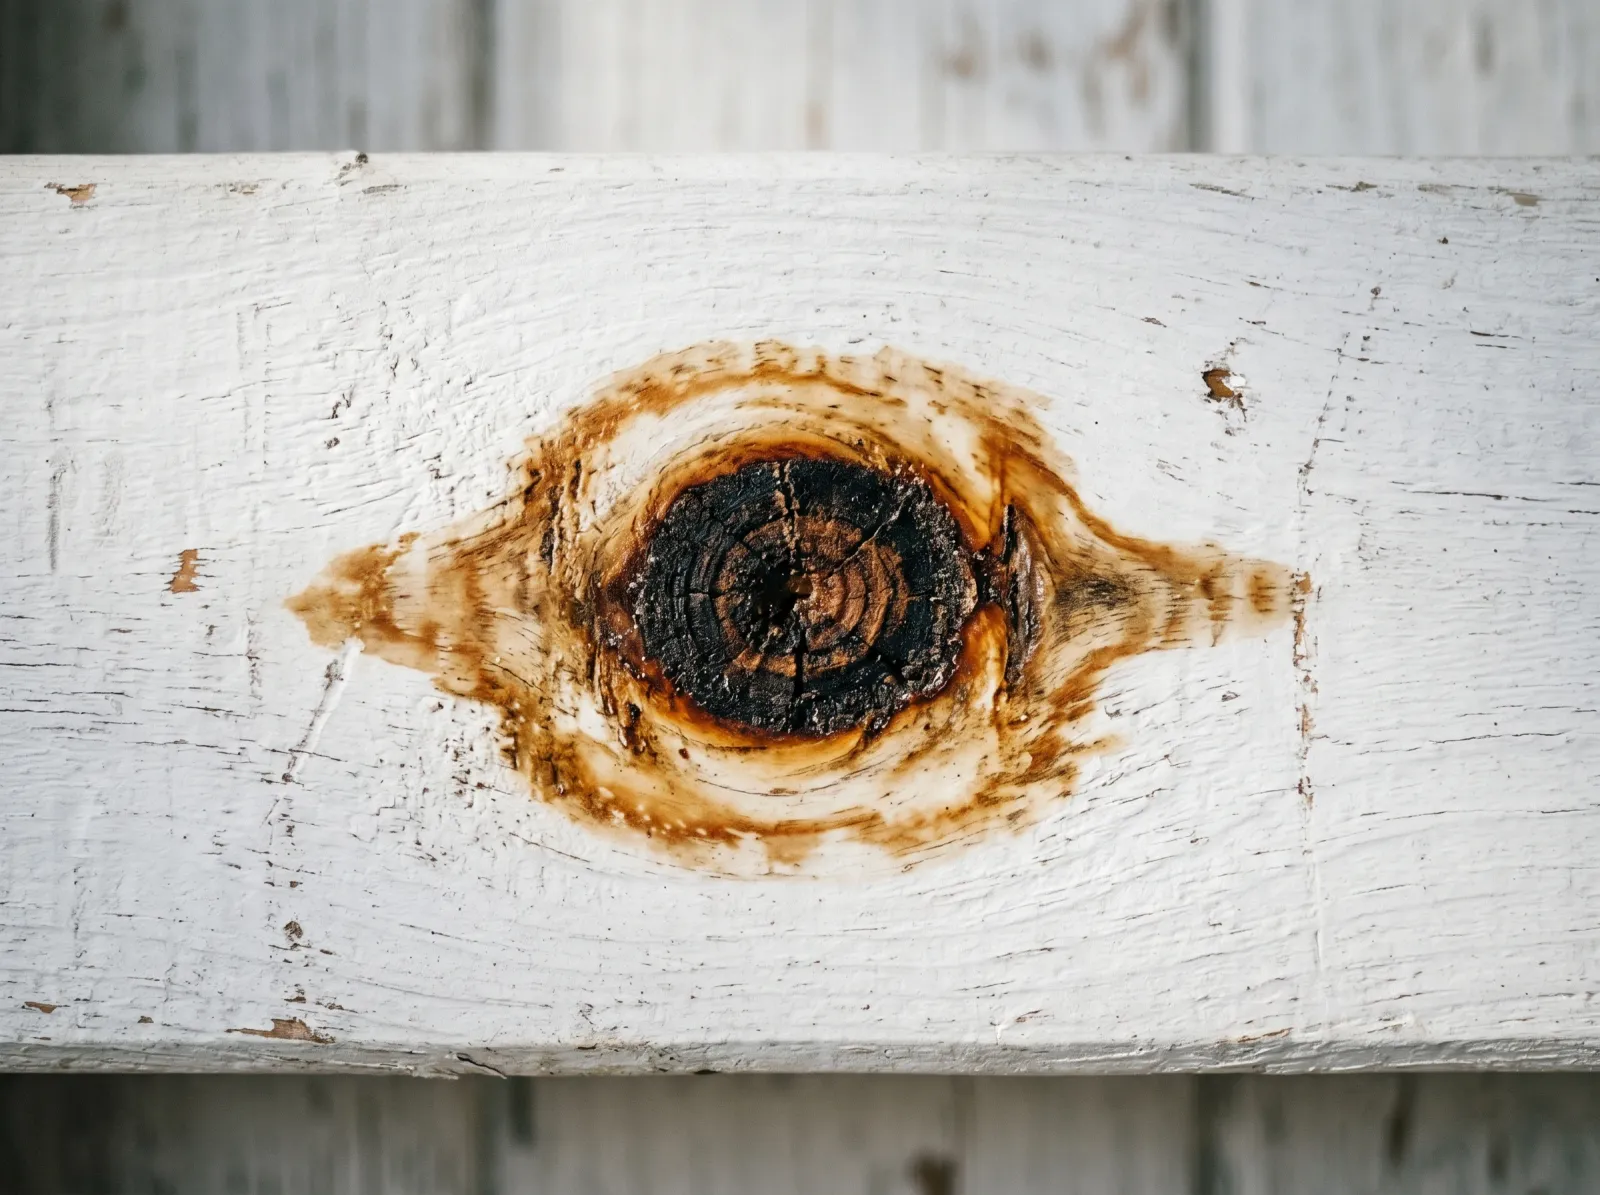 A single knot bleeding amber through the white film. The stain is centered on the knot and fades outward, the fingerprint of migrating extractives.
- Amber or yellow rings centered on the knots: classic tannin bleed. The color radiates out from each knot and fades at the edges.
- An overall warm cast across the whole white surface, not tied to knots: that’s usually the topcoat itself yellowing, a different problem. See why white trim turns amber.
- A sticky, glossy bead sitting on top of the paint at a knot: sap weeping, not color bleed. The knot has a live resin pocket pushing liquid out.
- Brown streaks running with the grain, away from any knot: water-soluble extractives carried by a moisture path, common on cedar and on pine that got damp before paint.
If you’ve got amber rings on knots, you’re in the right place. The rest of this page is about that.
How Serious Is This?
Cosmetic, in the structural sense. The film is bonded and the wood is sound. Nothing is rotting and nothing is failing underneath. What you have is a staining defect, and left alone it gets worse, not better, because the migration continues every time the board warms up.
Two situations push it past a quick fix. If a knot is actively weeping liquid sap, no primer holds until the pocket dries or gets cut out. And if the bleed keeps returning through a properly shellacked-and-topcoated surface, you’ve got a moisture source feeding it, and the wood needs to dry before any coating will stay clean.
Why This Is Happening (root Cause)
Pine isn’t inert. The wood, and the knots especially, carry a load of colored organic compounds (resins, terpenes, and the tannin-family extractives that give the stain its name). The knots are where a branch met the trunk, so they’re dense with this material. In raw wood it sits put. The trouble starts when you give it two things: a solvent it dissolves into, and a film it can move through.
A waterborne latex paint supplies both. The reason for that is film formation. A latex film coalesces from water-based emulsion, and while it’s curing, and even after to a degree, it stays somewhat permeable to water. The water in the wet paint, plus ambient moisture and humidity, acts as the carrier. The colored extractives dissolve into that water phase, migrate up through the still-open film by capillary action and diffusion, and deposit at the surface as the water evaporates. You get a stain ring exactly where the concentration of extractives below was highest: the knot.
Temperature is the accelerator. Warm the board and the resin’s viscosity drops and its mobility climbs. That’s why the halo so often appears on the first warm afternoon, or when the heating season starts, rather than the day you painted. The substrate hasn’t changed. The conditions that let it move have.
This is a substrate problem wearing a paint costume. Adding topcoats hands the wood more carrier and more film to stain. The only durable answer is to interrupt the path between the extractives and the topcoat with something they can’t dissolve into and can’t pass through.
The Fix
The sequence is cheap and it has held for decades on real trim. The load-bearing step is the shellac.
Step 1. Confirm the Knot Is Dry, Not Weeping
Press a clean rag to each knot. If it picks up sticky liquid resin, the knot is weeping and you can’t seal over wet sap. Wipe the knot with denatured alcohol to lift the surface resin, then let the board sit in a heated room until it stops weeping, usually a few hours, sometimes a full day on green lumber. If a sap pocket keeps reopening, scrape it back to solid wood, fill with a two-part epoxy wood filler, sand flush, and treat the filled spot as bare wood. Dry color bleed is fine to seal. Wet sap is not.
Step 2. Scuff and Clean
Lightly scuff the existing white film with 220-grit so the primer has a mechanical key, then wipe with a tack cloth or a damp microfiber and let it flash off. You’re not stripping anything. You’re knocking the gloss down and clearing dust so the shellac bonds. On a previously painted surface you don’t need to take it back to wood; the shellac will seal the migrated stain and block the next round.
Step 3. Shellac the Knots, Then the Field
This is the step that fixes it. Brush two thin coats of a shellac-base primer over every knot, letting the first dry about 45 minutes before the second. Zinsser B-I-N is the standard: pigmented white shellac in an alcohol carrier. The alcohol flashes off fast and leaves a hard, resin-impermeable film that the pine extractives cannot dissolve into. That’s the whole mechanism: shellac is the one common primer chemistry the resin can’t move through.
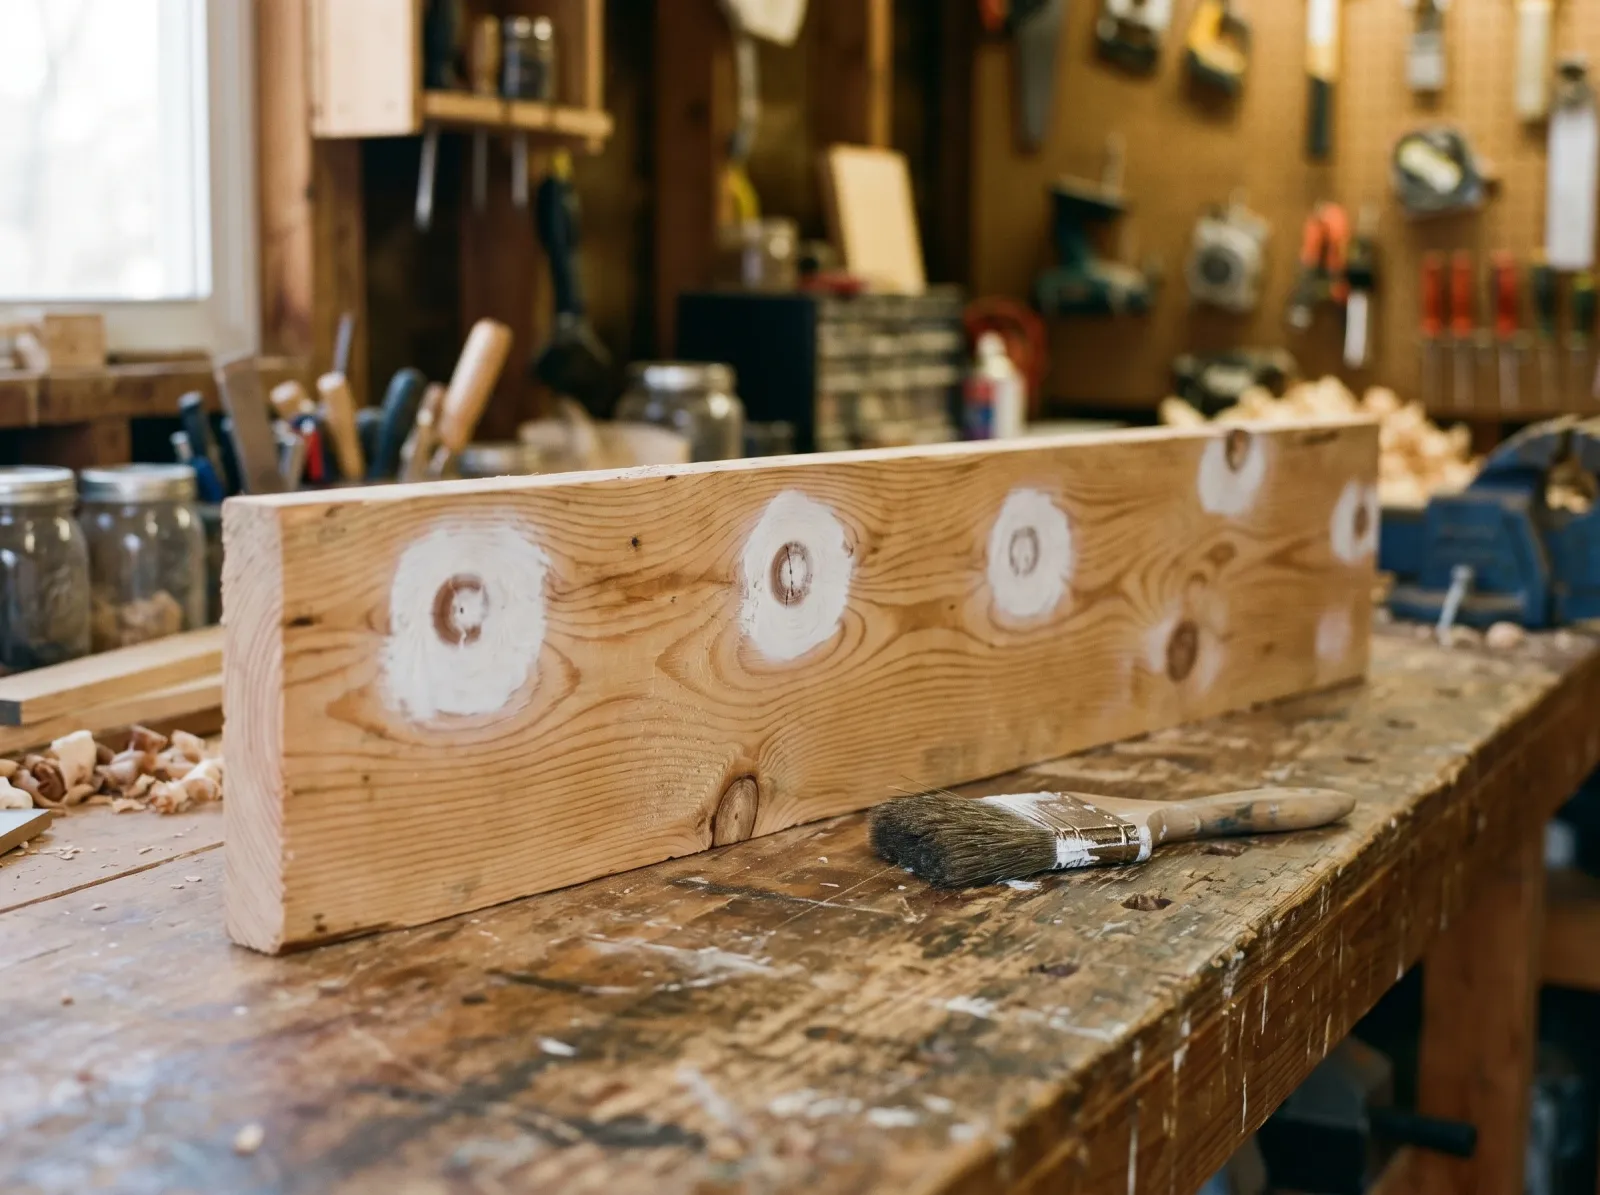 Knots sealed under two thin coats of white shellac primer. Once this film is dry, the migration path is closed.
Spot-prime the knots first, then prime the full board. For the field you can stay with shellac, or switch to an alkyd primer like Zinsser Cover Stain across the rest of the surface. Belt and suspenders: shellac on the knots, your primer of choice on the field. Clean brushes in denatured alcohol, not water. Waterborne cleanup doesn’t touch cured shellac.
Step 4. Topcoat
Two coats of a quality white. With the migration path sealed, the topcoat is just color and protection now, so you have a free choice of sheen and product. A waterborne acrylic or an acrylic-alkyd hybrid trim enamel both work over cured shellac. If you want the bright clean white to read true, check the white undertones explainer before you commit to a tint base.
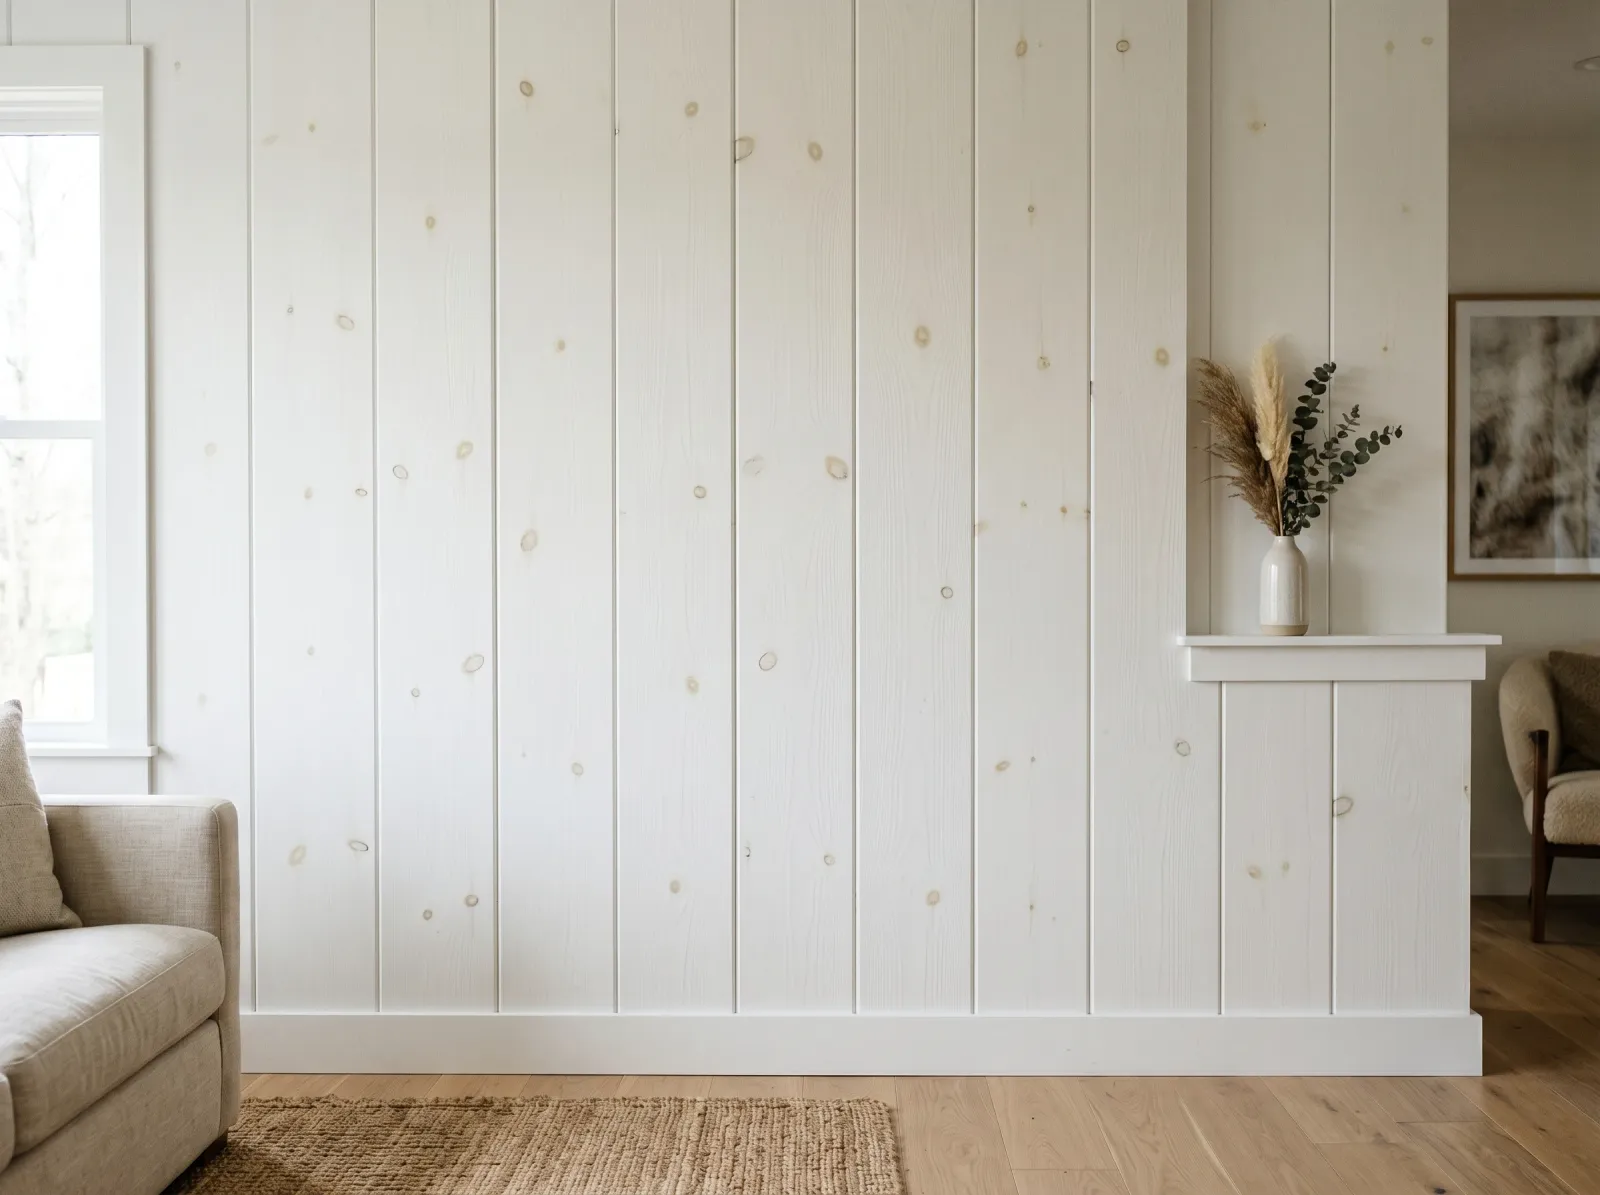 The finished surface with the knots sealed. No halos, because the extractives have nowhere to go.
Safety
Shellac primer is alcohol-based and the vapor is flammable and strong. Cross-ventilate, wear a solvent-rated respirator in a closed room, and keep it away from open flame and pilot lights. Gloves and eye protection. If you cleaned the wood with any household cleaner first, never mix bleach with vinegar, ammonia, or hydrogen peroxide (it produces toxic gas), and rinse and dry the surface before priming.
Which Primer Blocks Pine Bleed?
The carrier chemistry is what decides it, not the price or the marketing on the can.
| Primer type | Carrier | Blocks pine knot bleed? | Use it for |
|---|---|---|---|
| Shellac (Zinsser B-I-N) | Alcohol | Yes, the reliable choice | Knots, severe stains, the spot fix |
| Alkyd / oil (Cover Stain, KILZ Original) | Mineral spirits | Mostly, but can fail on raw knots | The field of the board |
| Waterborne stain-blocking (KILZ 2, Bulls Eye 1-2-3) | Water | No on knots | General drywall, not pine extractives |
| Plain PVA primer | Water | No | Bare drywall only |
The pattern: water-carried primers leave the resin a path, because water is the carrier the resin uses. Solvent primers do better, and alcohol-carried shellac does it completely.
Recommended Product
Zinsser B-I-N Shellac-Base Primer is the one I’d reach for on knots without thinking about it. Alcohol carrier, pigmented white shellac, a hard impermeable film once it cures. A small can runs around ten dollars and seals a hundred knots. The so-called knot sealers and conditioners on the same shelf are mostly diluted shellac at a multiple of the price.
Buy Zinsser B-I-N on Amazon → · What shellac primer is and how it works →
Common Mistakes
- Recoating with more white and hoping. More waterborne film is more carrier and more surface to stain. The halo returns.
- Trusting an alkyd primer alone on raw knots. It slows the bleed; on pine knots it often doesn’t stop it. Shellac the knots specifically.
- Sealing a weeping knot. Wet sap pushes through anything. Dry it or dig it out first.
- Cleaning shellac brushes with water. Cured shellac shrugs off water. Use denatured alcohol or you’ll ruin the brush.
- One thin coat of shellac. Two thin coats give a continuous film. A single pass can leave pinholes the resin finds.
Prevention
If you’re painting raw knotty pine for the first time, seal every knot with shellac before the primer coat goes on, not after the bleed shows up. The order matters: shellac the knots, prime the board, topcoat. Skipping the shellac on day one is what creates next summer’s callback.
Keep the wood dry through the process. Moisture is the carrier, so painting damp or recently rained-on pine builds the problem in. And in a room that swings warm (a sunroom, a south wall, a space over a furnace), the shellac step isn’t optional, because heat is exactly what mobilizes the resin. For a full walkthrough of priming and finishing this wood from bare, see the guide to painting knotty wood.
When to Call a Pro
- Knots weeping sap repeatedly despite drying. The lumber may be too green to finish, and a finish carpenter should assess replacing the worst boards.
- Bleed returning through properly shellacked, topcoated wood. That signals an active moisture source behind the paneling that needs to be found and fixed first.
- Pre-1978 home where the existing white might be lead-based and you’d be sanding. Test with 3M LeadCheck swabs and follow EPA RRP practices, or hire a certified contractor. The same rules covered in the peeling paint fix apply here.
- Large areas of knotty pine paneling where spraying shellac is faster but adds real ventilation and flammability hazards in an enclosed room.
FAQ
For the deeper version of the questions readers ask most, the answers are in the frontmatter and render below.