Why Chalk Paint Is Cracking or Flaking
Chalk paint cracking or flaking almost always means the surface underneath was too slick or too glossy. Here is how to confirm the cause and fix the finish for good.

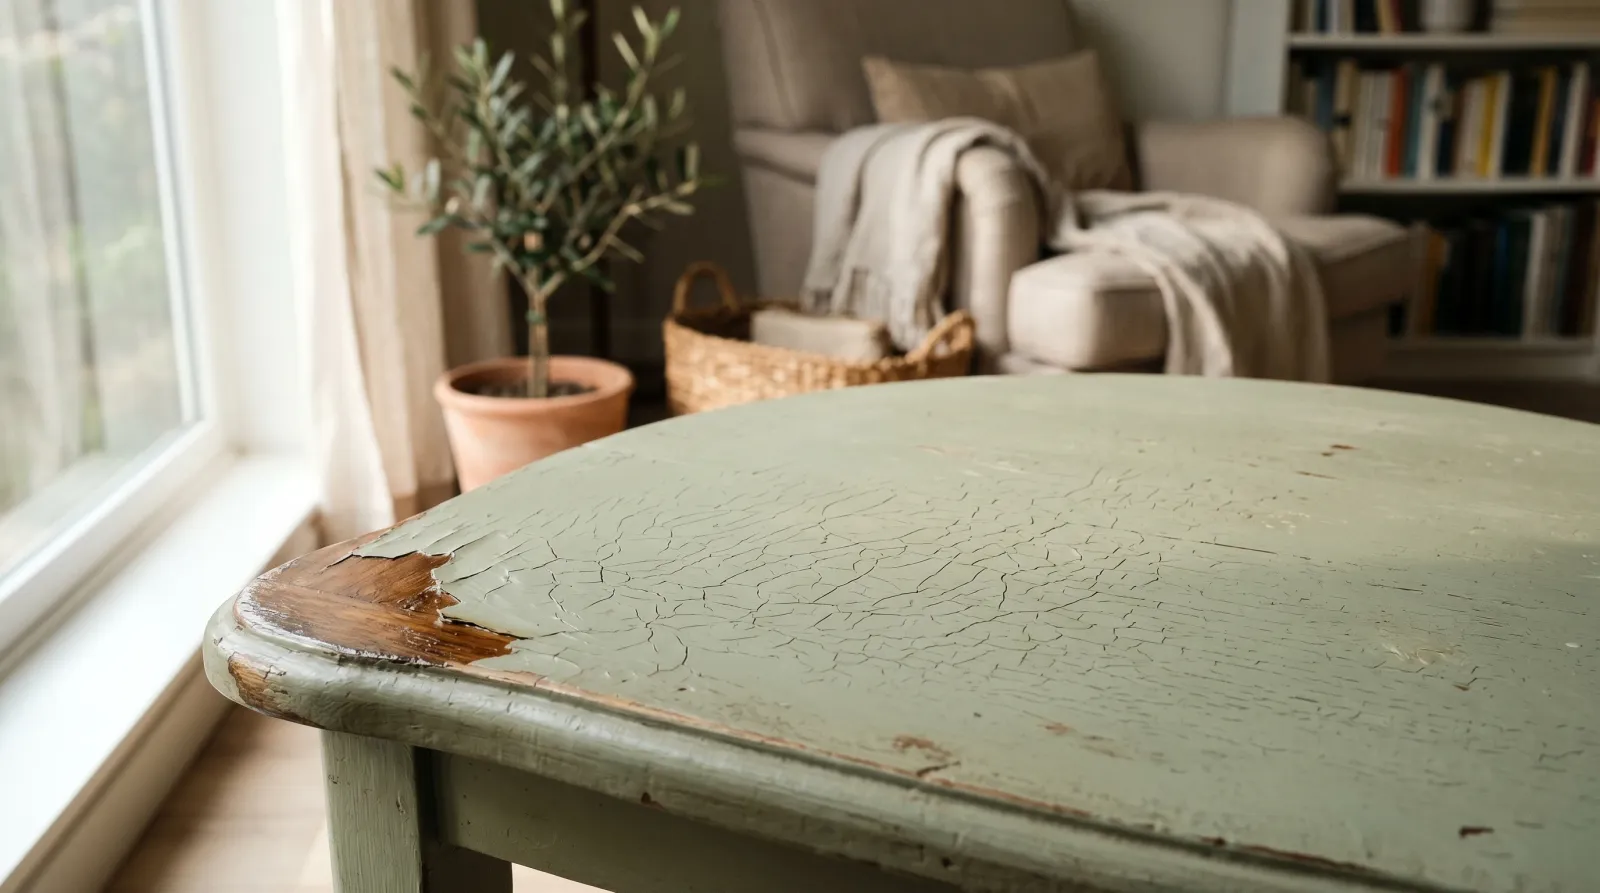
You bought chalk paint because everyone told you it sticks to anything with no sanding, and now the finish is splitting into a web of fine lines or lifting off your dresser in flakes. The paint isn’t defective. Chalk paint grips by sinking into a surface that can hold it, and a glossy, sealed, or slick piece gives it nothing to sink into. Almost every cracked or flaking chalk finish traces back to the surface underneath, not the can.
TL;DR
- Chalk paint cracks or flakes when the surface under it was too slick: old varnish, polyurethane, laminate, melamine, or a glossy previous coat.
- It grips raw, porous, clean wood with no prep. It struggles on anything sealed or shiny.
- A fine web of cracks usually means a coat too thick, or a second coat rushed on while the first was still soft.
- Flakes that lift in sheets mean the bond failed. The paint never keyed into the surface.
- The fix is the same either way: scrape what’s loose, dull the sheen by sanding, prime with a bonding primer, repaint in thin coats.
Does This Match What You’re Seeing?
Look closely at how the finish is failing, because the pattern tells you which problem you have.
- A fine web of hairline cracks across the surface, like dry riverbed mud: the coat went on too thick, or a second coat landed on a first that hadn’t dried. The paint shrank unevenly as it cured and split.
- Flakes lifting at the edges, peeling off in chips or sheets down to a shiny surface: a bond failure. The paint never gripped the slick layer beneath it.
- Cracks only over old hardware holes, repairs, or filler: the patch underneath flexed or wasn’t sealed, and the paint moved with it.
- An even, intentional-looking crackle in two colors: that’s a crackle medium, applied on purpose. Not a failure at all.
- Tiny cracks at corners and edges where the piece gets handled: wear, not a bond problem. A topcoat would have protected it.
Press a strip of painter’s tape firmly onto a flaking area and pull it off. If paint comes away on the tape, the bond failed and you have prep to redo. If nothing lifts, the cracking is thickness or wear, and you can repair it on the surface.
 When a flake lifts in one clean piece down to the shine, the paint never gripped the surface. That’s a bond failure, not a paint flaw.
How Serious Is This?
Cosmetic, almost always. Nothing behind the paint is rotting, and the piece isn’t damaged. What’s failed is the finish, and a finish you can redo in a weekend.
The honest part is this: cracked or flaking chalk paint won’t fix itself, and it won’t stop spreading if the cause is a bad bond. More paint on top of a failed bond cracks and flakes the same way. So the severity isn’t about danger. It’s about whether you do the prep this time or buy yourself a third coat of disappointment. A piece that lifts when you tape-test it needs to come back to a sound surface before any new paint goes on. A piece with a few thickness cracks and a solid bond can be sanded smooth and recoated where it sits.
Why This Is Happening (root Cause)
Chalk paint sells itself on no prep, and on the right surface that’s true. It’s a high-pigment, porous, low-binder paint, and it grips by mechanical key, settling into the microscopic tooth of a raw or matte surface and locking in as it dries. Bare wood, old chalky paint, unsealed plaster, anything with texture and a little absorbency, it holds beautifully. That’s the reputation, and it’s earned.
The reputation breaks on anything slick. A varnished tabletop, a polyurethane-sealed dresser, laminate, melamine, a glossy oil-based coat from a previous life: these have no tooth. The paint dries on top of the shine like a skin on a pudding, touching the surface but never keying into it. It looks fine for a week. Then the film shrinks as it finishes curing, and with nothing anchoring it, it splits and lifts. That’s the flaking story. The shiny layer you find under the flake is the whole explanation.
The web-of-cracks story is different. Here the bond is fine, but the paint was applied too thick, or a second coat went on before the first had given up its moisture. Chalk paint shrinks a little as it cures, and a heavy coat shrinks more than a thin one. The top dries and tightens before the bottom does, and the tension cracks the surface into that dry-mud pattern. Cold or humid rooms make it worse, because slow drying gives the film more time to pull against itself.
One more cause hides in plain sight: a repair underneath that moved. Filler that wasn’t sealed, a glued joint that flexes, a knot weeping resin. The paint over it cracks because the surface under it cracked first.
The Fix
Two problems, one repair path. Whether the bond failed or the coat was too thick, you’re taking the finish back to a sound, dull surface and rebuilding it in thin coats. Work in a ventilated room.
Safety first. Sanding old furniture finishes makes dust. If the piece was made or last painted before 1978, the old coat may contain lead, and you should not dry-sand it. See the lead test kits to check before you touch it. Wear a fitted respirator or N95, eye protection, and gloves for any sanding, and never dry-sand a suspected lead finish indoors.
Step 1. Remove Everything Loose
Scrape off every chip, flake, and lifting edge with a flexible putty knife or a paint scraper. Don’t leave anything that moves when you nudge it. If a section lifts as you scrape, keep going until the scraper meets paint that’s firmly stuck and won’t budge. The goal is a surface where everything remaining is genuinely bonded. Anything you leave behind that’s already failed will fail again under the new paint.
Step 2. Scuff-Sand the Whole Surface to a Dull Matte
This is the step the no-prep promise told you to skip, and it’s the step that fixes the problem. Sand the entire piece with 120 to 150 grit, then smooth with 220, until the sheen is gone and the surface reads evenly dull. You’re not stripping it. You’re knocking the gloss off so the paint has tooth to grip. Feather the edges of any sound paint that stayed so there’s no hard ridge between bare spots and painted spots. Wipe every speck of dust off with a tack cloth or a damp microfiber, and let it dry.
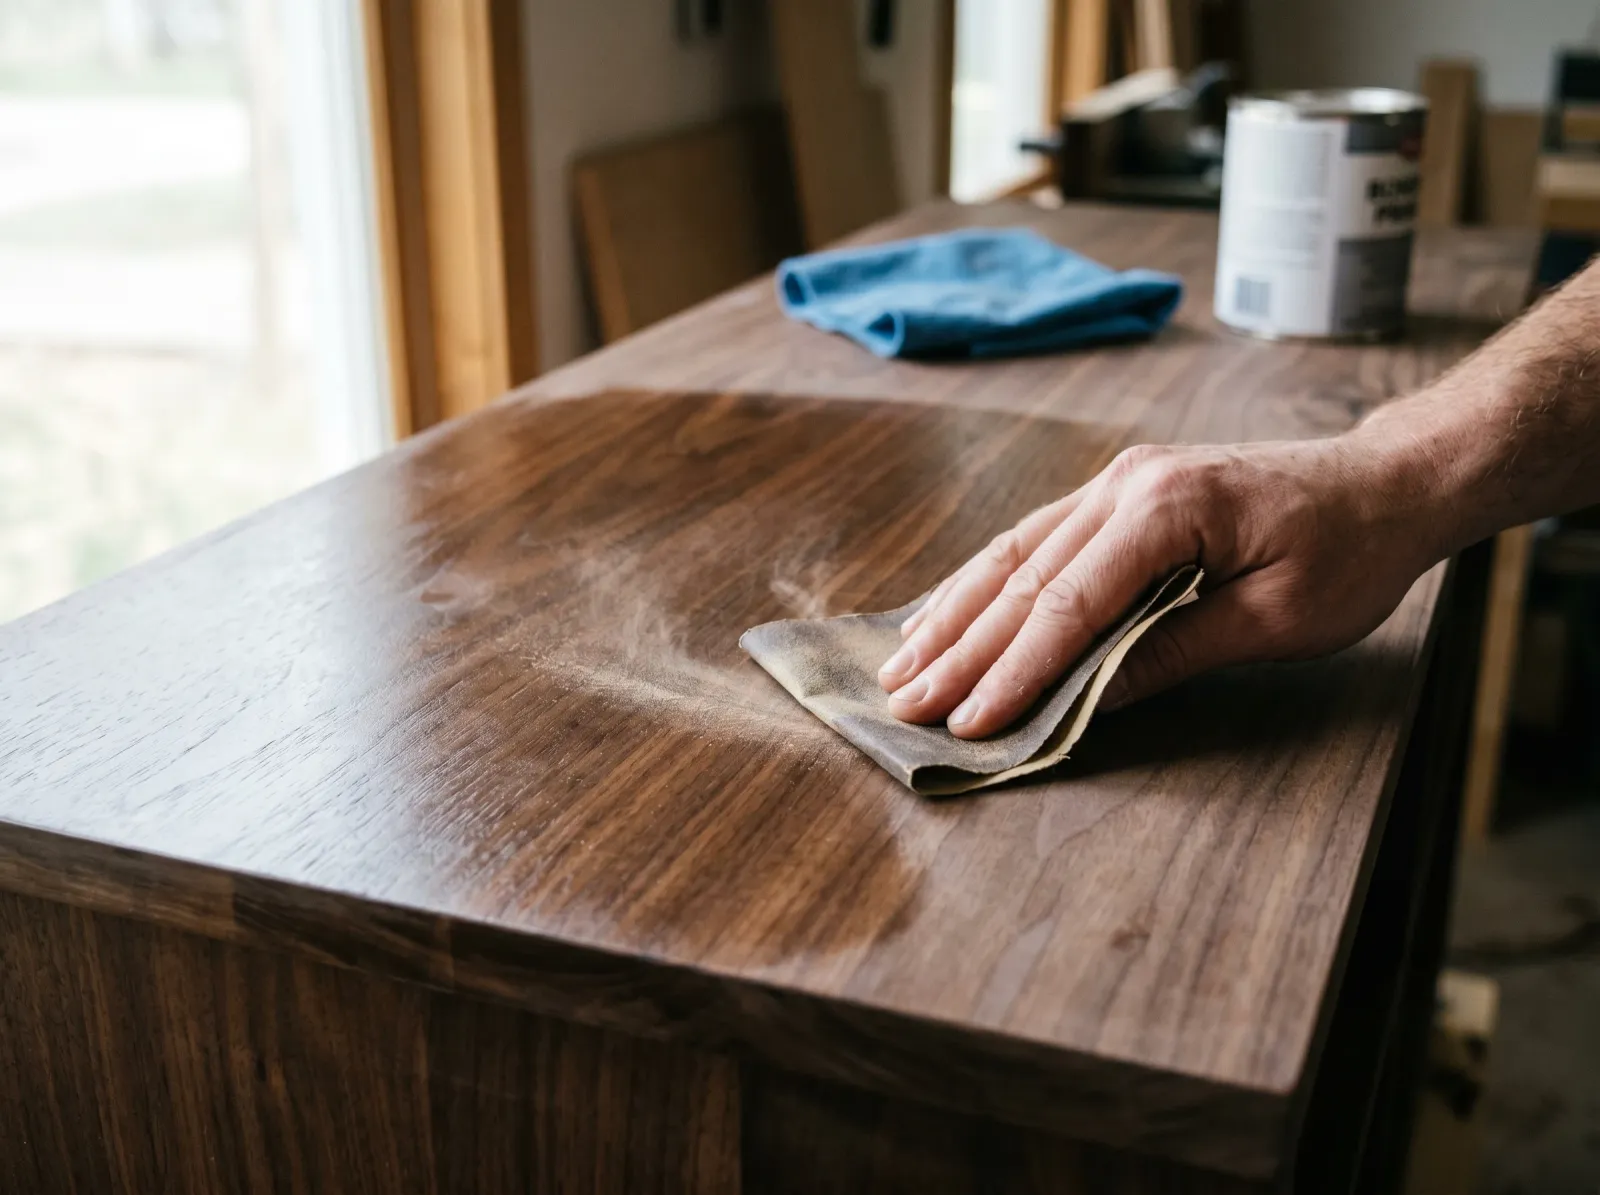 Knock the shine down to an even matte. The paint sticks to tooth, and sanding is how you give it some.
Step 3. Prime Slick Surfaces With a Bonding Primer
If the failure was flaking off a glossy, laminate, or previously oil-sealed surface, sanding alone may not be enough on the slickest spots. Lay down one coat of a bonding primer made to grip non-porous surfaces, such as Zinsser B-I-N (shellac-based) or KILZ Adhesion. Brush or roll it thin and even, and give it the full dry time on the label, usually 30 to 60 minutes for B-I-N and about an hour for KILZ Adhesion. A bonding primer creates the anchor layer chalk paint couldn’t make for itself. The guide to what a bonding primer does covers when it’s worth the extra coat. On raw wood that was never slick, skip this step.
Step 4. Repaint in Thin Coats, Fully Dry Between
Thin is the whole game now. Two or three light coats beat one heavy one every time, because thin coats shrink evenly and don’t crack. Brush or roll each coat, let it dry the full time on the can (chalk paint is usually touch-dry in an hour, recoat after two), and resist the urge to load the brush. If the first coat looks patchy, that’s normal for chalk paint and the second coat covers it. Don’t pile paint on to hide a thin spot. Build it in passes.
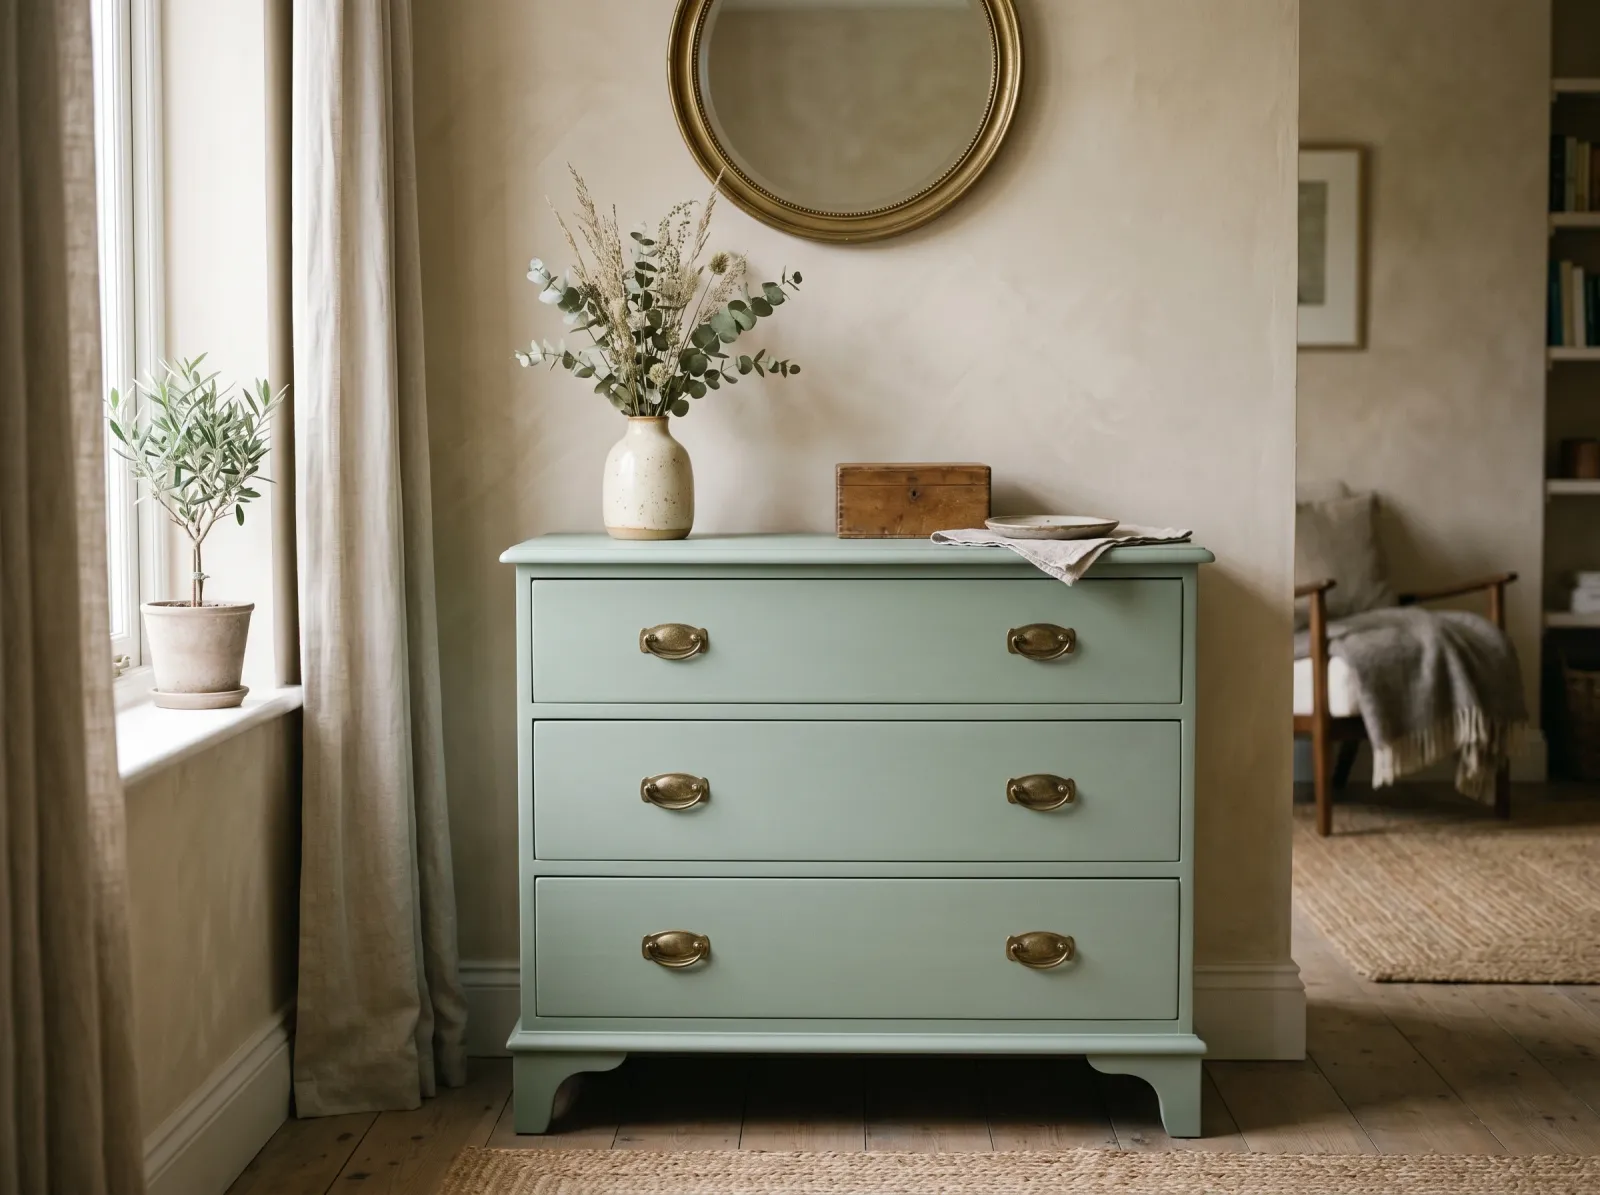 Thin coats on a dulled, primed surface dry flat and stay flat. This is what a sound chalk finish looks like.
Step 5. Seal It, Especially on Anything You Touch
Chalk paint dries to a porous matte that marks and chips easily on its own. On a tabletop, a dresser, a chair, anything handled daily, seal it once it’s fully cured. A clear furniture wax buffed in gives a soft matte sheen; a water-based polyurethane gives a tougher, more washable finish. Sealing won’t rescue a finish that’s already flaking, because flaking comes from the bond beneath. It protects a sound finish from the wear that starts the next problem.
Recommended Approach
There’s no single hero product here, because the right fix depends on what your paint is sitting on. For a flaking failure on a glossy or laminate piece, a shellac-based bonding primer (Zinsser B-I-N) is the most reliable anchor, and it blocks any tannin or wood stain from bleeding through at the same time. For raw wood or already-matte surfaces, you don’t need a primer at all, just thin coats and a topcoat. If you’re choosing a new can after this, the best chalk paint round-up covers which brands flow and cover with the fewest coats, since a thinner-bodied paint is far less likely to crack in the first place.
Prevention
The fix for next time isn’t a better paint. It’s reading the surface before you open the can.
- Test the surface. Run your hand and your eye over the piece. If it’s shiny, sealed, laminate, or melamine, plan to sand or prime. If it’s raw wood, old matte paint, or unsealed, you can paint straight onto it.
- Always knock the sheen down. A two-minute scuff with 150 grit over a glossy finish prevents almost every bond failure. The no-prep promise is true for porous surfaces and optimistic for slick ones.
- Prime the slick stuff. Laminate, melamine, glass, metal, and old oil finishes want a bonding primer under chalk paint, no matter what the marketing says. The page on why paint peels off laminate walks through that surface specifically.
- Go thin, and wait. Thin coats fully dry between each one. Chalk paint that cracks as it dries was almost always rushed or piled on.
- Work in a warm, dry room. Cold and damp slow the cure and pull the film apart. Aim for a room that’s comfortable for you, ideally 60 to 75°F, and not humid.
- Seal high-touch pieces. Wax or water-based poly on anything that gets handled keeps small chips from becoming flaking.
If the surface you’re fighting is trim or built-in cabinetry rather than freestanding furniture, the same bond rules apply, and the page on why paint won’t stick to trim covers the version of this problem on woodwork.
When to Call a Pro
- The piece is an antique or has real value. Stripping and refinishing a genuine antique the wrong way can erase its worth. A furniture restorer is cheaper than a ruined heirloom.
- You test positive for lead, or the piece predates 1978. Lead paint dust is a health hazard, and dry-sanding it at home spreads it. A certified pro handles lead-safe removal.
- The finish keeps failing after you’ve sanded and primed correctly. Something underneath is moving or weeping, a sealed-over silicone polish, a resinous knot, a flexing joint, and a refinisher can read what’s going on.
- The piece is large, built-in, or you’re refinishing a full kitchen of cabinets. The prep scales up fast, and a sprayed, properly bonded finish from a pro holds better than a brushed rescue on a surface that already failed once.
FAQ
Can I just paint over cracked chalk paint? Only if it’s firmly stuck. Press painter’s tape onto a cracked area and pull. If paint lifts, the bond failed and more paint will fail too. Scrape what’s loose, scuff-sand the edges flat, prime with a bonding primer, then repaint in thin coats.
Does chalk paint really need a primer? Not on raw, porous, clean wood, where it grips with no prep. Yes on anything slick: laminate, melamine, glossy varnish, or an old oil finish. Either scuff-sand the sheen off or lay down a bonding primer first.
Why is my chalk paint cracking as it dries? Usually a coat that’s too thick, or a second coat rushed on before the first dried. The paint shrinks as it cures, and a heavy coat shrinks unevenly and splits. Thin coats, dry between each, stay flat.
Do I have to seal chalk paint to stop it flaking? Sealing won’t stop flaking that’s already started, because that comes from the bond underneath. But a wax or topcoat protects a sound finish from the chips and wear that let flaking begin on a piece you handle daily.