How to Fix Paint Not Sticking to Trim
Latex over factory oil trim peels because there's no bonding layer. Scrape, sand to 220, prime with INSL-X Stix, then two coats of waterborne urethane that actually holds.

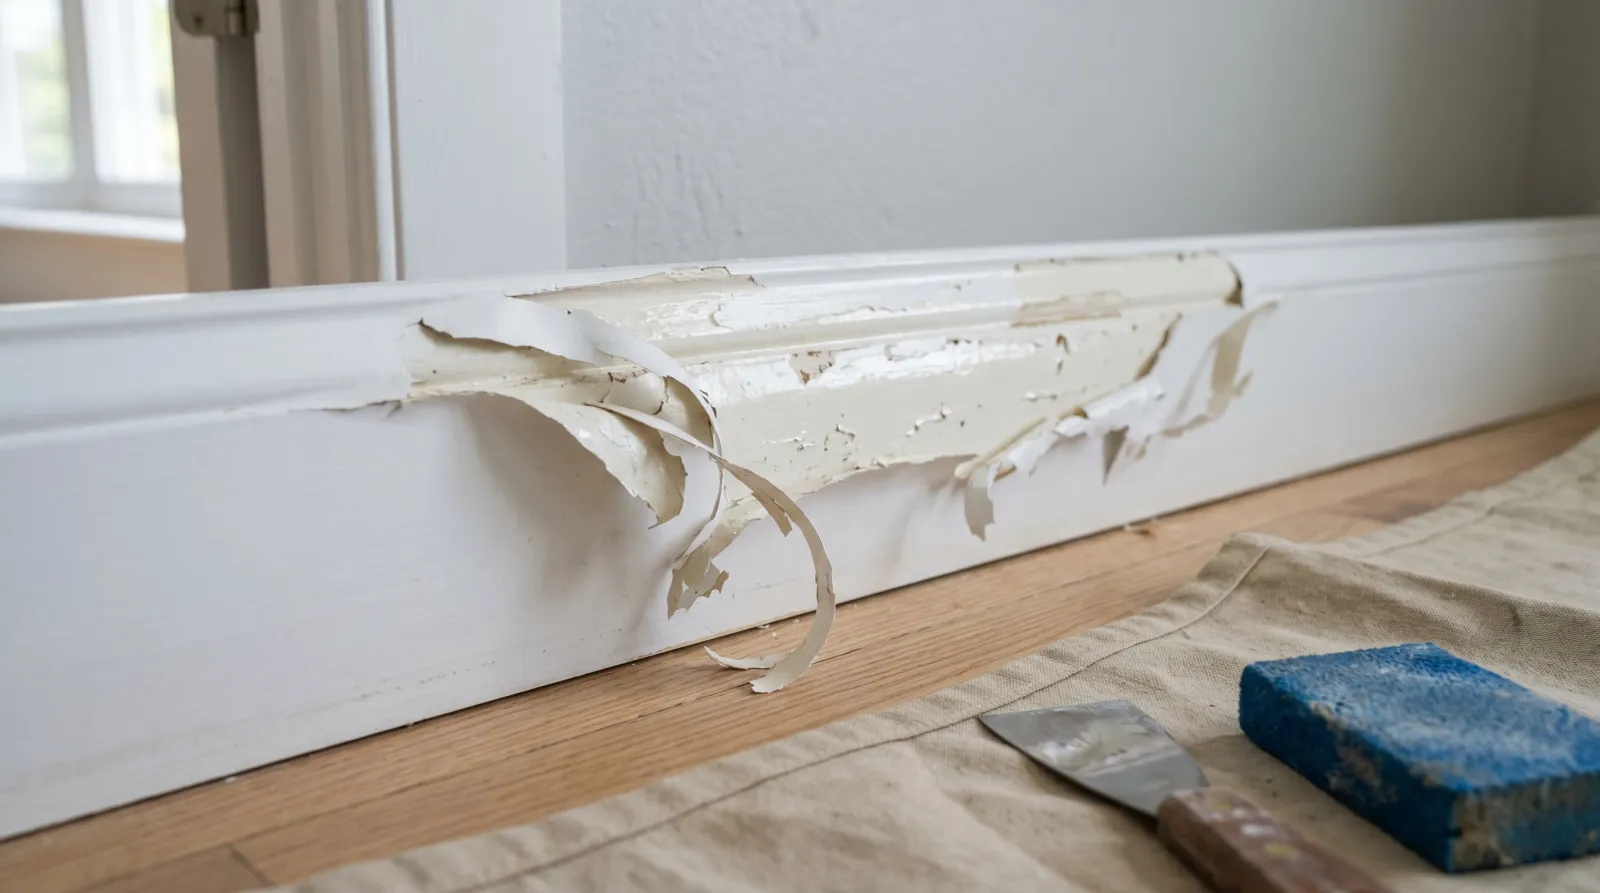
The fresh white trim looked perfect for about a week. Then someone dragged a vacuum across the baseboard and the new paint came off in a long curl, clean down to the old hard finish underneath. No tearing, no chipping. Just a ribbon of latex peeling like a sticker someone forgot to press down.
That’s adhesion failure. The new coat never bonded to the old one. Nothing’s wrong with the paint in the can. The bond between the two layers was never built.
Does This Match What You’re Seeing?
Adhesion failure on trim has a few common shapes. Confirm yours before you start, because the look-alikes want different fixes.
- Long ribbons peeling cleanly off a hard glossy substrate. The old finish underneath is intact and shiny. The new latex lifts in sheets without taking the old layer with it. This is the classic latex-over-factory-oil failure.
- Topcoat lifting in flakes around doorknobs, light switches, and baseboard edges. High-touch spots fail first because they get hand oil and abrasion. Same root cause, just the wear zones showing it earliest.
- Bubbles or blisters that pop into bare patches. The film delaminated before it fully dried. Often a humidity or rush-coat issue stacked on top of the bonding problem.
- Alligator cracking of the whole trim system, old layers and new. That’s not adhesion failure between two coats. It’s failure inside an older oil film that got brittle. See the alligator cracking fix instead.
If you can see hard glossy paint under the peel and the underside of the lifted piece looks smooth and intact, you’re in the right place.
How Serious Is This?
Same-weekend fix on one room. Nothing structural, nothing toxic unless the trim is pre-1978 (test for lead before sanding — that’s not optional). The wood under the trim is fine. The old oil film is fine. You just don’t have a bond between the new coat and everything below it.
If the whole house was repainted by a previous owner who skipped the prep, plan a week per major room. The peeling won’t stop on its own and spot-fixing the visible parts just delays the rest of the failure.
Why This Is Happening
Three things have to be true for paint to stick to trim. Most of the time, only one or two are.
Mechanical bond. The new coat needs surface texture to key into. Pores, scratches, hairline tooth from sanding. Factory oil trim is dense and slick on purpose so dust doesn’t grab and fingerprints wipe off. None of that texture is there.
Chemical bond. The new coat needs to soften the old one slightly so the two fuse. Latex over latex does this fine. Latex over fully cured oil does not. The latex is water-based, the oil film is inert, and they slide past each other.
Primer match. A primer between the two layers can bridge the gap, but only the right primer. Regular wall primer is porous and chalky. It bonds to drywall pores, not to glassy oil. The label has to say bonding or adhesion, not all-purpose.
Skip any one of the three and the system fails. The most common skip on residential trim is the bonding primer. The can said “self-priming,” the homeowner trusted it, the topcoat went straight onto factory oil, and eighteen months later it’s coming off in ribbons. “Self-priming” means the topcoat can sometimes go to bare drywall. It does not mean it bonds to gloss.
The Fix
Step 1. Scrape Back to a Tight Edge
Anything already loose is going to keep coming. Take a putty knife or a 5-in-1 and pull every lifting flake until you hit paint that won’t move under the blade. Don’t dig. You’re removing failure, not stripping the trim.
Once the loose stuff is off, run your fingernail along the edge of the remaining paint. If it lifts more, that section wasn’t bonded either. Keep going until the edge holds.
You’ll end up with patches of bare oil-undercoat or bare wood mixed with islands of older paint. That’s normal. Feather the edges in the next step.
Step 2. Feather the Edge With 220-Grit
Sanding sponge or a flat block, 220 grit. Three minutes per linear foot. Two jobs at once: dulling the gloss on the intact paint so the primer can grab, and feathering the lip where the scraped paint meets the unscraped paint so it doesn’t telegraph through the topcoat.
Feel for the ridge with your fingertip after each pass. When you can’t feel the step from old to scraped, you’re done with that section.
Wipe the dust with a tack cloth or a microfiber dampened with water. Skin oil and dust both kill primer adhesion. Don’t touch the sanded area with bare hands after this.
If the trim is pre-1978, test for lead with a $15 swab kit before any sanding. If it’s positive, stop and read the EPA RRP rules. That’s a different job.
Step 3. Prime With INSL-X Stix
This is the step that fixes the actual problem. The primer has to be a bonding primer.
INSL-X Stix Acrylic Urethane Bonding Primer is the default. Water-based, sticks to glass-smooth surfaces, brushes on like a thick latex, recoats in 1 hour at 70°F. One coat is enough on most trim. Apply with a quality angled sash brush, work in long strokes, don’t overwork it.
Zinsser BIN shellac is the heavier-duty option. Solvent-based, smells strong, needs ammonia for cleanup. Use BIN if you also need stain blocking (tannin bleed from pine, water rings, marker) or if the surface is something extreme like factory polyurethane. Recoats in 45 minutes.
Don’t substitute Kilz Original or Zinsser Bullseye. Those are stain-blockers, not bonding primers. They have the same adhesion problem the topcoat does.
Step 4. Two Coats of Waterborne Urethane
The topcoat does the visible work. For interior trim that gets touched, leaned on, and scuffed by furniture, the right finish is a waterborne urethane or waterborne alkyd, not regular wall paint.
Benjamin Moore Advance. Waterborne alkyd. Levels like oil, cures hard, holds its white in low-UV rooms. Two coats, 16 hours between for proper film build.
Sherwin-Williams Emerald Urethane Trim Enamel. The SW counterpart. Slightly harder cured film. Two coats, same wait.
Skip plain wall paint on trim. It cures soft, marks up the first month, and shows brush strokes the first time you wipe it down.
Safety and Chemical Interactions
Test pre-1978 trim for lead before sanding. Wear an N95 mask and eye protection for all sanding. Never mix bleach with vinegar, ammonia, or hydrogen peroxide during cleaning. The combination produces toxic gas. Ventilate the room during BIN shellac primer application; the alcohol carrier reads strong in a closed space. Keep dropcloths and rags wet when you bag them, because shellac-soaked rags can self-heat in a pile.
Recommended Product
INSL-X Stix Acrylic Urethane Bonding Primer is the one specialty product worth buying for this job. It’s what pro painters reach for when latex won’t grab. Water cleanup, 1-hour recoat at 70°F, sticks to surfaces regular primer slides off of.
Buy on Amazon · Manufacturer page
For the topcoat, see the best interior trim paint round-up for the Advance vs Emerald Urethane comparison and the runner-up picks.
Prevention
The trim never had to fail. Three habits keep it from happening again.
Use a bonding primer every time you put a water-based topcoat over anything glossy. Even if the old paint looks dull, if it was originally semi-gloss or oil, treat it as gloss. A coat of Stix costs an hour and a small can.
Sand before you paint, even on sound trim. 220 by hand, three minutes per panel. The hairline tooth is what mechanical bond means.
Match the topcoat to the surface. Trim is a high-touch surface. Use a waterborne urethane or alkyd, not regular wall paint. The hardness is the whole reason the product exists.
The two-year warning: if the previous painter skipped the prep and you topcoat over their work without redoing it, the failure you’re seeing now will repeat under your new coat. It might take eighteen months instead of six, but it’ll come. Sand back to the failure point before you put anything new on.
When to Call a Pro
- Pre-1978 home with peeling trim. Test for lead first. If positive, EPA RRP-certified contractor only.
- Whole-house adhesion failure where every painted surface is lifting. That’s a substrate or moisture problem behind the paint, not just a trim issue.
- Crown molding above 10 feet or detailed millwork where brush marks will read at eye level. Pros spray these and the finish reads cleaner than any brush job.
- Factory-finished furniture with a catalyzed polyurethane you can’t dull with 180-grit. The substrate is too hard for hand prep.
What’ll Bite You in Two Years
The trim job that comes back to bite people is the spot fix. You see a four-inch peel near the doorframe, scrape it, prime the bare spot, brush a little Advance over it, and move on. The patch holds. Six months later the next four inches peel, six inches down the same run.
The bond failure isn’t local. It’s the whole length of trim. The visible peel is just where it started showing. Either you prep the entire run now, or you’ll be doing it section by section every few months for the next two years.
Scrape what’s loose. Feather to 220. One coat of Stix. Two coats of Advance or Emerald Urethane. The whole length, in one weekend. That’s the job.