How to Fix Alligator Cracking on Paint
Alligator cracking is a paint stack that lost flex — usually oil under latex, thick coats, or 20 years of layers. Scrape, sand, BIN, two coats acrylic. Heat gun for the worst of it.

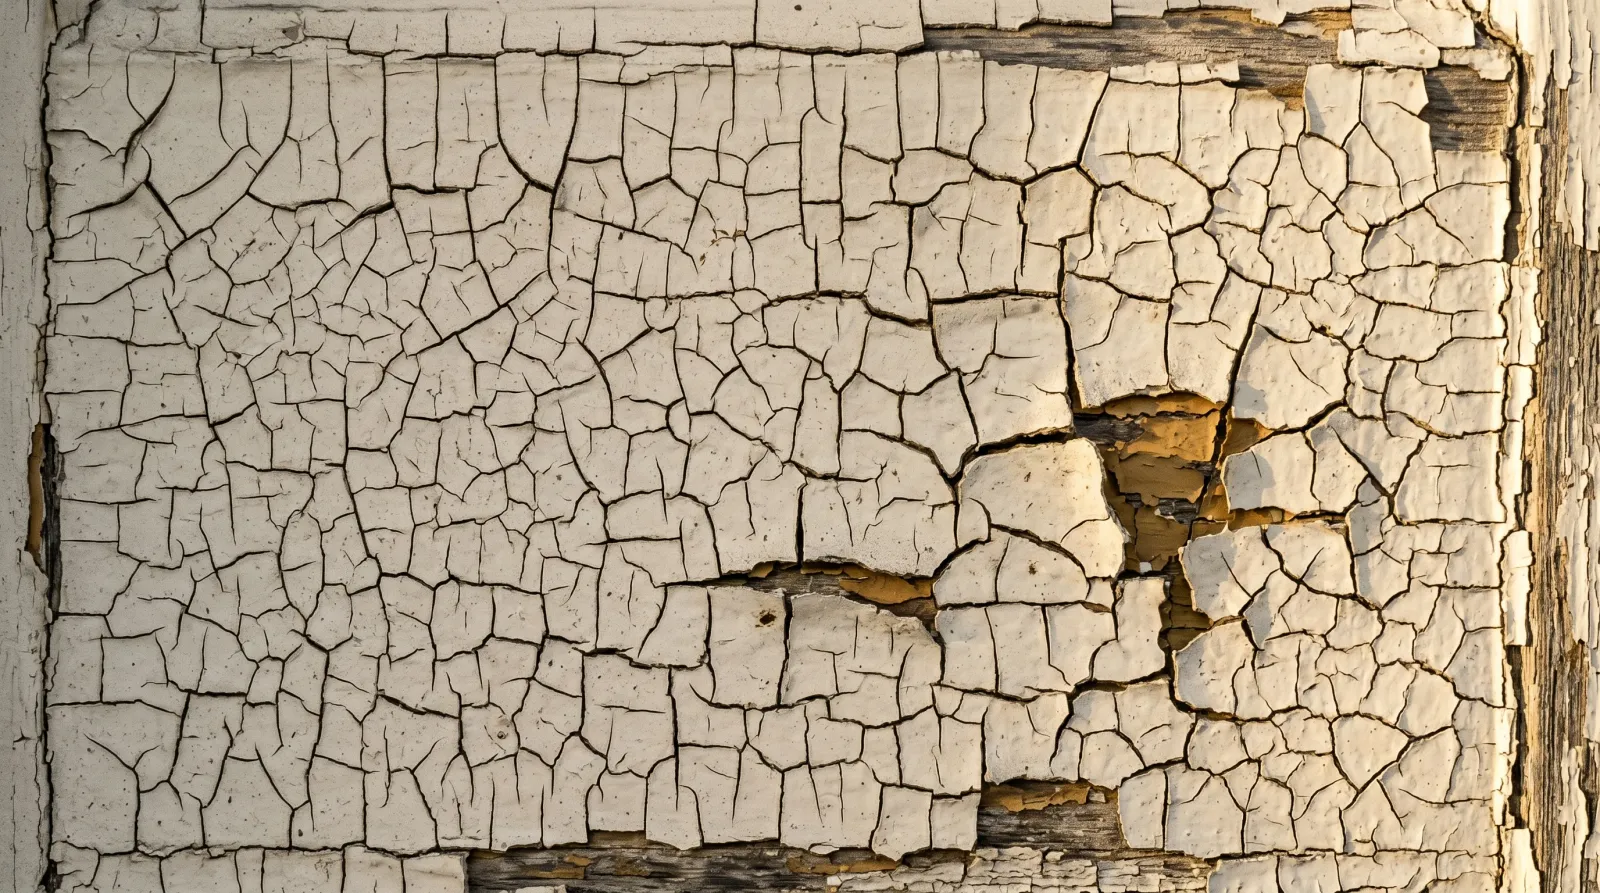
Alligator cracking is the paint stack telling you it’s done. The film cracked into a grid because the layers underneath don’t move together anymore. Usually oil under latex. Sometimes three thick coats over two thick coats. Sometimes twenty years of recoats on a sunny door. The fix isn’t a clever topcoat. The fix is taking the stack down and rebuilding it thin.
Does This Match What You’re Seeing?
Look at the pattern before you grab a scraper.
- Tight grid, hairline cracks, no curl: classic alligatoring. Brittle but still bonded. Heat gun and scraper time.
- Wide grid, edges starting to lift: late-stage. Bond is going next. Two-weekend job.
- Cracks only on south- and west-facing trim: UV cooked the binder. Common on doors, sills, window casings.
- Cracks under a fresh recoat (months, not years): wrong primer or solvent trap.
- Cracks on an interior door painted ten times: thick-coat history. The stack is too rigid to move with the wood.
- Cracks plus bleed-through stains: tannin or smoke pushing up through aged paint that lost its seal.
Fingernail fits in the cracks? The stack is at the end. Don’t try to encapsulate.
How Serious Is This?
Interior trim with light alligatoring is a same-weekend job. A south-facing exterior door with deep grid cracks is a full-Saturday strip plus a Sunday rebuild. Three triggers push this to high severity:
- Pre-1978 home: lead until tested. EPA RRP rules apply and the heat gun is off the table.
- Wide-area alligatoring across a whole exterior elevation: full strip job, not a touch-up. Budget two weekends or hire it out.
- Cracks came back within 18 months of a proper repaint: the layer underneath is still wrong. Stop painting and re-diagnose.
Why This Is Happening (root Cause)
Three things cause most alligator cracking. Often two of them at once.
Incompatible coats. Latex sprayed over old oil trim without sanding or a bonding primer. Latex shrinks at a different rate than oil, and within a few years the surface grid-cracks while the bond still holds. Cousin failure: oil over fresh latex on a kitchen door someone “freshened up” with whatever was in the garage.
Multiple thick coats. Every homeowner repaint added another 4 or 5 mils. By the fourth or fifth cycle the stack is rigid. Wood swells and shrinks with humidity; the stack can’t. The surface breaks first.
Age and UV. Binder oxidizes over 15 to 20 years. The film gets brittle and crazes. South- and west-facing trim goes first.
Pop a chip off with a putty knife. Two or more colors stacked means mismatch. One uniform color with cracks running through it means age or thick-coat history. Confirming the cause keeps you from repeating the mistake on the recoat.
Safety First (Read Before Step 1)
- Pre-1978 home: test for lead before any scraping or sanding. 3M LeadCheck swabs, $15 at any home center. Positive result: wet-scrape only, P100 respirator, plastic containment, HEPA cleanup, no heat gun, no power sanding without a HEPA-rated tool. Or hire an RRP-certified contractor.
- Heat guns are for post-1978 paint only. Heat volatilizes lead. Use mechanical methods on lead-positive surfaces.
- N95 for sanding, P100 if you’re unsure of the lead status. Eye pro overhead. Cross-ventilate during BIN application; the shellac carries a strong alcohol smell.
- Never mix bleach with vinegar, ammonia, or hydrogen peroxide. Toxic chlorine gas. If you’re cleaning mildew off the substrate first, use Concrobium or a straight 1:10 bleach solution and nothing else.
The Fix
Step 1. Scrape the Loose Stuff
A 2-inch carbide scraper, held at 30 degrees, pulled toward you with two hands. Get off everything that releases under light pressure. Don’t fight sound paint loose. You’ll just chew up the substrate underneath.
On a tight-grid alligator pattern that’s still bonded, the scraper alone won’t take much. That’s fine. Step 2 does the rest.
Step 2. Heat Gun the Thick Stack (post-1978 Only)
When the stack is thicker than a nickel — interior doors painted ten times, exterior trim with a forty-year history — a heat gun does the work scraping can’t. Set the gun to 750 to 1,000°F. Hold it 4 to 6 inches off the surface, keep it moving in slow passes, and follow with a sharp 2-inch scraper as the paint bubbles up. The stack lifts in chunks.
Two rules. Never park the gun on bare wood for more than three or four seconds; you’ll scorch the grain. Never use a heat gun on pre-1978 paint. Heat volatilizes lead.
Chemical strippers (Citristrip, Smart Strip) work on smaller areas, but heat is faster on a panel door.
Step 3. Sand Flat
You’ve got bare spots where the stack came off and hard cliffs where it didn’t. Topcoat over a cliff and the transition telegraphs through every coat after. Sand each cliff with 80 grit, then 120, until the edge feels flush under your fingertip. Finish the whole surface with 150 to give the BIN something to grab.
Power sanders eat substrate fast. Lowest setting, finish by hand on softwood trim. A random-orbit at full speed dishes out pine in under a minute.
Vacuum with a fine-filter shop vac, then tack-cloth the surface. BIN over sanding dust doesn’t bond.
Step 4. Wash and Dry
Soap and water, scrub, rinse, dry 24 hours on exterior wood. On interior trim a damp microfiber and a denatured-alcohol wipe is enough.
If you saw mildew or chalk on the bare spots, treat with Concrobium Mold Control or a 1:10 bleach solution before priming. Let it dry fully. BIN over a damp substrate fish-eyes.
Step 5. BIN Shellac, One Coat
Zinsser B-I-N Shellac-Base Primer. Cut in with a synthetic brush, roll the field with a 1/4” microfiber, work fast — BIN flashes in 15 minutes and lap marks set hard. One coat. Recoats in 45 minutes.
BIN does three things at once. Bonds to the brittle aged paint you didn’t strip off. Seals the bare wood where you sanded through. Blocks tannin, smoke, or stain bleed before it ghosts through your topcoat. A waterborne bonding primer (Stix, Bulls Eye 1-2-3) can substitute on a sound dulled stack, but on a sanded alligator repair with mixed substrate showing through, BIN is the safer pick.
Crack a window. The alcohol carrier smells strong for 20 minutes.
Step 6. Two Thin Coats of Acrylic
Two coats. Always two coats. One-coat coverage means one coat under perfect conditions, and a sanded-down door isn’t perfect conditions.
- Exterior wood and trim: 100% acrylic exterior, satin or low-gloss. Sherwin-Williams Duration, Benjamin Moore Aura Exterior, Behr Marquee Exterior.
- Interior trim and doors: waterborne alkyd hybrid like Benjamin Moore Advance or Sherwin-Williams Emerald Urethane. Levels like oil, cleans up like latex, stays flexible longer.
Lay it on at the recommended film build, not heavier. The reason you’re standing here scraping is the last person rolled it on like wedding-cake frosting. Two thin coats hold up better than one heavy coat and a hope.
Cut in the corners, roll while the cut-in is still wet, don’t stop in the middle of a door panel. Stops show as lap marks the second morning sun hits them.
What’s Under There Decides the Primer
| Substrate situation | Primer | Topcoat |
|---|---|---|
| Sanded-down stack, mixed substrate showing | BIN shellac, one coat | 2 coats acrylic or alkyd-hybrid |
| Bare wood after a full strip | Zinsser Cover Stain (oil) | 2 coats acrylic exterior |
| Sound dulled paint, no bare spots | INSL-X Stix bonding primer | 2 coats acrylic |
| Lead-positive paint, encapsulation route | BIN shellac over wet-scraped surface | Flexible elastomeric, 10-year repair |
| Tannin-prone bare wood (cedar, redwood) | BIN or Cover Stain, two thin coats | 2 coats acrylic exterior |
A wrong primer here puts you back on the scraper in three to five years.
Prevention
- Don’t recoat without prep. Sand dull at 220, deglosser wipe, prime the bare spots. Skipping prep is how the next stack starts.
- Don’t add a thick coat to a thick stack. Two thin always beats one thick.
- Latex over oil needs a bonding primer. Sand dull, Easy Liquid Sander wipe, Stix or BIN, then latex. Skip a step and the latex grid-cracks within five years.
- Recoat south-facing exterior trim every 7 to 10 years. The binder dies on a schedule.
- Keep up the caulk. Failed caulk lets vapor in behind the film, and the film tells you about it by cracking.
When to Call a Pro
- Pre-1978 home with widespread alligatoring (lead containment job)
- South-facing two-story exterior with grid cracking across a full elevation
- Heritage trim where stripping would create a worse hazard than encapsulation
- Repeating alligator cracking on the same trim for the third time (something deeper is wrong)
- Mold area >10 sq ft alongside the cracking (EPA threshold)
- Soft, dark, or sagging substrate underneath (wood rot, not paint failure)
What’ll Bite You in Two Years
Skip the BIN and the two thin coats, and the next set of cracks shows up along the same grid before the third winter. The film doesn’t know it’s new paint. It only knows whether the layers underneath move together. Take the stack down, prime it right, and rebuild it thin. That’s the whole trick.