How to Paint Over a Glossy Finish
Glossy trim and furniture reject latex unless you break the sheen first. Sand to 220 or wipe with Krud Kutter Gloss-Off, prime with Stix, then topcoat with a waterborne urethane.

Glossy paint is slick on purpose. The same property that makes it wipe clean and resist scuffing is the property that makes a new coat slide right off. Latex over untreated gloss peels in sheets the first time someone leans against it. The fix isn’t a better paint. It’s breaking the sheen, then using a primer built to grip plastic-like surfaces.
Does This Match What You’re Seeing?
Confirm the surface before you start. Different glosses fail in different ways:
- Old oil-based gloss trim: hard, slick, often yellowed if it’s pre-1990s. Tap with a fingernail and it sounds like glass. This is the classic “won’t take latex” problem.
- Factory polyurethane on furniture: a thick, plastic-looking topcoat over wood. Dressers, table legs, kitchen cabinets from IKEA or big-box stores. Even harder to paint than oil trim because the cure is catalyzed.
- Glossy latex over old paint: semi-gloss or full-gloss latex walls or trim. Less slick than oil, but still rejects a new coat without prep.
- Melamine or laminate (not paint at all): plastic-faced particle board. Looks like glossy paint but isn’t. Needs the same prep plus a longer cure window — Stix can handle it, but give the topcoat 30 days to harden before you scrub.
If you can’t tell oil from latex, rub a cotton ball with denatured alcohol on the surface. Latex softens and leaves color on the ball. Oil doesn’t.
How Serious Is This?
Same-weekend fix. The surface isn’t damaged, the room isn’t unsafe, nothing’s growing. You just have a paint that will not stick without prep. Skip the prep and you’ll be redoing the job in a month. Do the prep and the topcoat will outlast the next two homeowners.
The one exception: pre-1978 trim with peeling paint. Test for lead before you sand. The RRP rule applies the second a sanding sponge touches it.
Why This Is Happening (the Root Cause)
Paint sticks two ways. Mechanical bond — the new coat keys into pores and scratches on the substrate. Chemical bond — the new coat dissolves slightly into the old one and they fuse.
Glossy finishes are designed to reject both. The sheen comes from a smooth, dense binder film with almost no surface texture for mechanical grip. The binder is also fully cured and inert, so latex topcoats can’t soften it for a chemical bond. Factory polyurethane is worse — the cure is catalyzed, meaning it cross-links into a plastic shell that no water-based topcoat will dissolve.
Regular latex primer doesn’t solve this. It’s a porous, chalky film designed to bond to drywall and bare wood, not to a slick cured surface. The primer fails for the same reason the topcoat fails — there’s nothing for it to grab.
The fix is two-part. Break the sheen so the surface has some bite. Use a primer with a binder formulated to stick to slick substrates — that’s what “bonding primer” or “adhesion primer” means on the label.
The Fix
Step 1 — Clean the Surface
Glossy trim collects skin oil, hand cream, kitchen grease, and dust. None of it is visible. All of it kills adhesion.
Wipe with a 50/50 mix of warm water and TSP substitute, or denatured alcohol on a lint-free cloth. Rinse with clean water. Let dry 30 minutes. Don’t skip this — a primer that would have stuck fine fails on a greasy surface.
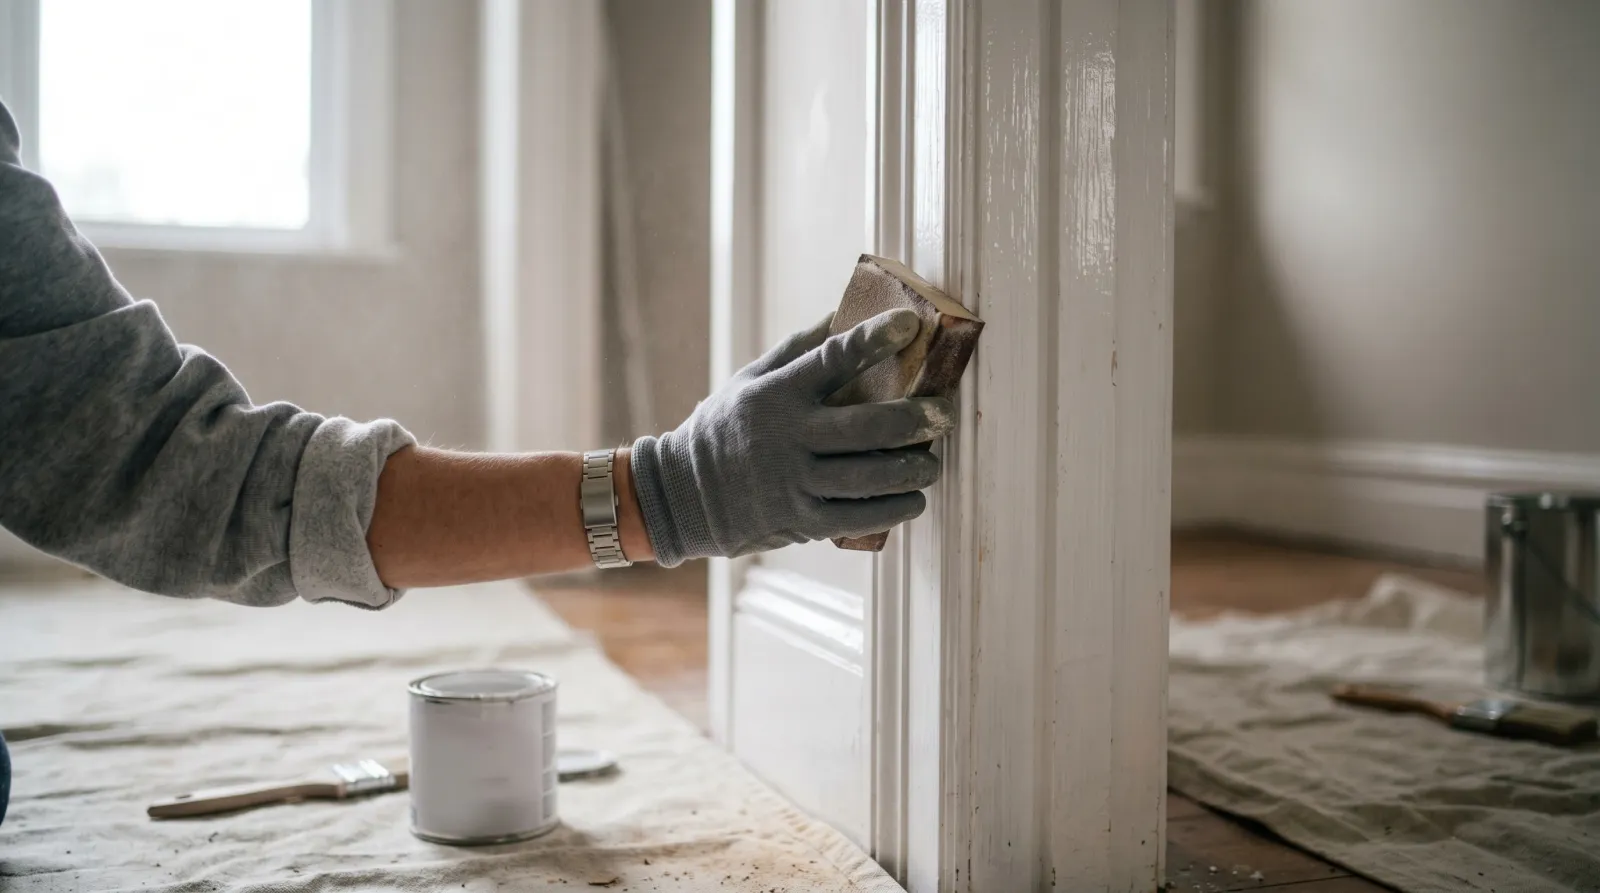
Step 2 — Break the Sheen
Two paths. Pick one based on the surface shape.
Sand to 220-grit. Hand-sand or use a sanding sponge. Three minutes per panel. You’re not removing paint — you’re dulling the gloss to a uniform haze. Wipe dust with a tack cloth or damp microfiber. This is the right call for flat trim, door panels, and most furniture.
Wipe with Krud Kutter Gloss-Off. Liquid deglosser. Saturate a cloth, wipe the surface, let dwell 10 minutes, wipe off the residue. The chemical softens the top few microns of the existing finish so primer can grab. Right call for curved trim, raised panel doors, and anywhere a sanding block can’t reach a corner.
Both work. Sanding gives the more reliable bond on factory polyurethane. Deglosser is faster on detailed millwork.
Step 3 — Prime with a Bonding Primer
This is the step people skip and pay for later. The primer has to be a bonding primer. The two that actually work:
- INSL-X Stix Acrylic Urethane Bonding Primer. Water-based, sticks to glass-smooth surfaces, recoats in 1 hour. The default for glossy trim, furniture, and laminate.
- Zinsser BIN Shellac. Solvent-based shellac. Even better grip than Stix, but smells strong and needs ammonia to clean up. Use for knotty pine, tannin-heavy wood, or when you also need stain blocking.
One coat is enough on most glossy surfaces. Two coats only if you can still see the underlying color through the primer film. Don’t substitute Kilz or Zinsser Bullseye — those bond to porous substrates, not to gloss.
Step 4 — Topcoat with the Right Paint
Match the paint to the use.
- Trim and doors: a waterborne urethane like Benjamin Moore Advance or Sherwin-Williams Emerald Urethane Trim Enamel. Both cure to a hard, scuff-resistant film closer to old oil-based gloss than regular latex. Two coats, with a full 24 hours between for proper film build.
- Furniture: a DTM (direct-to-metal) acrylic or an alkyd-modified latex. The hardness matters more than the brand — furniture takes more abuse than trim. Two coats minimum.
- Cabinets: see the best kitchen cabinet paint round-up — same prep, more specific picks.
Don’t topcoat with regular wall paint. It cures soft, doesn’t level, and you’ll see brush marks the first time you wipe it down.
Safety and Chemical Interactions
Sanding old trim in pre-1978 homes can release lead dust. Test first with a $15 swab kit before any sanding. Wear an N95 mask and eye protection for all sanding. Never mix bleach with vinegar, ammonia, or hydrogen peroxide during cleaning — produces toxic gas. Ventilate during deglosser use and shellac primer application.
Recommended Product
INSL-X Stix Acrylic Urethane Bonding Primer is the single specialty product worth buying for this job. It’s the primer pro painters reach for on glossy trim, doors, cabinets, and factory-finished furniture. Water cleanup, 1-hour recoat, sticks to surfaces regular primers won’t touch.
Buy on Amazon → · Manufacturer page
For the topcoat, see the trim paint round-up for the full Advance vs Emerald Urethane comparison.
Prevention
Once you’ve put a properly prepped finish on, prevention is small stuff:
- Don’t wipe with abrasive cleaners. Magic Erasers strip waterborne urethane in a few passes. Use a soft cloth and dish soap.
- Give the topcoat 30 days to fully cure before scrubbing. Waterborne urethanes are walk-on hard in a day but full chemical-resistance hard at the 30-day mark.
- Touch up scratches early. A pinhole nick in the topcoat lets moisture into the primer layer. Cover it within a week.
The real prevention is the prep you already did. If you sanded and used Stix, the new finish is mechanically anchored. It won’t peel unless someone hits it with a hammer.
When to Call a Pro
- Pre-1978 home with peeling trim — test for lead first. If positive, RRP-certified contractor only.
- Furniture or trim with a catalyzed factory finish you can’t dull with 180-grit. The substrate is too hard for hand prep.
- Cabinets you want to spray for a factory-grade finish. Spraying needs containment and the right gun setup — worth hiring out for a kitchen.
- Any surface where the existing paint is failing in sheets, not just glossy. That’s an adhesion-failure problem in the older layers, and patching won’t hold.
What’ll Bite You in Two Years
The two failure modes I see on touch-ups people called me back for:
The first is skipping the bonding primer because the can said “self-priming.” Self-priming means the topcoat can sometimes go straight to drywall. It doesn’t mean it bonds to gloss. The topcoat peels off the trim in long ribbons within 18 months.
The second is using regular Kilz instead of Stix. The Kilz layer bonds fine to itself but not to the gloss underneath, so the whole system delaminates as one sheet. Looks dramatic. Costs a full redo.
Sand or deglosser. Stix or BIN. Then your real paint. In that order, every time.
Related
Frequently asked questions
Can I just paint over glossy paint without sanding?+
Do I have to sand all the way down to bare wood?+
What grit sandpaper for glossy trim?+
Will a deglosser replace sanding?+
Is Kilz or Zinsser Bullseye a bonding primer?+
How long before I can topcoat the bonding primer?+
- How to paint trim and doors
- Best trim paint round-up
- Sheen guide