How to Paint Over Existing Painted Wood (Latex, Oil, or Unknown)
Painting over old paint on wood: how to test latex vs oil, scuff-sand to 220, deglosser vs sandpaper, and prime only where you need to. Full prep-to-topcoat guide.

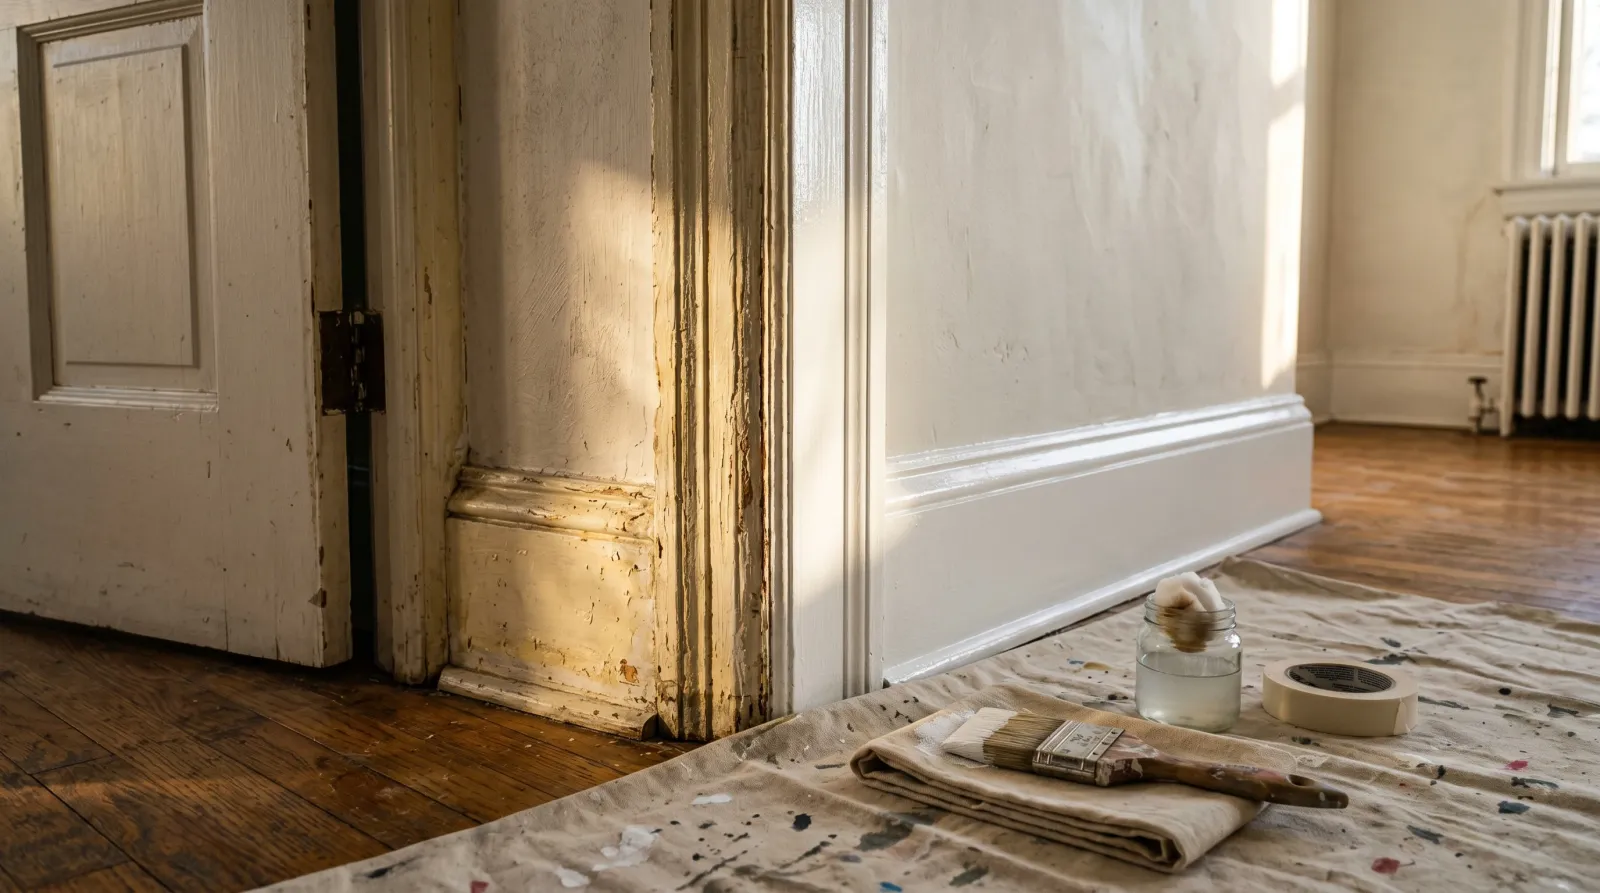
Old paint on wood doesn’t have to come off. It has to be diagnosed, scuffed, spot-primed where it matters, and recoated. Strip-to-bare is overkill on 90% of trim and doors. The rule is simple: figure out what’s on there, knock the sheen off, prime only where the old film is broken, then paint.
Skip the diagnosis step and you’ll find out which paint was on there the hard way. Your fresh latex peels off old oil in sheets, six weeks in.
TL;DR
- Test first. Denatured alcohol on a cotton ball. Latex picks up; oil doesn’t.
- Scuff-sand to 220 over the whole run. Knock the sheen off, vacuum, tack-cloth.
- Prime only the broken spots — bare wood, filler patches, bleeding stains, oil-to-waterborne transitions. Not the whole surface.
- Topcoat with a quality waterborne enamel. Two coats. Always two coats.
- Cure 14 days before hardware goes back; 30 days before you wipe it down.
What “existing Painted Wood” Actually Means
Doors, trim, casings, jambs, baseboards, paneling, built-ins, mantels. Any interior wood that already wears a paint film. Could be oil from 1962. Could be waterborne acrylic from last year. Could be three layers of both, the bottom one chalking, the top one yellowed. You won’t know until you test. The film underneath sets every decision in this guide: which primer (if any), which solvent, which topcoat chemistry.
Tools & Materials
Materials
- Denatured alcohol (or isopropyl 91%) + cotton balls, for the latex/oil test
- TSP substitute or Krud Kutter degreaser for kitchen and bath trim
- Liquid deglosser (e.g., Klean-Strip Easy Liquid Sander), optional for shaped profiles
- 120 grit (repairs) and 220 grit (scuff) sandpaper or sanding sponges
- Wood filler or lightweight spackle for chips and gouges
- Painter’s caulk for separated seams
- Bonding primer (Insl-X Stix) for oil-to-waterborne transitions
- Shellac primer (Zinsser BIN) for knots, stains, smoke ghosts, water rings
- Waterborne trim enamel as your topcoat
- Tack cloth
- Painter’s tape, drop cloths
Tools
- 2.5” angled sash brush
- 4” or 6” foam mini-roller for flat door panels
- Vacuum with brush attachment
- Lead test swabs (3M LeadCheck) if the home was built before 1978
Why Old Painted Wood Is Trickier Than Bare Wood
Bare wood is simple. You sand it, you prime it, you paint it. The grain is your only variable.
Existing painted wood adds three unknowns. You don’t know the chemistry of the existing film (oil or latex). You don’t know how bonded that film is (sometimes it’s letting go from the back). And you don’t know what’s bleeding through (knots, water rings, smoke from a fireplace, nicotine if the house had a smoker). Each one needs a different fix. The diagnosis is the whole job. Once you know what’s there, the rest is fifteen minutes per door of actual prep.
Step 1. Diagnose What’s on There
This is the step everyone skips. Don’t.
The alcohol test. Wet a cotton ball with denatured alcohol. Press it to a hidden patch of the painted wood (back of a door, inside of a closet jamb). Hold for 30 seconds. Rub. White residue on the cotton means latex. Clean cotton and a hard surface means oil. Do this on every distinct paint run. The trim in the hallway might be oil; the door in the bedroom might be the latex repaint someone did in 2018.
The age tell. If the house was built before 1978, the original trim paint may contain lead. Buy a 3M LeadCheck swab kit ($15). Swab any layer you plan to sand. If it pops red, stop. RRP rules apply, and you’re sanding lead dust. Either hire a certified contractor or shift to wet-sanding and a sealed-up zone with HEPA cleanup. Don’t dry-sand lead and don’t hand it to a homeowner who doesn’t know what they’re sanding.
The bond test. Press a strip of masking tape firmly onto the painted wood, then rip it off fast. If paint comes up with the tape, the existing film isn’t bonded. You’ve got a stripping job, not a recoat job. That’s a different article.
Step 2. Clean
Trim collects body oils, kitchen grease, and skin grime, especially around door handles and the top of baseboards behind a couch. Wipe everything down with TSP substitute or Krud Kutter. Krud Kutter is what I keep on the truck. Spray, wipe with a clean rag, rinse with a damp rag, let it dry an hour. Skip this and your topcoat fish-eyes wherever your hand has touched the door for the last ten years.
In bathrooms and kitchens, do two passes. The soap-and-cooking film is thicker than it looks.
Step 3. Repair
Now fix the wood, not the paint.
- Chips and gouges: wood filler or lightweight spackle, sand to flush at 120, then refine at 220.
- Cracks in joinery, gaps at the wall: painter’s caulk, smoothed with a wet finger. Let it skin before you sand the surrounding paint or you’ll smear it.
- Loose paint at the edges of a chip: scrape with a 5-in-1 until the surrounding paint stops lifting. Feather the edge with 120 grit so there’s no shelf where old meets new.
- Knots bleeding through old paint: the knot is winning. Spot-prime each one with shellac BIN after sanding. Two coats on bad ones.
Don’t try to fill an entire damaged door panel. If the existing film is alligatored or cracking across the field, you’re stripping, not recoating.
Step 4. Scuff-Sand to 220
The most important five minutes of the whole project. Scuff-sand the entire surface with 220 grit. Not to remove paint. Just to knock the sheen off. The cured film comes out of the sander uniformly hazy. That haze is the mechanical bite your topcoat needs.
Use a sanding sponge on shaped profiles. Flat sandpaper doesn’t hit the cove and the bead. On flat panels, a 220 sheet wrapped around a block. On doors, ten minutes total. On a 12-foot run of baseboard, fifteen.
Vacuum the dust off with a brush attachment. Then tack-cloth. Then look at it under raking light to make sure the whole surface reads matte. Any shiny spots get a second pass.
Deglosser Instead of Sandpaper
On shaped trim profiles where sanding is awkward (fluted casings, dentil molding, recessed door panels), a liquid deglosser does the same job chemically. Klean-Strip Easy Liquid Sander or M-1 Deglosser. Wipe it on with a rag, let it flash off per the label (usually 10 to 15 minutes), recoat within the open window (usually one hour).
Deglosser doesn’t replace sandpaper where you’ve made repairs or where the existing film has chips. Use both: deglosser on the smooth runs, 220 on the repaired spots.
Step 5. Spot-Prime, Don’t Whole-Prime
Here’s where most homeowners over-do it. You don’t need a full prime coat over sound, scuffed paint. You need a primer only where the old system is broken or where you’re transitioning chemistries.
Prime these spots:
- Anywhere you sanded down to bare wood. Bonding primer.
- Filler patches and spackled chips. Filler is more porous than the surrounding paint. Primer evens the absorption so the topcoat doesn’t flash dull over the patches.
- Bleeding stains. Water rings, smoke ghosts, knots that started showing through the old paint, nicotine. Shellac BIN. It’s the only primer that locks tannins and smoke for good.
- Oil-to-waterborne transitions. If the existing film tested as oil and you’re putting waterborne enamel on top, the whole run needs a bonding primer first. Insl-X Stix is the cleanest choice. It bonds to old oil, bonds to glossy factory finishes, dries fast, top-coats with anything.
Don’t prime everywhere else. The scuff-sanded existing film is the primer. Skipping the unnecessary prime coat saves a day and doesn’t cost you a thing in the finished job.
Step 6. Paint
A quality waterborne trim enamel. Sherwin-Williams Emerald Urethane Trim Enamel, Benjamin Moore Advance, or PPG Break-Through if the room sees abuse. Pick one and run with it. For the full breakdown of which trim enamel for which job, see the best trim paint round-up.
Two coats. Always two coats. Doesn’t matter what the can says about one-coat coverage; trim under raking daylight tells on a single coat every time. Cut in with a 2.5” angled sash brush, lay it on heavy, leave it alone. Let the paint level itself. Brushing it back and forth past the open time is how you get brush marks that look like railroad tracks under the next morning’s light.
For flat door panels, a 4” foam mini-roller after you brush the recesses gives a finish that’s nearly indistinguishable from a sprayed door. Back-roll while the brushed cut-in is still wet. That’s how you avoid lap marks where the roller meets the brush work.
Stick with the chemistry you started. Waterborne over a bonding-primed oil substrate: fine. Oil over latex: don’t. There’s no upside left in oil for interior trim. It yellows, it off-gasses for a week, and the cured film isn’t meaningfully harder than what Emerald Urethane gives you.
Step 7. Dry, Recoat, Cure
The numbers, not the vibes.
- Touch-dry: 1 to 2 hours for most waterborne trim enamels.
- Recoat: 4 hours for Emerald Urethane, 16 hours for BM Advance. Read the can.
- Hardware back on: 7 days. The film is hard enough but not fully crosslinked.
- Full cure: 14 to 30 days. That’s when you can wipe it down with a damp cloth or close a door against its stop without leaving a print.
The window between recoat and full cure is when the film is most vulnerable. Don’t lean ladders against fresh trim. Don’t slam doors. Don’t tape anything to a baseboard for at least two weeks. The cured film at day 30 is dramatically tougher than the cured film at day 7.
Common Mistakes
- No alcohol test. You assumed latex, it was oil, your fresh latex is peeling in two months.
- Whole-priming over sound paint. Wasted gallon, wasted day. Spot-prime instead.
- Skipping the scuff. Topcoat sits on top of the old film instead of biting in. First door bump chips it.
- Painting over loose paint. New paint doesn’t make old paint stick. Scrape, feather, prime the bare spot, then recoat.
- Recoating before the film is dry. Tacky paint underneath traps solvent and the new coat wrinkles. Trust the recoat number on the can.
- Going aggressive with the sander. 220 to scuff. Anything coarser leaves scratches the topcoat shows.
Maintenance & Longevity
A properly recoated trim job lasts 8 to 12 years before the next cycle, longer in low-traffic rooms. Clean it once a year with a damp microfiber. No abrasives, no solvent cleaners, no Magic Eraser on satin trim (it burnishes). Touch up chips within a week of them happening, and keep a quart of the topcoat labeled and dated in the basement. Trim in a kitchen or a kid’s bathroom takes more abuse and recoats every 6 to 8 years; trim in a guest bedroom can ride 15. The deciding factor is almost always the cure window. A recoat that gets handled hard at week one wears in five years instead of ten.
FAQ
How do I know if my old wood paint is oil or latex? Wet a cotton ball with denatured alcohol or isopropyl, press it on the painted wood for 30 seconds, then rub. If white residue comes off on the cotton, it’s latex. If the cotton stays clean and the surface still feels hard, it’s oil. Pre-1980 trim is almost always oil.
Do I need to sand old paint before repainting? Yes, but not to bare. Scuff-sand with 220 grit just to knock the sheen off. Five to ten minutes per door. If you skip the scuff, your topcoat doesn’t bite and it peels at the first ding.
Can I use a liquid deglosser instead of sandpaper? On shaped profiles where sanding is awkward, yes. Wipe it on, let it flash, recoat within the window on the label. Deglosser doesn’t fix chips or filler patches. Use both: deglosser on smooth runs, sandpaper where you’ve made repairs.
Do I have to prime over old painted wood? Not the whole surface. Prime where you sanded back to bare wood, where you filled a chip, where a stain is bleeding through, or where you’re going from oil to waterborne. Everywhere else, scuff-sand and topcoat directly.
Can I paint waterborne paint over old oil paint? Yes, with a bonding primer. Latex straight over oil peels in sheets within months. Scuff-sand to 220, prime with Insl-X Stix or Zinsser BIN, then topcoat. The primer is the bond layer.
What’ll Bite You in Two Years
The job that fails is the one where the homeowner felt the scuff was optional. The new paint goes down beautiful. Six months later, nothing. Eighteen months later, a chair back catches the baseboard and a 6-inch strip of new paint comes off in one piece, with the old paint underneath looking exactly as it did the day before you started. There was nothing wrong with the topcoat. There was nothing holding it to the substrate. Five minutes with a 220 sponge prevents that, every time.
Related
- How to paint bare interior wood for when the answer is strip
- Best paint for trim and doors for the topcoat picks
- Fix peeling paint on wood when the existing film is the problem
- Oil vs water-based paint on why you tested in step one
- Repaint interior trim for the weekend project plan