Best Caulk Removal Tools
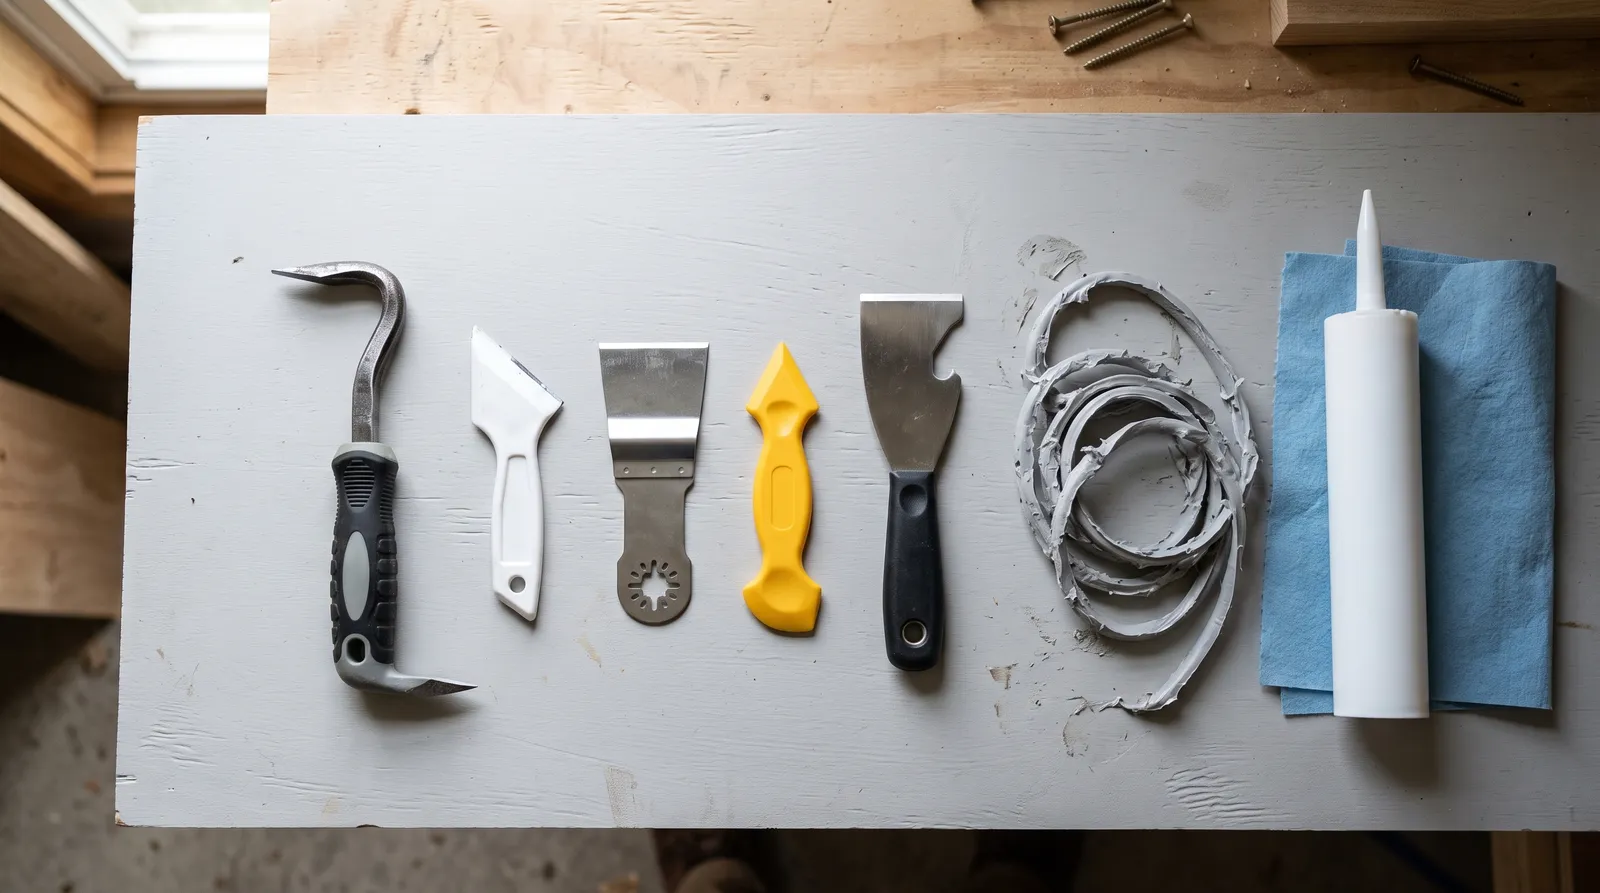
Five caulk removal tools tested on hardened silicone, latex, and painted-over beads. Top pick: the Hyde Dig-it — plus the plastic tool for acrylic tubs and the blade for whole-bathroom jobs.

Disclosure: Some links below are affiliate links. We earn a commission if you buy through them, at no extra cost to you.
Top pick: the Hyde Dig-it, model 43670. About $9, high-carbon steel, a bent blade with a sharp point at each end and a thumb notch that keeps your knuckles off the tile. It wins on cured silicone, which is the exact case that defeats every plastic tool sold as a caulk remover. It falls short on acrylic tubs and fiberglass surrounds, where steel leaves a scratch you get to look at forever. For those surfaces the Homax Caulk Remover Tool is the plastic-tipped answer. For a whole shower or a long exterior run, a Dremel MM610 flexible scraper in an oscillating tool cuts the work from an afternoon to about twenty minutes. And if you are recaulking one window and want to buy one thing, the Hyde Caulk Aid removes the old bead and tools the new one for under five dollars.
No single tool takes out every bead.
Most people need two: something steel for the cutting and something plastic for the surfaces steel would ruin. That combination runs about fifteen dollars and covers every caulk joint in a house.
Five Tools and Four Jobs That Broke Them
I bought all five off the shelf and ran them on caulk that was already failing in service, not on fresh beads squeezed onto a test board. Test beads come out easy. Fifteen-year-old silicone does not.
Job one was an acrylic tub surround in a 1978 ranch, gray silicone at the tub-to-tile joint with a second bead applied over the first at some point by a previous owner. Job two was a tiled walk-in shower, roughly twenty-two linear feet of interior corner in mildew-stained sanitary silicone. Job three was twelve window casings on the interior, latex caulk with two coats of semi-gloss painted over the top. Job four was about thirty feet of south-facing siding-to-trim joint in acrylic latex that had been baking since the Obama administration and was cracked open along most of its length.
The tub taught the first lesson within ten minutes. I put the Dig-it on a hidden patch behind the toilet to see what steel does to acrylic, and it left a visible scratch on the first pull. Steel stayed on tile and trim after that.
The shower taught the second. Twenty-two feet by hand is a knee-destroying afternoon. Twenty-two feet with a flexible scraper blade in an oscillating tool is a coffee break.
Why Old Caulk Fights Back
Cured caulk fails three different ways depending on what it is, and the tool that beats one is often useless against the others.
Silicone stays elastic. That is the whole point of the material and it is why a wide blade shoved at a silicone bead just squashes it sideways. Silicone does not chip, does not crumble, does not dissolve in anything you can buy at a home center. It has to be cut. A fine point run down the middle of the bead splits it into two ribbons that then peel out of the joint in long strips, and when a silicone removal goes well you pull a single unbroken rope out of a ten-foot corner. When it goes badly you spend an hour picking at crumbs with your fingernail.
Latex and acrylic go brittle. Sun and time drive the plasticizer out, and an old exterior acrylic bead cracks like dried mud. This is the caulk that responds to a chemical softener, and it is the caulk that comes out in chunks with almost any pointed tool. The trap here is that brittle caulk breaks off flush with the joint face and leaves the deep part still bonded, so you think you are done when you are half done.
Painted-over caulk becomes part of the trim. Two coats of semi-gloss over a latex bead welds the caulk, the paint film, and the wood into one surface. You cannot see where the joint is. Dig it out with a point and you will tear the paint edge on both sides, which means the recaulk turns into a repaint of that casing.
A tool that handles all three does not exist. A tool that handles two costs about nine dollars.
Match the Blade to the Surface, Not to the Caulk
This is the decision that actually matters and most buying guides skip it.
Acrylic tub, fiberglass surround, cultured marble, laminate countertop. Plastic only. These surfaces scratch under steel on the first pass and the scratch does not polish out. Homax Caulk Remover Tool or the Hyde Caulk Aid.
Glazed ceramic tile, porcelain, natural stone, glass. Steel is fine. The glaze on a wall tile is harder than the tool. Keep the angle shallow anyway, because a steel point stabbed at a grout line will chip the grout.
Painted wood trim, window casings, exterior siding joints. Steel, and specifically a point rather than an edge. Score the paint film along both sides of the joint with a utility knife first so the caulk releases without dragging paint with it. This is the same discipline as the scraper work in exterior prep, and skipping it makes more work than it saves.
Stainless sink rims and chrome fixtures. Plastic. Steel-on-stainless leaves gray drag marks that read as scratches under bathroom lighting.
Get this wrong once and the nine dollars you saved stops mattering.
How the Testing Ran
Same protocol on all five, with one exception noted below.
Severance test. Can the tool cut a cured silicone bead down its center in a single pull, or does it push the bead around? Scored on the shower corners, which had the oldest and hardest silicone in the set. Pass, partial, fail.
Surface damage. Each steel tool ran a ten-inch test pull on a hidden section of the acrylic tub and a hidden section of glazed tile. Inspected under a work light at a low angle, which is the only way scratches on white acrylic show up. The steel tools were pulled off the acrylic after this and did not run the tub job.
Fatigue and clearance. A continuous ten-foot run of shower corner, timed, with a note on where my hand gave out. A tub-to-tile inside corner is about the tightest working geometry in a house, and tools were scored on whether the working end reached the joint with the hand still clear of the tile face. This is where the bent blades separated from the flat ones.
Residue. After removal, each joint was photographed and then razor-shaved to see how much film the tool had left behind. Every tool leaves some.
Recaulk and 48-hour check. Every joint got a fresh bead and was inspected at 48 hours for adhesion failure. Two joints failed, both on sections where I had rushed the residue step. That is the finding worth carrying away from this whole test: the removal tool matters less than what you do after it.
Comparison at a Glance
| Tool | Blade | Safe on acrylic and fiberglass | Cuts cured silicone | Best job | Price tier |
|---|---|---|---|---|---|
| Hyde Dig-it 43670 | Bent high-carbon steel, twin points | No | Yes | Tile, porcelain, painted trim | $ |
| Homax Caulk Remover Tool 2407 | Angled plastic, point plus hook | Yes | Partial | Acrylic tubs, cultured marble, sink rims | $ |
| Dremel MM610 Flexible Scraper | Flexible steel, oscillating | With care only | Yes | Whole showers, long exterior runs | $$ |
| Hyde Caulk Aid 43660 | High-impact plastic, multi-end | Yes | No | One-window recaulk, bead tooling | $ |
| Hyde 17-in-1 06985 | Stainless point and contour edge | No | Partial | Painted-over caulk on trim | $$ |
1. Hyde Dig-it 43670, Top Pick
The Dig-it is not sold as a caulk tool. It is sold as a removal and scraping tool for mortar, caulk, and grout, and that broader remit is why it works: it was designed to survive material harder than silicone, so silicone is the easy end of its range.
What makes it the pick is the geometry. The blade is bent, so the working point sits down in the joint while your hand stays up and clear of the tile. There is a thumb notch cut into the blade for your leading thumb, which is the detail I did not expect to care about and then cared about a lot around hour two of the shower. Points on both ends means you flip the tool at an inside corner instead of contorting your wrist. The edge between the points is beveled and cuts on the push and the pull.
On the shower corners it severed the silicone cleanly on the first pull, every time. I pulled one unbroken ribbon of gray silicone out of a six-foot vertical corner, which is the outcome you want and rarely get. On the painted window casings it dug the latex out of the joint without tearing the casing edge, once I had scored the paint film first with a utility knife.
Three real weaknesses. The steel scratches acrylic and fiberglass, full stop, and the test scratch behind the toilet is still there. The points are sharp and unguarded, so the tool wants respect and a dedicated spot in the drawer rather than a loose rummage. And the blade is too wide for a hairline joint, like the seam under a tight kitchen backsplash, where you need a razor instead.
| Spec | Value |
|---|---|
| Blade | Bent high-carbon steel, riveted to nylon handle |
| Points | Two, one at each end |
| Works on | Silicone, latex, acrylic caulk; also mortar and grout |
| Safe on acrylic and fiberglass | No |
| Approx. price | $9–$12 |
Buy it if: your caulk is on tile, porcelain, or painted wood, and you want one tool that will still be in the drawer in ten years. Skip it if: every joint in your bathroom meets an acrylic tub or a fiberglass surround.
2. Homax Caulk Remover Tool 2407, Best for Acrylic Tubs and Tile
The tool that saves you from your own top pick.
Everything about it is built around the tub-to-tile corner. The body is angled so the working end lies almost flat against the tub lip while your hand clears the wall tile. One end is a sharpened plastic point that splits the bead. The other is a curved point that hooks under the split halves and lifts them out. Two motions, one tool, no metal anywhere near the acrylic.
On the 1978 tub surround it did the whole first bead cleanly. Where it struggled was the second bead underneath, the one a previous owner had laid over the original without removing anything. That lower layer was older, harder, and bonded to both faces, and the plastic point flexed against it instead of cutting. I finished that section with a razor blade held nearly flat, which is the correct save on acrylic. The plastic point also visibly dulled by the end of the job and there is no way to bring it back.
Verdict: buy it alongside the Dig-it, not instead of it. Around $5, and it is the only thing in the test I would hand to someone recaulking a fiberglass shower with no supervision.
3. Dremel MM610 Flexible Scraper, Best for Whole Bathrooms and Long Runs
Twenty-two feet of shower corner is the line where hand tools stop making sense.
The MM610 is a flexible steel scraper blade, roughly two inches wide, for oscillating multi-tools. The flexibility is the feature. A rigid blade chatters across the curve of a tub lip and skips out of the joint; the flexible one conforms and stays cutting. Dremel lists it as compatible with Dremel, Bosch, Makita, Milwaukee, and Rockwell oscillating tools, which means most people who already own one of those already own the driver. The exception called out is the Fein MultiMaster FMM250.
The shower took about twenty minutes standing up. By hand it would have been most of an afternoon on my knees. The blade walks along the corner, the old silicone comes off in a continuous curl, and you move on. On the exterior siding joints it was the same story over thirty feet: the brittle acrylic latex came out in long sections rather than the chips a hand point produces. That run is usually the opening move of a repaint, and the exterior wood guide covers what comes after the joints are open.
Speed is also the danger. The tool moves faster than your reflexes, and a slip against an acrylic tub or a glass shower panel gouges it before you have registered what happened. Keep it off soft surfaces entirely. It also throws small crumbs of old silicone across the room at a surprising rate, so wear eye protection and plan on vacuuming.
Buy it if: you have a full bathroom, a whole-house exterior joint run, or you already own an oscillating tool for other work. The blade is around $15. Skip it if: the job is one window. The blade alone is not the purchase, and the tool underneath it is not worth buying for a single bead.
4. Hyde Caulk Aid 43660, Best All-in-One for a Single Recaulk
Four dollars and change buys removal blades, a corner point, a cartridge tube cutter, and a padded bead smoother on one plastic body.
I keep recommending this one to people who are recaulking a single kitchen sink or one bathroom window, because it covers the whole task. You are going to need to cut the cartridge tip anyway. You are going to need to tool the fresh bead, and the padded end does a better job than a wet fingertip, especially on silicone where a fingertip drags. Having those on the same body as the removal end means one purchase and one thing to lose.
Where it runs out is cured silicone. The high-impact plastic blades have no leverage against an elastic bead and they round off fast. A single tiled shower wore one visibly flat.
Verdict: the right buy for a one-joint job and for the bead-tooling step on every job after that. Not the tool for a bathroom full of old silicone.
5. Hyde 17-in-1 06985, Best Crossover for Painted Trim
Painted-over caulk is a different problem, and the tool that solves it is usually already in your pocket.
The 17-in-1 has a crack-opening point that fits into a trim joint after you have scored the paint film, and a contour scraper edge that cleans up the residue the point leaves. On the twelve window casings it dug the painted latex out of the joint without chewing the wood edge, then scraped the joint faces clean in the same pass. That saved a trip back to the truck, which is the whole argument for a multi-tool.
It stalls on silicone. The point is blunter than the Dig-it and the body is too thick for a tub joint under about a quarter inch.
Buy it if: you are painting anyway and the caulk work is a step in that job rather than the job itself. Around $14.
What We Tried and Left Out
- Caulk remover gels. DAP Caulk-Be-Gone softens cured latex well and does nothing to silicone. Worth buying for painted-over latex on trim; do not buy it expecting to melt a shower bead.
- The wet-finger-and-a-butter-knife method. People do this. It bends the knife, scratches the tub, and leaves half the bead in the joint.
- Dedicated caulk removal blades on a razor scraper. They work, but a plain fresh razor blade held flat does the same thing for a fraction of the price, and the razor is what you need for the residue pass anyway.
- Heat. A heat gun will soften latex caulk and help on painted trim. On silicone it does very little, and around an acrylic tub it warps the surface faster than it loosens the bead.
- Oscillating grout blades used on caulk. Carbide grout blades are made for hard, brittle material. On elastic silicone they load up and stop cutting within a foot.
Getting the Joint Clean Enough to Recaulk
This is the step that decides whether your work lasts five years or five months.
Shave the faces. After the bulk is out, run a fresh razor blade nearly flat along each face of the joint. Every removal tool leaves a thin film of silicone bonded to the tile and the tub lip, and it is close to invisible. New silicone will not stick to old silicone film. It stacks on top, cures, and peels off in one sheet the first time the tub flexes under someone’s weight.
Solvent wipe. Denatured alcohol or mineral spirits on a clean rag for silicone residue. Warm water and dish soap for latex and acrylic. Wipe, then wipe again with a dry rag, then let it flash off completely. Wet joints are the second most common cause of adhesion failure.
Kill the mildew. If the old bead was stained black, the mold is in the grout and the substrate, not only in the caulk. A bleach solution at about one part bleach to three parts water, left on for ten minutes and rinsed, gets it. Skip this and the new white bead goes gray in a season.
Dry time before the new bead. Give a shower a full 24 hours with the fan running before you recaulk, longer in a humid climate. Silicone cures by pulling moisture from the air, and a soaked substrate under it causes a skin that looks cured over a bead that is not. Humidity stretches every cure window in a bathroom, which the paint drying times chart spells out for coatings and applies just as well here.
Tape both sides. A strip of tape along each face gives you a bead with two clean lines instead of a smear. Pull the tape while the caulk is still wet, at a shallow angle, immediately after tooling. The painter’s tape round-up covers which tapes release cleanly off tile without leaving adhesive.
Then tool the bead once, in one pass, and leave it alone. Going back over a setting bead is how you get the lumpy look.
Mistakes That Turn an Hour into a Weekend
- Recaulking over the old bead. The single most common one. The new caulk bonds to the failing old caulk and fails with it, usually within a season. There is no version of this that works.
- Steel on an acrylic tub. Permanent scratches on the most visible surface in the room. Check what your tub is made of before you pick up a tool; if a knuckle rap sounds hollow and plasticky, it is acrylic.
- Skipping the utility knife on painted trim. Digging painted-over caulk out without scoring the paint film first tears the paint edge on both sides, and now you are repainting the casing.
- Stopping at the visible caulk. Brittle exterior acrylic breaks off flush with the joint face and leaves the deep bond intact. Run a point down into the joint and confirm it is empty before you reload.
- Not shaving the residue film. Invisible, and the reason most DIY recaulks fail at the six-month mark. Razor, flat, both faces.
- Recaulking a wet joint. Silicone needs a dry substrate. A shower used that morning is not dry, however dry it looks.
- Buying a plastic tool for a silicone job. Plastic is for surface protection, not for cutting. If your bead is silicone and your surface is tile, buy steel and stop fighting the tool.
What to Buy for Your Job
One window or one sink, on any surface: the Hyde Caulk Aid at about $5. It removes the bead and tools the new one.
A tiled bathroom with silicone joints: the Hyde Dig-it at about $9, plus the Homax at about $5 for any acrylic or fiberglass the steel cannot touch. Fifteen dollars, and it is the combination I would use on my own house.
A full shower surround, a whole-house exterior joint run, or anything past fifteen linear feet: the Dremel MM610 blade in an oscillating tool you already own. If you do not own one, borrow one before you buy one.
Painting the trim anyway: the 17-in-1 handles the caulk as part of that job, and you were carrying it regardless. For what goes back into the joint afterward, see the caulk round-up, because the wrong caulk on an exterior siding joint fails just as fast as a bad removal.
Ask a Question