Why Painted Furniture Chips on Edges (and How to Prevent It)
Painted furniture chipping on edges almost always means skipped prep on a slick factory finish. Diagnose the cause, repair the chips, and seal it so the paint actually holds.

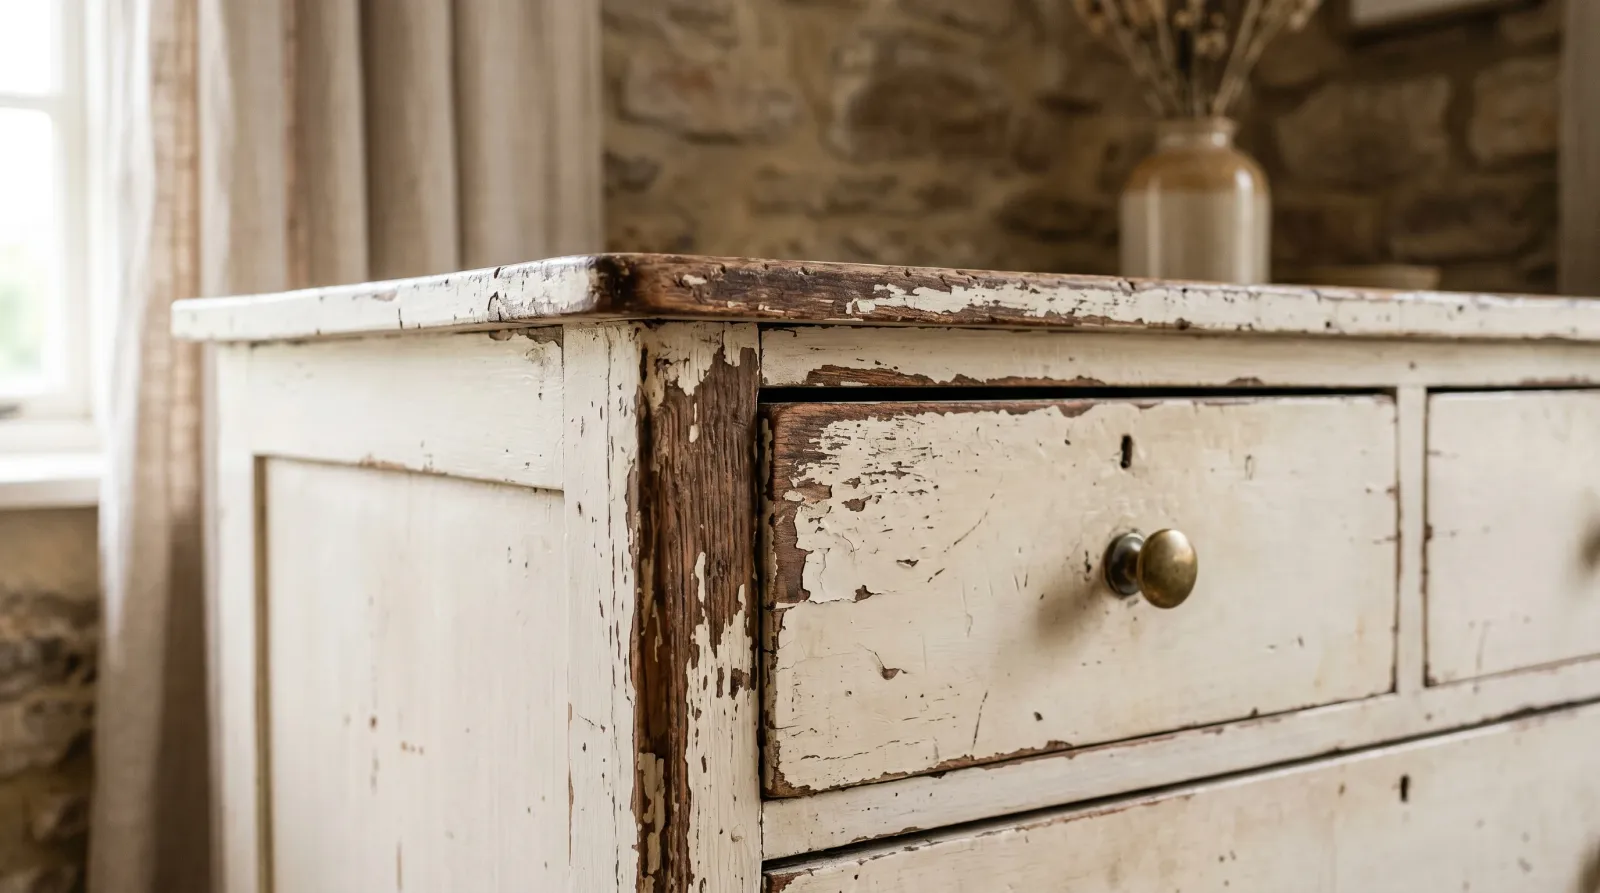
Painted furniture chips on edges because the paint never bonded to what’s underneath. Almost every time, it’s a slick factory finish that got painted over without a scuff. The paint dried into a hard shell sitting on top of a glossy surface, and the first knock to a corner pops it loose. Fix the bond and the chipping stops.
Does This Match What You’re Seeing?
Look at what’s under the chip. That tells you the cause.
- Chips peel down to a slick, colored original finish. Intercoat failure. You painted over a factory sheen with no sanding or bonding primer. The most common one by far.
- Chips lift down to bare brown wood or pale MDF. No primer at all. Bare substrate pulled the binder out of the paint and the bond is weak.
- Paint flakes off in small hard chips only on edges and corners. Thin film plus high wear. The flats are fine because they don’t get touched.
- Paint stays gummy under the chip and stretches instead of snapping. Not chipping. That’s an uncured or tacky finish, a different problem. See how to fix tacky painted furniture →.
- Whole sheets lift off a glossy table top or a dresser side. Slick laminate or conversion varnish with zero adhesion. Worst case, but fixable.
If the chip exposes a previous coat of paint that’s also loose, you have two failed layers and you’re going down to the substrate.
How Serious Is This?
Cosmetic and mechanical, not structural. The furniture is fine. The finish failed. You can use a chipping dresser for years and nothing bad happens beyond it looking rough and shedding paint flakes.
The fix is a one-evening job on a small piece, a weekend on a full dresser or table. The only thing that pushes it past easy is the substrate underneath. A slick laminate top or a piece with a conversion varnish needs a real bonding primer, and skipping that step is why the first paint job failed. Pre-1978 furniture is rare, but a painted antique can carry lead in the old finish. Test it before you sand.
Why This Is Happening (root Cause)
Three things cause furniture paint to chip on edges. They stack.
The bond was never there. Factory furniture comes coated with a slick, cured finish built to repel everything. Conversion varnish, catalyzed lacquer, melamine, a laminate skin. Paint needs a rough, porous, dull surface to grab. Roll latex or chalk paint straight onto that gloss and it forms a film that sits on the surface like a sticker. It holds on the flats where nothing touches it. The second an edge takes a hit, the film releases because it was never anchored. This is the cause behind most chipping I see on flipped furniture.
Edges carry the thinnest film and the most wear. Paint flows away from a sharp corner as it dries, so the edge always ends up thinner than the flat. That same edge is what a drawer drags across, what a hip catches, what a chair back rubs. Thinnest paint, hardest use. The edge is where a marginal bond shows up first.
The wrong paint or no topcoat for the job. Flat wall paint on a table top wears through in a month. Chalk paint with no wax or poly on a chair arm chalks off onto sleeves. Furniture takes abrasion that walls never see. The coating has to be built for handling, or it won’t last.
Run one test before you fix anything. Press a strip of painter’s tape hard onto a sound-looking painted area, then rip it off fast. If paint lifts with the tape, the whole finish is marginal, not just the chipped spots. Plan to strip or scuff the entire piece, not patch it.
The Fix
Step 1. Test and Knock Off the Loose Paint
Do the tape test above first. Then take a flexible putty knife and lift every chip that’s already loose or lifting at the edge. Anything that releases under light pressure is failing. Get it off now so you’re not painting over a chip that’s going to pop next month. Don’t gouge sound paint loose. If it’s stuck, leave it.
On a pre-1978 painted antique, wet-sand only and test for lead first with 3M LeadCheck swabs. Old furniture finishes can carry lead. Don’t dry-sand them.
Step 2. Scuff the Whole Piece Dull
This is the step that was skipped the first time. Sand every surface you’ll paint with 150 grit, then 220, until the sheen is gone and the surface feels dull and slightly rough under your hand. You’re not removing the finish. You’re scratching it so primer can bite. Feather the chip edges flush while you’re at it. Sand each one until your fingertip can’t feel the step between bare spot and surrounding paint.
For a glassy conversion varnish or laminate that resists sanding, wipe it down first with a liquid deglosser like Klean-Strip Easy Liquid Sander, then scuff. Wipe all the dust off with a tack cloth or a damp microfiber and let it dry.
Step 3. Prime With a Bonding Primer
This is the fix. A bonding primer is built to grip slick, glossy surfaces that regular primer slides off. Use INSL-X STIX or Zinsser Bulls Eye 1-2-3 on most factory finishes and laminate. For a glassy melamine, a heavily stained piece, or anything bleeding through, Zinsser BIN (shellac) grips and seals in one coat.
One thin, even coat. Cut your edges in by hand. STIX needs roughly 1 hour to dry to recoat and cures hard over about 7 days. BIN recoats in about 45 minutes. Don’t skip this and don’t substitute a wall primer. Wall primer doesn’t have the adhesion resins, and that’s how the last finish failed.
If you want to read why these grip when standard primer won’t, see what bonding primer is and when you need it →.
Step 4. Paint With a Furniture-Grade Finish
Topcoat with a paint built for handling, not flat wall paint. An acrylic-alkyd hybrid enamel like Benjamin Moore Advance or Sherwin-Williams Emerald Urethane levels like oil, dries hard, and takes abrasion. Two thin coats, not one thick one. Thin coats cure harder and cover the edges more evenly than a heavy coat that sags off the corner.
Chalk paint works too on lower-wear pieces if you scuffed and primed first. It needs a topcoat. Wax for a soft look on a low-touch piece, water-based polyurethane on anything that gets daily use. For the round-up of what holds up, see the best furniture paint picks → and the best chalk paints →.
Step 5. Let It Actually Cure Before Use
Dry to touch is not cured. Most furniture enamels feel dry in a few hours and don’t reach full hardness for 7 to 30 days. This is the step everyone rushes. Stack books on a freshly painted shelf at day two and you’ll print the spines into the finish. Let drawers and doors cure a full week before normal use, longer before anything heavy sits on a flat surface. The chipping you were fixing often comes back because the first coat got used before it hardened.
Safety
Cross-ventilate while sanding, priming, and painting. Shellac primers like BIN throw alcohol fumes; open a window. N95 during sanding, P100 if the piece is pre-1978. Never mix a chemical deglosser or stripper with bleach. Gloves and eye protection with any liquid sander or stripper.
How Do You Keep Painted Furniture From Chipping?
Prevention is the prep you skip when you’re in a hurry.
- Always scuff a factory finish. No-prep paint is a marketing line on a sealed surface. 220 grit until dull, every time.
- Use a bonding primer on anything slick. Laminate, melamine, conversion varnish, a previous gloss coat. This single step prevents most chipping.
- Pick a furniture-grade topcoat. Acrylic-alkyd hybrid enamel or chalk paint with a poly topcoat. Flat wall paint belongs on walls.
- Two thin coats, not one thick one. Thin coats build a harder, more even film, especially on edges where paint wants to run thin.
- Round or ease sharp edges slightly during sanding. A knife-sharp corner can’t hold paint. A softened edge can.
- Let it cure before you use it. A week minimum on anything that gets handled, longer for shelf surfaces.
When to Call a Pro (or Walk Away)
- Pre-1978 painted furniture that tests positive for lead. Don’t dry-sand it. Hire someone set up for safe removal, or leave the old finish sealed under a bonding primer.
- Veneer that’s lifting or bubbling, not just chipping paint. That’s a substrate repair, not a paint job.
- A high-value antique. Sanding and repainting kills the value. Talk to a restorer first.
- A laminate piece where paint sheets off no matter what you try. Some melamine resists every consumer primer. A pro with an industrial conversion coating, or a new piece, beats fighting it.
FAQ
Can I just paint over the chipped spots?
Only if you feather them first. Sand each chip edge with 220 grit until the step between bare spot and old paint is flush under your fingertip, then spot-prime with a bonding primer and recoat. On a small piece, recoat the whole panel so the patch doesn’t show under raking light.
Will STIX work on laminate furniture?
Yes. INSL-X STIX is built for slick surfaces like laminate, melamine, and tile. Scuff the laminate dull first, wipe it clean, then one thin coat of STIX. For an extra-glossy melamine, Zinsser BIN grips even harder. See fixing paint that peels off laminate → for the full laminate sequence.
Why does my trim chip the same way as my furniture?
Same cause. Slick old finish, no scuff, no bonding primer. The fix is identical: dull it, bond-prime it, recoat with a hard enamel. See how to fix adhesion failure on trim →.
What’ll Bite You in Two Years
If you patch the chips but never sanded and bond-primed the whole piece, the rest of that finish is living on borrowed time. The tape test told you whether the bond was marginal. If it lifted anywhere, the chips you fixed are the first of many. Scuff and bond-prime the entire piece now, or you’ll be sanding this dresser again in two summers with a different chip in a different corner.