DIY Lead-Safe Practices (RRP-Exempt Scenarios)
Which pre-1978 paint jobs are RRP-exempt for DIY, how to confirm yours qualifies, and the wet-work, containment, and HEPA cleanup that keep lead dust off your family.

If your house went up before 1978, assume the old paint is lead until a swab says otherwise. The EPA’s RRP rule that scares everyone regulates paid contractors, not the owner working on their own home. That exemption is real, and it’s the single most misread thing in home renovation. It excuses you from the paperwork. It does not make the dust safe.
This page is about that gap. Which jobs are genuinely RRP-exempt for a DIY homeowner, how to confirm yours is one of them, and how to work so the lead never ends up in your kid’s bloodstream.
Does This Match What You’re Seeing?
Before you decide whether you’re exempt, figure out what you’re actually dealing with. The hazard isn’t the paint sitting on the wall. It’s the dust and chips you make when you disturb it.
- Intact, sound paint you only want to repaint: lowest risk. A bonded lead film isn’t shedding dust. Clean, scuff-sand wet, prime, topcoat. You may not need to remove anything.
- Peeling, chalking, or alligatored old paint: this is already releasing lead. Every flake on the windowsill is a chip a toddler can mouth. Containment matters before you touch it.
- Friction surfaces (window sashes, jambs, door edges): the worst offenders. Painted surfaces that rub create fine lead dust on their own, no tools required. Old double-hung windows are the classic lead-dust factory.
- A small repair under a doorknob or one patch of trim: likely under the de minimis size and a candidate for the exemption. Still wet-work it.
- A whole room, full window replacement, or siding strip: over the line. Treat it like the rule applies whether or not it legally does.
If you can’t tell whether the paint is lead, stop and test. Don’t guess on a pre-1978 house.
How Serious Is This?
Serious enough that the federal government built a whole certification program around it. Lead is a cumulative neurotoxin. There’s no safe blood level in children, and the damage doesn’t reverse. A renovation that releases lead dust into a house with kids is the one paint mistake that follows them for life.
Three things push your specific job from “manageable DIY” to “stop and rethink”:
- A child under 6 or a pregnant woman lives in the home. The DIY exemption still applies on paper for your own residence, but the entire reason to be careful just doubled. Many people in this spot should hire a certified lead-safe contractor and leave the house during the work.
- It’s a rental you own. The DIY exemption does not cover rental property. Disturbing paint in a unit you rent out makes you a regulated renovator, full stop.
- The job is large or involves window replacement. Big surface area means big dust load. This is where the de minimis exemption runs out and lead-safe work practices stop being optional.
Why This Is Confusing (root Cause)
The confusion comes from one fact people mishear. The RRP rule — Renovation, Repair, and Painting — is a worker-protection and consumer-protection regulation. It says a firm that disturbs more than 6 square feet of paint inside, or 20 square feet outside, in a pre-1978 home, must be EPA-certified, must use a certified renovator, and must follow specific containment and cleanup steps. The full explainer lives in the RRP rule explained.
The homeowner exemption is narrow. You’re exempt when you do the work yourself, on a home you own and live in, with no child under 6 and no pregnant woman residing there. Miss any one of those and you’re either regulated or you’ve lost the safety margin the rule was protecting.
Here’s what trips people up. The exemption is about who needs a license, not about whether lead dust is dangerous in your house. The dust doesn’t read the regulation. A homeowner dry-sanding a pre-1978 window casing produces the exact same lead-laden dust a contractor would, and contaminates the same carpet, the same HVAC return, the same sippy cup on the counter. The exemption saves you a $300 certification and a stack of forms. It saves you nothing on cleanup, exposure, or the long-term cost of a poisoned floor.
So the right way to read it: the RRP rule is the floor for pros. For your own family, work above that floor regardless of what the law technically requires of you.
The Fix
This is the lead-safe procedure for a DIY-exempt job. Run all of it even on the small stuff. The setup takes 30 minutes and it’s the difference between a clean repair and a lead-dust cleanup you didn’t sign up for.
Safety Rule Block
Wet-work only. No dry sanding, no power sanding without a HEPA-shrouded sander, no heat guns over 1,100°F, no open flame, no torches. Those vaporize or aerosolize lead. P100 respirator, not N95. Disposable coveralls and shoe covers you take off at the door. Keep kids, pregnant women, and pets out of the work zone and out of the cleanup path entirely. And never mix any cleaning chemicals — bleach with ammonia, vinegar, or hydrogen peroxide all produce toxic gas. Plain detergent does the job here.
Step 1. Test First
Use 3M LeadCheck swabs or a D-Lead test kit from any home center, around $10 to $30. Cut a notch through every layer of paint down to the substrate so the swab reads all the coats, not just the newest one. Swab each layer. A pink or red reaction means lead. If it’s negative on every layer and every spot, you can work normally. Pick from the best lead test kits and read the full method in the pre-1978 lead test guide.
Test multiple spots. Old houses got repainted in patches over decades, and one window can be lead while the one next to it isn’t.
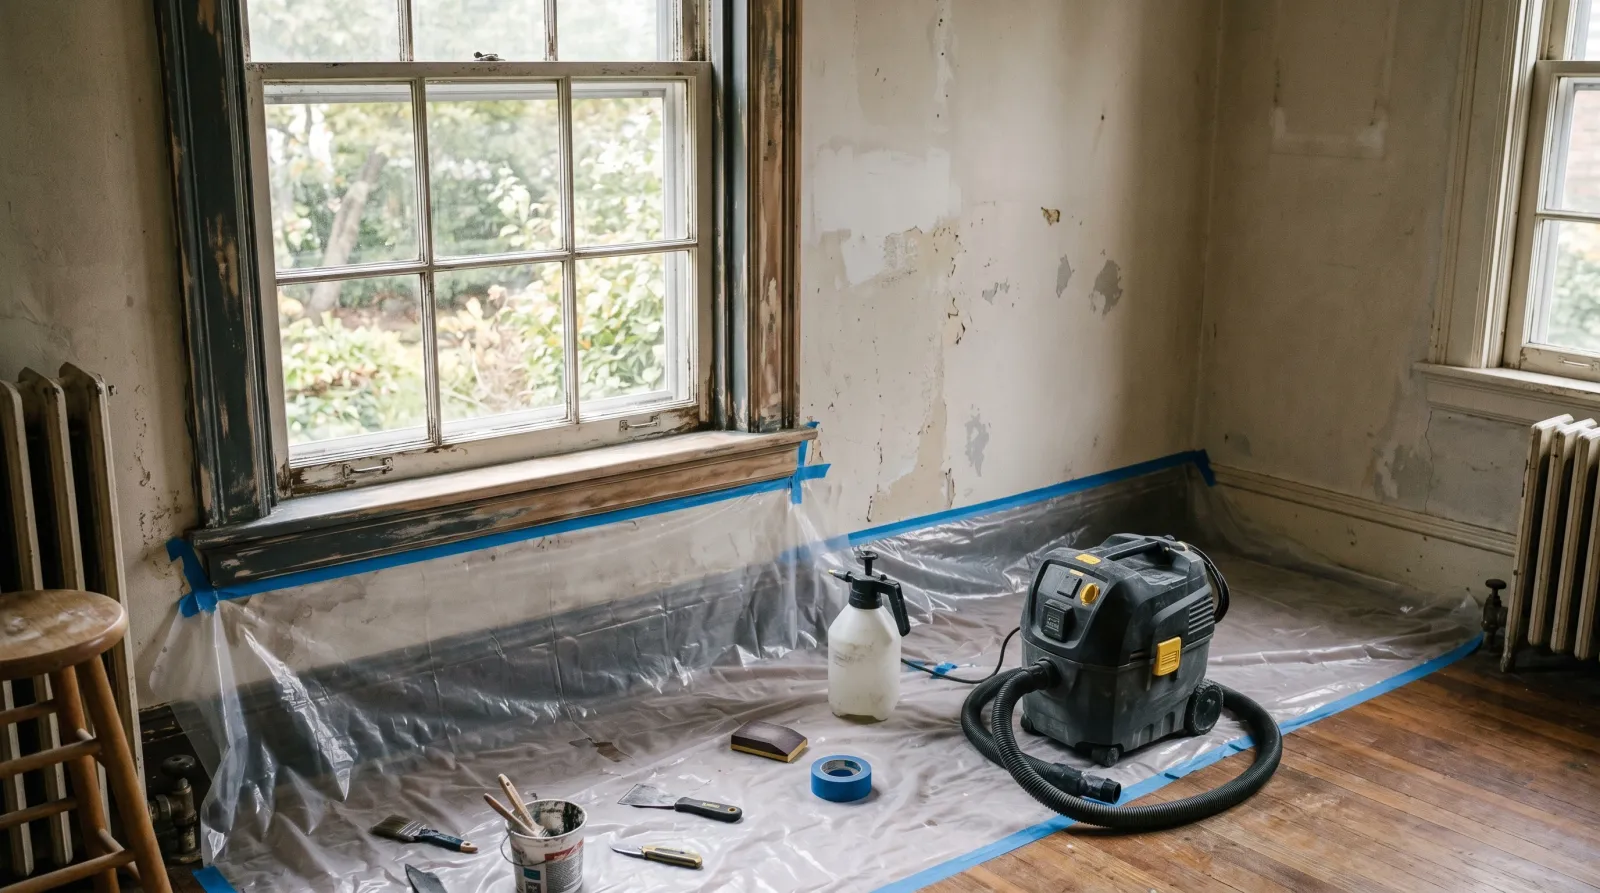
Step 2. Contain the Work Zone
Lay 6-mil plastic sheeting on the floor, extending at least 5 feet out from the work surface inside, 10 feet outside. Tape the edges down. Close and tape over HVAC vents and returns in the room so dust doesn’t ride the ductwork through the house. Shut the door, or hang plastic in the opening. On exteriors, drop the plastic on the ground below and never work on a windy day. Chips and dust travel.
Take down curtains, move furniture out, roll up rugs. Anything porous that stays in the room becomes a lead reservoir you can’t fully clean later.
Step 3. Mist, Then Scrape
Fill a spray bottle with water and a few drops of dish soap. Mist the surface until it’s visibly wet, then scrape with a sharp carbide pull scraper held at about 30 degrees. Keep it damp the whole time. Wet paint releases as heavy chips that fall straight onto your plastic instead of becoming airborne dust. Re-mist constantly. The second a section dries out, you’re making dust.
For edges that need smoothing, wet-sand by hand with a wet sanding sponge, or use a sander fitted with a HEPA dust-extraction shroud. No bare orbital sanders. See the breakdown of methods in the lead paint removal guide and the tool picks in the scraper round-up.
Step 4. Bag the Debris as You Go
Don’t let chips pile up and dry. Fold the plastic inward over the debris periodically, mist again, and roll wet chips into a heavy-duty contractor bag. Double-bag it. Most municipal trash takes small amounts of residential lead-paint debris as regular waste, but check your local rules. Some areas require it tagged or taken to a household hazardous-waste site.
Step 5. HEPA Vacuum and Wet-Wipe
This is the step people skip and regret. Vacuum the entire work zone, the plastic, and a wide margin around it with a HEPA-filtered vacuum — a true HEPA unit, not a shop vac. A standard shop vac blows fine lead dust straight through the filter and back into the air. After vacuuming, wet-wipe every hard surface with disposable cloths and a detergent solution. Wipe, rinse with a fresh cloth, repeat. Then HEPA-vacuum one more time.
Mop the surrounding floors twice with clean water and a fresh mop head between passes. Throw out the cloths and the mop head. Don’t wash them with the family laundry.
Step 6. Prime and Repaint
Once the surface is clean, dry, and sound, prime. A bonding primer like Zinsser Bulls Eye 1-2-3 or INSL-X STIX locks down chalk and gives the topcoat a grip. For bare wood that’s been scraped, an oil-based primer such as Zinsser Cover Stain seals better and blocks tannin. Two topcoats of a quality acrylic. The fresh film encapsulates whatever lead remains bonded underneath, which is the whole point.
Can I Just Paint Over Lead Paint Instead?
Often, yes, and it’s the smartest play on this whole page. Intact lead paint that isn’t peeling, chalking, or on a friction surface is not releasing meaningful dust. You don’t have to remove it. Clean it with detergent, scuff it with a wet sanding sponge, prime with a bonding primer, and topcoat. That’s encapsulation, and a well-bonded paint film is a legitimate lead barrier.
The catch: encapsulation only holds if what’s underneath is sound. Paint over peeling lead and you’ve sealed a failure in place, and it’ll lift again with the lead still in it. Fix the adhesion first. The prep that makes a repaint actually hold is the same prep covered in how to fix peeling paint. And skip encapsulation entirely on window sashes and door edges, where friction grinds new dust no matter how many coats you put on. Those get replaced or properly abated.
Prevention
The work practices above keep one job clean. These habits keep lead out of the house for good.
- Don’t disturb sound lead paint at all. If it’s bonded and not on a friction surface, leave it and paint over it. The cheapest lead-safe job is the one you don’t turn into dust.
- Wet-clean window wells and sills monthly in a pre-1978 house with kids. Friction dust collects there constantly. A damp wipe with detergent, not a dry dust cloth that just redistributes it.
- Replace old double-hung windows rather than stripping them in place when the budget allows. They’re the largest single lead-dust source in most old homes.
- Never let kids near the work zone, the debris, or the cleanup. Lead poisoning in children is almost always dust ingestion, not paint chips. Hand-to-mouth on a contaminated floor is the route.
- Test your kids’ blood lead if you’ve done any disturbing work in an occupied pre-1978 home. A simple finger-stick at the pediatrician. It’s cheap and it’s the only thing that tells you whether your containment actually worked.
- Keep the P100 cartridges sealed and dated. They have a shelf life, and a clogged or expired cartridge is a false sense of safety.
When to Call a Pro
Hand it to a certified lead-safe contractor or a licensed abatement firm when any of these are true:
- A child under 6 or a pregnant woman lives in the home and the job is anything beyond a tiny repair.
- It’s a rental unit. The DIY exemption doesn’t apply, and disturbing paint there without RRP certification is a regulated violation.
- The job is large: a full room of trim, multiple windows, or an exterior siding strip.
- The paint is widely peeling or chalking and there’s a lot of it. High dust load, high exposure.
- You don’t own a true HEPA vacuum and a P100 respirator and you’re not buying them. Without that gear you can’t clean up safely, and the job isn’t worth improvising.
Abatement (permanent removal) and RRP-style renovation are different services. For a full-scale removal where the goal is to get the lead out of the house, hire an EPA-certified lead abatement contractor, not a general painter.
What’ll Bite You in Two Years
The lead dust you didn’t clean up doesn’t go anywhere. It settles into carpet, floor cracks, and the HVAC system, and it gets re-stirred every time someone vacuums with a regular machine or the furnace kicks on. A job that looked finished can keep poisoning a household for years because the cleanup was a shop vac and a broom instead of a HEPA vac and a wet wipe. The exemption let you skip the license. It never let you skip the cleanup.