The EPA RRP Rule, Explained for Homeowners
The EPA RRP rule governs how pros sand, scrape, and prep pre-1978 paint. Here is what triggers it, what it costs, and what it means for a DIY repaint.

The RRP rule is the reason a contractor quoting your 1920s house wraps the porch in plastic and shows up in a respirator to scrape one window. RRP stands for Renovation, Repair, and Painting, an EPA regulation (40 CFR Part 745, in force since April 2010) that controls how paid pros disturb paint in homes built before 1978. The trigger is simple: pre-1978 housing is presumed to contain lead paint, and any paid job that disturbs more than 6 square feet of interior surface per room (or 20 square feet outside) has to follow lead-safe work practices and be run by an EPA-certified firm.
The reason any of this exists is dust. Intact lead paint on a wall does almost nothing to you. The moment you sand, scrape, or torch it, you turn a stable solid into fine airborne particles that settle on floors, sills, and soil, where small children and pets pick them up. RRP is a containment rule first and a paint rule second.
TL;DR
- The RRP rule covers paid renovation, repair, and painting in homes and child-occupied facilities built before 1978.
- It is triggered by disturbing more than 6 sq ft inside a room or 20 sq ft outside, or by any window replacement.
- Homeowners working on their own home are exempt from the rule, though the lead hazard is the same.
- The core requirements are a certified firm, a certified renovator on site, contained work areas, and a specific cleanup-and-verification routine.
- Three methods are flat-out prohibited: open-flame burning, high-heat guns above 1100 °F, and uncontained power sanding or grinding.
- The cheapest path on stable old paint is usually to encapsulate (clean, prime, topcoat) rather than strip.
When the RRP Rule Applies
It applies when:
- A paid contractor, painter, or handyman disturbs paint in a home built before 1978.
- The work disturbs more than 6 square feet of interior painted surface in any single room.
- The work disturbs more than 20 square feet of exterior painted surface.
- Any window is removed or replaced, regardless of square footage.
- The building is a “child-occupied facility” built pre-1978 (a daycare, preschool, or kindergarten visited by the same under-six child on a regular basis).
It does not apply when:
- You are the homeowner doing the work on your own primary residence. This is the biggest point of confusion. The rule regulates the trade, not the owner.
- The surfaces have been tested and documented lead-free by a certified renovator or risk assessor.
- The job stays under the minor-repair thresholds above and uses no prohibited method.
- The structure was built in 1978 or later.
Is My House Old Enough to Worry About?
1978 is the line because that’s when lead was banned from residential paint in the U.S. Houses from the 1950s and 1960s often carry the heaviest lead loads, since pre-war “white lead” paints used lead carbonate as the primary white pigment at concentrations that would be unthinkable today. A pre-1950 house can have surfaces testing well above the 5,000 ppm (0.5% by weight) hazard threshold under several layers.
You don’t have to guess. An EPA-recognized swab kit (3M LeadCheck or D-Lead) costs about $10–25 and reads in seconds. Test the layer you plan to disturb, not just the surface. The lead is frequently in a buried 1940s coat under three later repaints, so scuff down to bare substrate at a hidden spot and swab the cut. A certified risk assessor with an XRF gun gives a quantitative reading if you want certainty before a big job.
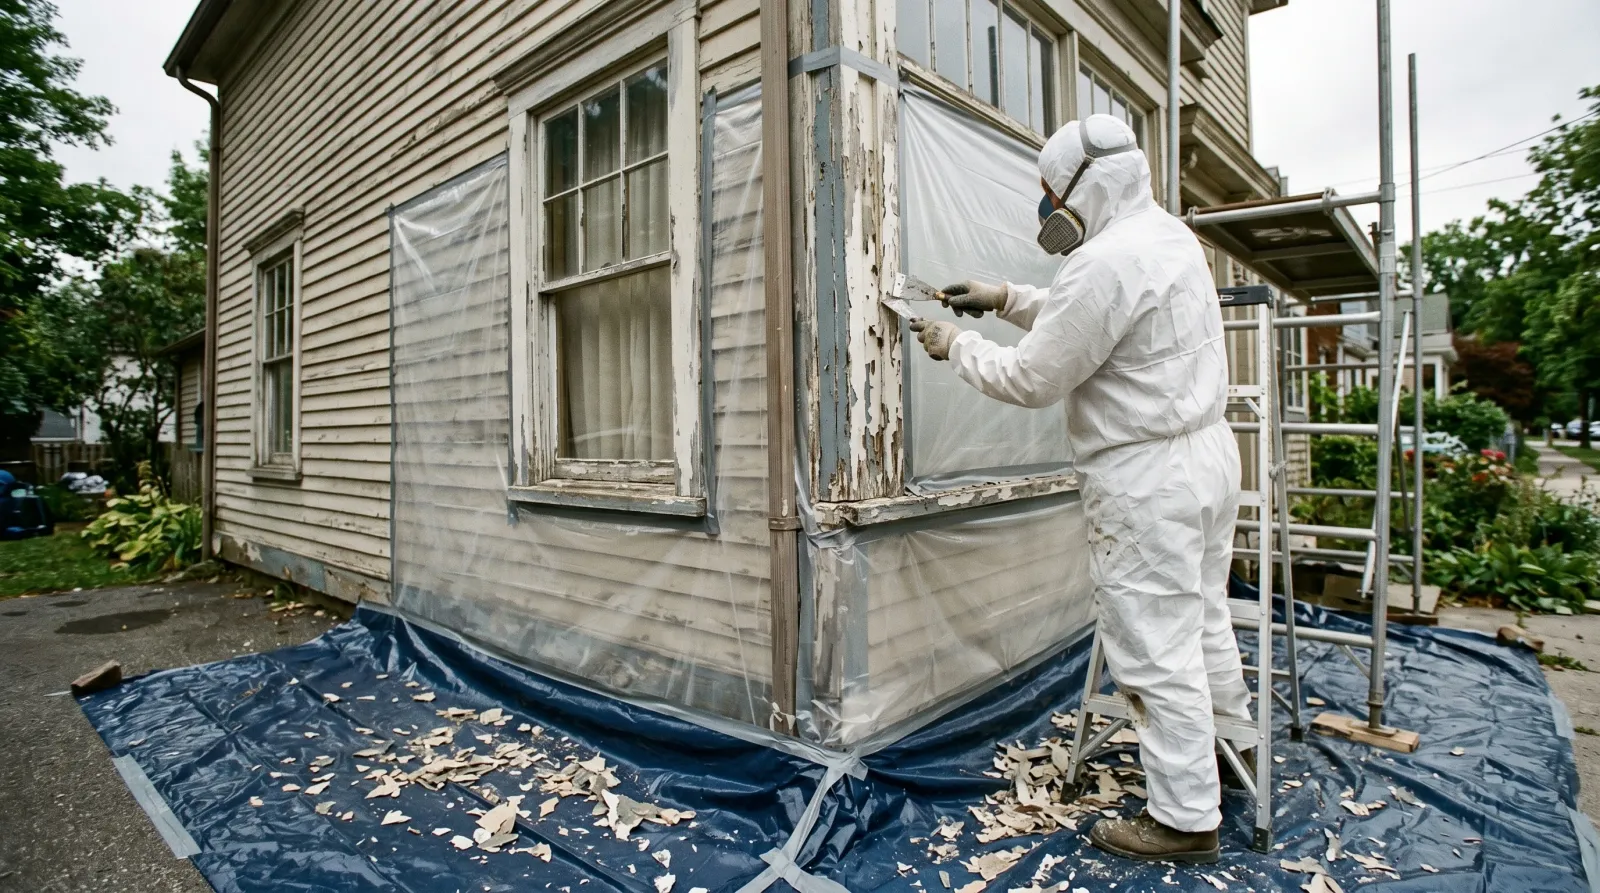
What a Certified Pro Actually Does
The rule isn’t vague encouragement. It’s a defined procedure, and a homeowner watching a real lead-safe job should see all of it.
| Step | What it looks like | Why it’s required |
|---|---|---|
| Contain | Plastic sheeting on floors and over vents; exterior poly on the ground out 10 ft | Keeps dust and chips inside the work zone |
| Disturb safely | Wet-scrape, wet-sand, or HEPA-shrouded sanders only | Stops paint from becoming airborne dust |
| Clean | HEPA-vacuum, then wet-wipe every surface | HEPA filters trap sub-micron lead particles |
| Verify | White-glove or cleaning-verification wipe vs. EPA card | Confirms the dust load is back to safe |
| Document | Records kept 3 years; client given the Renovate Right pamphlet | EPA can audit; fines run to ~$37,500/day |
The certified-firm and certified-renovator pieces are separate. The firm holds an EPA certification (a paperwork-and-fee credential). The renovator is an individual who took an 8-hour accredited course and supervises the lead-safe practices on site. A legitimate contractor can show you both.
Methods the RRP Rule Bans Outright
Three prep methods are prohibited on lead surfaces because they generate the most hazardous dust or fume:
- Open-flame burning or torching. Vaporizes lead into a fume you breathe directly. Never legal on lead paint.
- Heat guns above 1100 °F. Same vaporization risk at the high settings people reach for on stubborn alkyd.
- Uncontained power sanding, grinding, or sandblasting. A random-orbit sander with no HEPA shroud throws an invisible cloud of lead dust across the whole room.
If you’ve read our peeling-paint repair guide, this is where the safe approach and the lead-safe approach converge: wet methods. Wet-scraping and wet-sanding keep the particles bound in water instead of floating in air, which is good practice on any old exterior even when lead isn’t confirmed.
Common Mistakes
- Assuming the rule binds you as a homeowner. It doesn’t. But people then skip the safe practices entirely and dry-sand lead paint over a play area, which is the actual hazard the rule was written to prevent.
- Swabbing only the top coat. A negative on the newest layer means little when the lead is in a 1945 coat underneath. Cut down and test the layer you’ll disturb.
- Stripping when you could encapsulate. Aggressive removal creates the dust. Stable, adhered lead paint is safest left in place under a fresh, well-bonded film. Clean it, scuff-prime with a bonding primer, and topcoat.
- Hiring an uncertified “cash” painter for an old house. No containment, no HEPA cleanup, no verification, and the lead dust stays in your home long after the crew leaves. Ask for the firm’s EPA certification number.
- Dry-sweeping the chips. A broom resuspends fine lead dust. HEPA-vacuum and wet-wipe instead.
 Wet-scraping over contained sheeting is the core of every lead-safe job — chips fall onto plastic, not into the soil.
What This Means for a DIY Repaint
You’re exempt, so nothing legally requires the plastic and the respirator. The chemistry of the hazard doesn’t care about that exemption. If your pre-1978 trim is peeling and you’re prepping it yourself, treat it as if it’s lead until a swab says otherwise. Mist the surface with water before you scrape, catch the chips on plastic, wear an N100 or P100 respirator (an N95 won’t stop lead-laden fume), and HEPA-vacuum plus wet-wipe when you’re done. Keep kids and pregnant women out of the area until cleanup is finished.
On a sound surface, the better move is to skip removal. Lead paint that’s tightly adhered and not chalking is a low exposure risk. De-gloss it by hand with a damp 220-grit pad, prime with a bonding primer, and topcoat with a quality acrylic. That seals the old film in place. For the prep mechanics on aged exterior boards, our exterior wood guide covers feathering edges and spot-priming without chasing every flake down to bare wood.
If you’re sealing an old room and worried about indoor air during the work, our explainer on VOCs in paint covers the solvent side of the same ventilation problem, and the sandpaper guide covers the abrasives that let you de-gloss without aggressive grinding.
The rule reads like bureaucracy, but every line of it traces back to one physical fact: lead is harmless on the wall and dangerous in the air. Don’t create the dust, and you’ve solved the problem the regulation was written to solve.