Epoxy vs Acrylic Countertop Kit Topcoats
Epoxy vs acrylic countertop kits compared on heat, scratch, gloss, cure time, and cost. A tester's verdict on which topcoat survives a real kitchen, by surface.

The 30-Second Answer
For a kitchen counter that gets daily use, pour epoxy. It cures glass-hard, seals the whole surface in one thick layer, and shrugs off water and scratches in a way a thin film can’t touch. For a bathroom vanity, a low-traffic counter, or a rental where you want it done by Sunday night, brush on the acrylic-urethane topcoat. It dries in hours, smells like almost nothing, and cleans up with water. The split is traffic and heat, not the room’s name. Heavy daily use and faux-stone depth go epoxy. Speed, low odor, and easy recoat go acrylic.
At a Glance
| Epoxy coating | Acrylic-urethane topcoat | |
|---|---|---|
| Type | Two-part pour-on resin | Water-based clear, brush/roll |
| Film build per coat | ~1/8-inch (thick pour) | ~2-3 mils (thin) |
| Heat resistance | Softens ~130-150°F | Softens ~120-140°F |
| Scratch resistance | High (glass-hard) | Moderate |
| Water/stain seal | Sealed, seamless | Good with 2-3 coats |
| Self-leveling | Yes (pours flat) | No (brush marks possible) |
| Look | Deep, wet, poured-stone gloss | Satin to gloss, painted-on |
| Odor / VOC | Low VOC mixed, amine smell | Low odor, low VOC |
| Cleanup | Solvent / scrape | Water |
| Working time | 20-40 min pot life | Long; recoat in 2-4h |
| Full cure | 7-30 days | 7-14 days |
| Cost (avg counter) | $80-200 kit | $30-90 kit/quart |
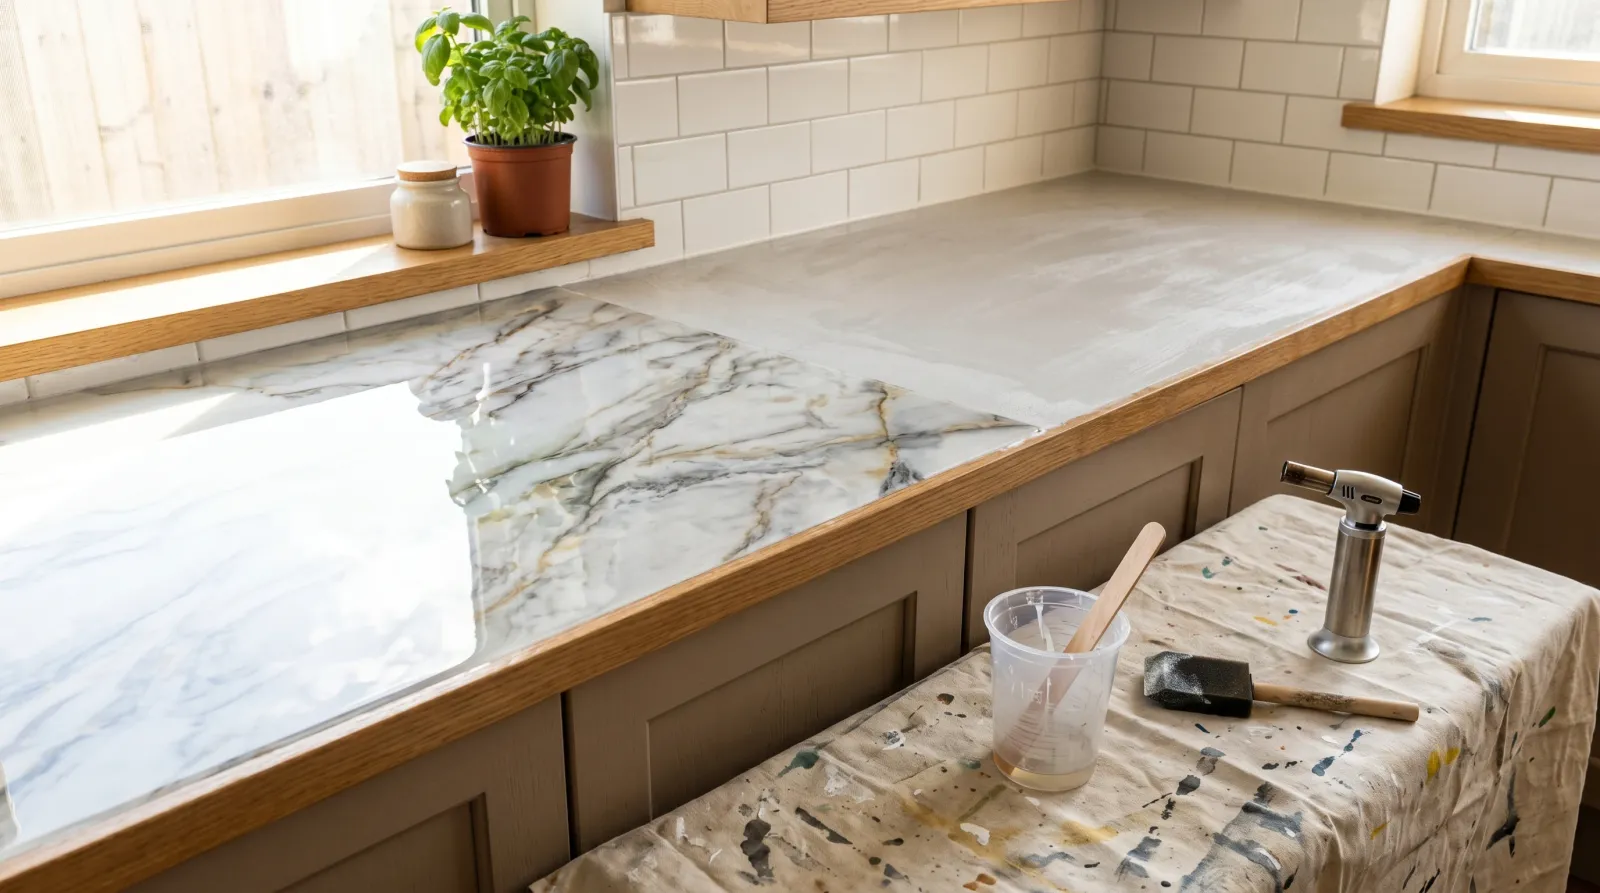
How to Tell Which One You Already Have
Walk up to the counter before you buy anything.
Run a fingernail across the surface and look at the edge. Epoxy is thick. It builds a visible rounded lip where it rolled over the front edge, the surface has real depth like glass over a photo, and it feels dead-flat with zero brush texture. Acrylic-urethane is a thin film over a base coat: faint brush texture in raking light, no edge build-up, sometimes a soft spot a nail can catch. The acetone test settles it. Dab a cotton ball with acetone (nail polish remover) in a hidden corner. Acrylic-urethane softens and may lift color onto the cotton. Cured epoxy barely reacts. Know which film you’re on before you pick a topcoat that bonds to it.
Durability
This is where the two coatings stop being interchangeable.
Epoxy pours on at roughly an eighth of an inch and cures into a single seamless slab over the substrate. There are no seams for water to creep into, no thin spots, no edges to chip. On a kitchen counter that takes daily glasses, spills, and elbow traffic, that thickness is the whole advantage. I’ve seen self-poured epoxy bar tops hold a clean gloss for years with nothing but a wipe-down. Water beads and sits; it never works its way under the film.
Acrylic-urethane is a thin protective skin, two to three mils, over a colored base coat. Done right with the full coat count it seals fine, and on a bathroom vanity that sees a toothbrush and a hand towel it lasts. Push it onto a working kitchen counter and the traffic paths dull inside a year. The film is too thin to absorb daily abuse, and once it wears through, the base coat underneath stains fast.
The edge case worth naming: epoxy is unforgiving of a bad pour. Trap a bubble, miss a spot with the torch, or pour over a contaminated surface and the defect is locked in the slab. Acrylic’s thinness is also its rescue. A worn acrylic top scuffs and recoats in an afternoon. A scratched epoxy top means sanding back the whole slab or pouring a fresh flood coat over the top.
Winner: Epoxy on a kitchen counter. Acrylic on recoat-ability.
Heat and Scratch Resistance
Both soften under heat. One survives a knife slip; the other doesn’t.
Epoxy resists scratching well. The cured surface is hard enough that everyday cutlery, plates, and the occasional dropped utensil leave it alone. It is not cut-proof, and a knife dragged with weight will mark it, but in normal use it stays glossy. Heat is the weak point. Most countertop epoxies start softening in the 130-to-150°F range, and a pan straight off the stove runs north of 200. Set one down and you’ll lift a dull white scorch ring or a soft dent that doesn’t recover. Use a trivet, every time.
Acrylic-urethane is softer on both counts. Its thin film scratches more readily, scuffs show in traffic paths, and its heat threshold sits a step lower, around 120 to 140°F. A hot mug left to sit can leave a faint ring. Neither topcoat is heatproof, so the trivet rule applies to both, but epoxy gives you more margin before damage.
Winner: Epoxy, on both heat margin and scratch.
Finish and Depth
Look is the reason a lot of people choose epoxy before they ever read a spec.
Epoxy self-levels into a flat, wet, deep gloss. Poured over a faux-marble or stone-look base, it gives that liquid-glass depth that reads like a real slab. The thickness is part of the look; light travels into the surface and back. This is the finish that sells the poured-counter videos. If you want the dramatic, expensive-looking faux stone, epoxy is the only one of the two that delivers it.
Acrylic-urethane is a protective coat, not a feature coat. It comes in satin and gloss, and a gloss acrylic over a stone-look base looks clean and finished, but it sits on the surface. It can’t fake depth, and it can show brush or roller marks if you rush the application. For a tidy, even, satin-to-gloss painted counter, it does the job. For wet-look depth, it can’t compete.
One honest mark against epoxy: without tape dams on the front edge, it drips and self-levels into uneven thickness near the edges. Acrylic lays down even everywhere because it’s brushed to a controlled film.
Winner: Epoxy for depth and drama. Acrylic for a clean, even, no-fuss finish.
Ease of Use
This is where the acrylic wins back real ground, and it matters more than the spec sheet suggests.
Acrylic-urethane is a brush-and-go topcoat. Stir, brush or roll on a thin coat, wait two to four hours, recoat, repeat for the two or three coats the kit calls for. Low odor, water cleanup, no mixing ratios, no torch, no countdown clock. A first-timer can do a vanity on a weeknight and not ruin it. Mistakes are recoverable: a thin spot or a missed area gets another coat tomorrow.
Epoxy is a project with a clock attached. You mix Part A and Part B by exact ratio, you have a 20-to-40-minute pot life before it gels in the cup, and you commit to the whole pour at once. You need tape dams on the edges, a foam brush or squeegee to spread it, and a heat gun or propane torch to pop the air bubbles before it skins over. Drips down the cabinet face, dust in the wet flood coat, and trapped bubbles are permanent if you miss them. It’s doable for a careful DIYer, but it’s a one-shot, no-undo job. That care-and-prep tradeoff starts with the base coat; the Formica laminate counter guide covers the prep both systems depend on.
Winner: Acrylic, by a wide margin, on ease and forgiveness.
Cure Time and Cost
Acrylic gets you back in service faster and usually cheaper.
An acrylic-urethane topcoat is touch-dry in hours and recoats the same day. You can use the counter gently within a day or two, with full cure (full hardness and chemical resistance) landing around 7 to 14 days. An epoxy flood coat is touch-dry overnight but stays soft for far longer; you want 24 to 72 hours before light use and a full 7-to-30-day cure before you treat it as a working kitchen surface. Use it hard too early and you’ll dent the still-soft slab. Neither is food-safe until fully cured, so prep the kitchen for a couple weeks of careful use either way.
On price, the systems overlap but tilt. An acrylic-base stone-look kit with its topcoat runs roughly $30 to $90 for an average counter; a standalone acrylic-urethane topcoat quart sits at the low end of that. A two-part epoxy countertop kit runs $80 to $200 for the same coverage because you’re buying enough resin to pour a thick layer, plus the consumables (mixing cups, foam tools, torch fuel). Square-foot for square-foot, epoxy costs more in material and far more in time.
Winner: Acrylic on both speed-to-use and cost.
Verdict by Use Case
- Pick epoxy if: it’s a kitchen counter, island, or bar top that gets daily heavy use; you want the deep poured-stone wet look; you need a fully sealed, seamless, water-tight surface; and you’re willing to do a careful one-shot pour with a torch and accept a long cure.
- Pick acrylic-urethane if: it’s a bathroom vanity, a powder room, a laundry counter, or any low-traffic surface; you’re a renter or first-timer who wants low odor and water cleanup; you need it back in service fast; or you want a finish you can scuff and recoat in an afternoon when it wears.
- It’s basically a tie when: it’s a guest-bath vanity or a rarely-used secondary counter. Both will look good and hold up. Pick acrylic for the easier, cheaper, faster path, or epoxy if you specifically want the depth and don’t mind the project.
Top Picks by Side
Going with epoxy? Most kitchen-counter epoxy lives in dedicated countertop coating kits and refinishing systems. The countertop paint kit round-up sorts the pour-on and brush-on systems by surface and durability, and for the related job of refinishing a metal appliance with a hard epoxy enamel, the best appliance epoxy paint covers that tier.
Going with acrylic? The clear acrylic-urethane topcoat is the last step of most stone-look counter kits, and the same countertop paint kit round-up is where to compare those systems. If your project is furniture-adjacent rather than a hard counter, the wax vs polycrylic topcoat comparison covers the sealer choice on painted wood, where the calculus shifts.
FAQ
Can I put a hot pan straight on an epoxy countertop? No. Most countertop epoxies soften around 130 to 150°F and a pan off the burner runs 200-plus. You’ll get a dull white scorch ring or a soft dent that never fully recovers. Epoxy resists heat better than acrylic, but neither topcoat replaces a trivet.
Do I need to topcoat an acrylic countertop kit? Usually yes. Most stone-look counter kits include a separate clear acrylic-urethane topcoat as the last step, and that topcoat does the protecting. The colored base coats stain and wear fast alone. Apply the full two or three coats the kit calls for.
Which lasts longer in a real kitchen, epoxy or acrylic? Epoxy, on heavy-use kitchen counters. The thick poured slab seals seams and resists scratching far better than a thin acrylic film. Acrylic lasts fine on a low-traffic vanity. Match the topcoat to the traffic.
Can I apply epoxy over an acrylic countertop paint kit? Sometimes. Let the acrylic base fully cure, scuff with 220-grit, wipe clean, and run a small test patch first. Fresh, uncured base can lift under the epoxy and fisheye.
Is epoxy or acrylic safer to use indoors? Acrylic-urethane is the lower-odor, water-cleanup option. Two-part epoxy is low-VOC once mixed, but the amines and the torch warrant open windows and a fan. Neither is food-safe until fully cured. See the VOC explainer for why the numbers matter indoors.
Related
- Best countertop paint kit round-up: pour-on and brush-on systems by surface
- Best appliance epoxy paint: hard epoxy enamel for metal surfaces
- How to paint Formica laminate counters: the base-coat prep both systems need
- Wax vs polycrylic topcoat: the sealer choice on painted furniture
- VOC explained: what the numbers mean on an indoor job