How to Stain a Deck
How to stain a deck the way it holds: clean, brighten, let it dry, then back-brush thin coats with the grain. Wood type, weather window, and product picks.

Most deck stain jobs fail in the same two places. The wood wasn’t dry, or somebody flooded on a coat thicker than the boards could drink. Both of those happen on day one, before the stain even goes down. Get the prep and the weather window right and the staining itself is the easy part.
So here’s the order that holds. Clean the deck. Let it dry all the way through, not just the surface. Then put down thin coats and brush them in with the grain. That’s the whole job.
What You’ll Get
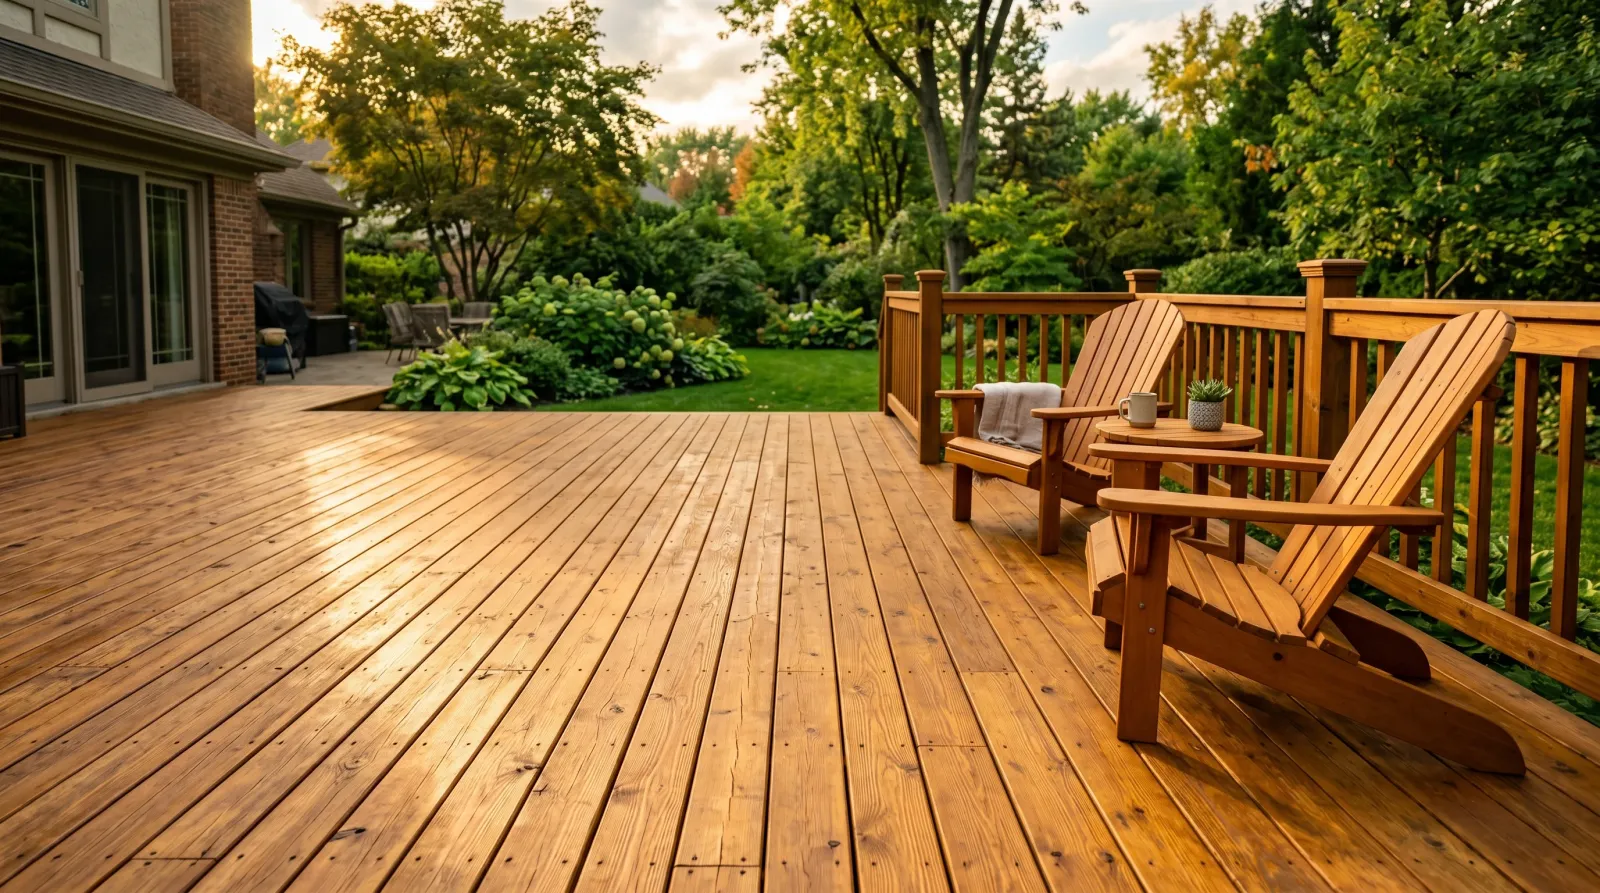
A deck that beads water, shows its grain through a warm color, and wears evenly for two or three years before it asks for a recoat. Not a painted-looking film. A finish that soaks in.
Honest Take on Difficulty and Time
This is a one-weekend job, but the weekend has a dead day in the middle. Saturday morning you clean. Then the deck has to dry, and that’s a full day or two of decent weather, no shortcut. Sunday or Monday you stain.
A 300 to 400 square foot deck is about 4 hours to clean and 4 to 6 hours to stain, railings and all. The drying is the part people rush. Don’t. A deck stained over damp wood looks fine for a week, then the stain that never soaked in starts to flake off the wear paths.
If the forecast shows rain inside 48 hours of your stain day, move the whole thing to next weekend. The wood needs dry going in and dry coming out.
What You’ll Need
Stain and Cleaner
A penetrating oil stain is what you want for a floor you walk on. Penofin, Ready Seal, and TWP 1500 all soak in and wear instead of peeling. For dense hardwood decking like ipe or mahogany, Cabot Australian Timber Oil is built for wood that won’t drink a normal stain. Match the color to how much grain you want to show: clear shows the most and protects the least, semi-transparent is the sweet spot, solid hides the grain and behaves more like paint.
A deck cleaner, and ideally a brightener too. A two-part kit like Restore-A-Deck strips the gray and old failing finish, then the brightener neutralizes it and opens the grain back up so the stain bites. For full SKU picks and how the finishes compare, see the best deck stain round-up.
Still deciding between a stain and a film? Read the paint versus stain breakdown first. On a horizontal deck, stain wins almost every time.
Tools
A pressure washer in the 1,500 to 2,500 PSI range with a 25-degree tip does the cleaning fast. No washer? A stiff deck brush, the cleaner, and a hose get there with more elbow grease. Keep the pressure off max either way; high pressure chews soft wood into fuzz.
For the boards, a stain pad on a pole or a 4-inch synthetic stain brush. For railings and balusters, a 2.5-inch angled sash brush. Picks are in the best paint brushes round-up. And buy a cheap pin-type moisture meter. It’s the one tool that tells you the deck is actually ready instead of guessing.
Step 1 — Clear It, Mask It, Check the Boards
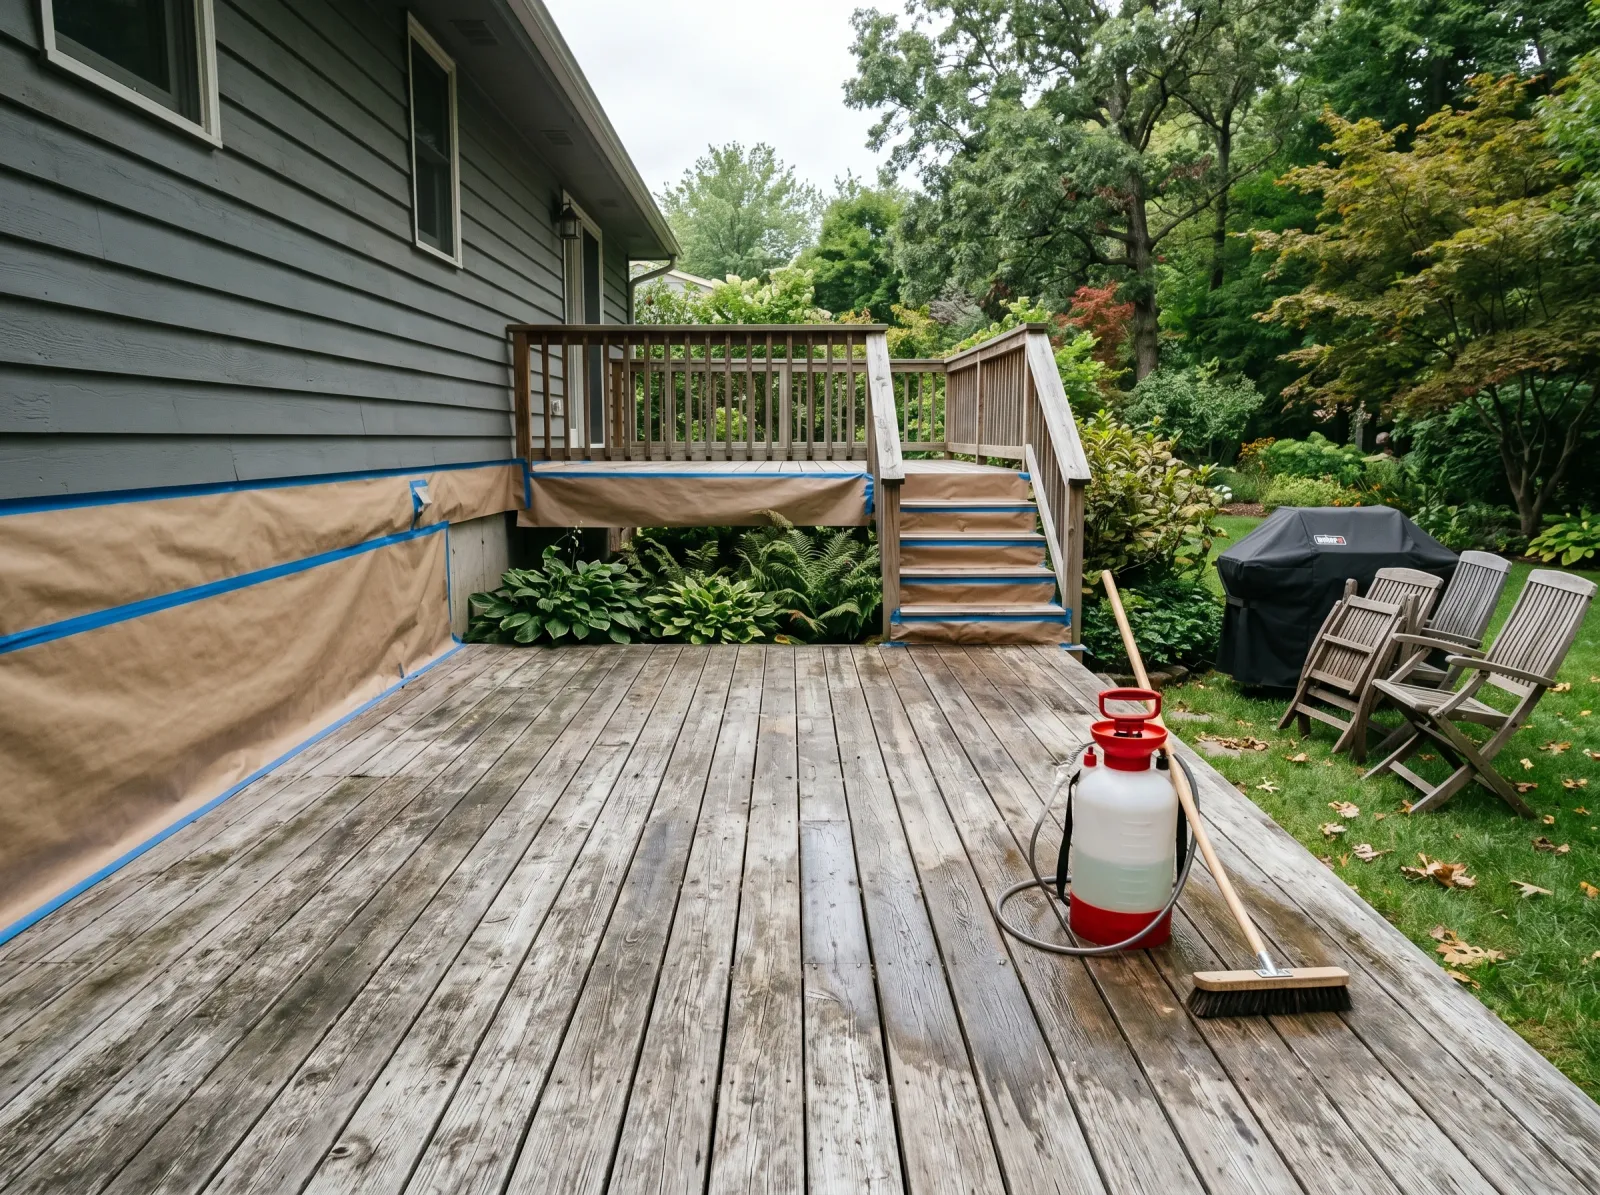
Furniture off, grill rolled away, siding and plants below masked off with rosin paper and tape.
Everything comes off the deck. Furniture, grill, planters, the doormat. Sweep out the gaps between boards with a putty knife or a stiff broom; leaves pack in there and trap moisture under your fresh stain.
Mask the house siding along the deck edge and tape rosin paper or plastic over any brick, stucco, or plants sitting below the rail. Cleaner and stain both splash.
While you’re down there, walk the deck. Set any popped nails or proud screws, replace boards that are soft or split, and feel for splinters. Fixing wood now beats staining over a problem.
Watch out for the boards right against the house. They stay shaded and damp and rot first. Press a screwdriver into a few. If it sinks in, that board needs replacing before anything else.
Step 2 — Clean and Brighten the Wood
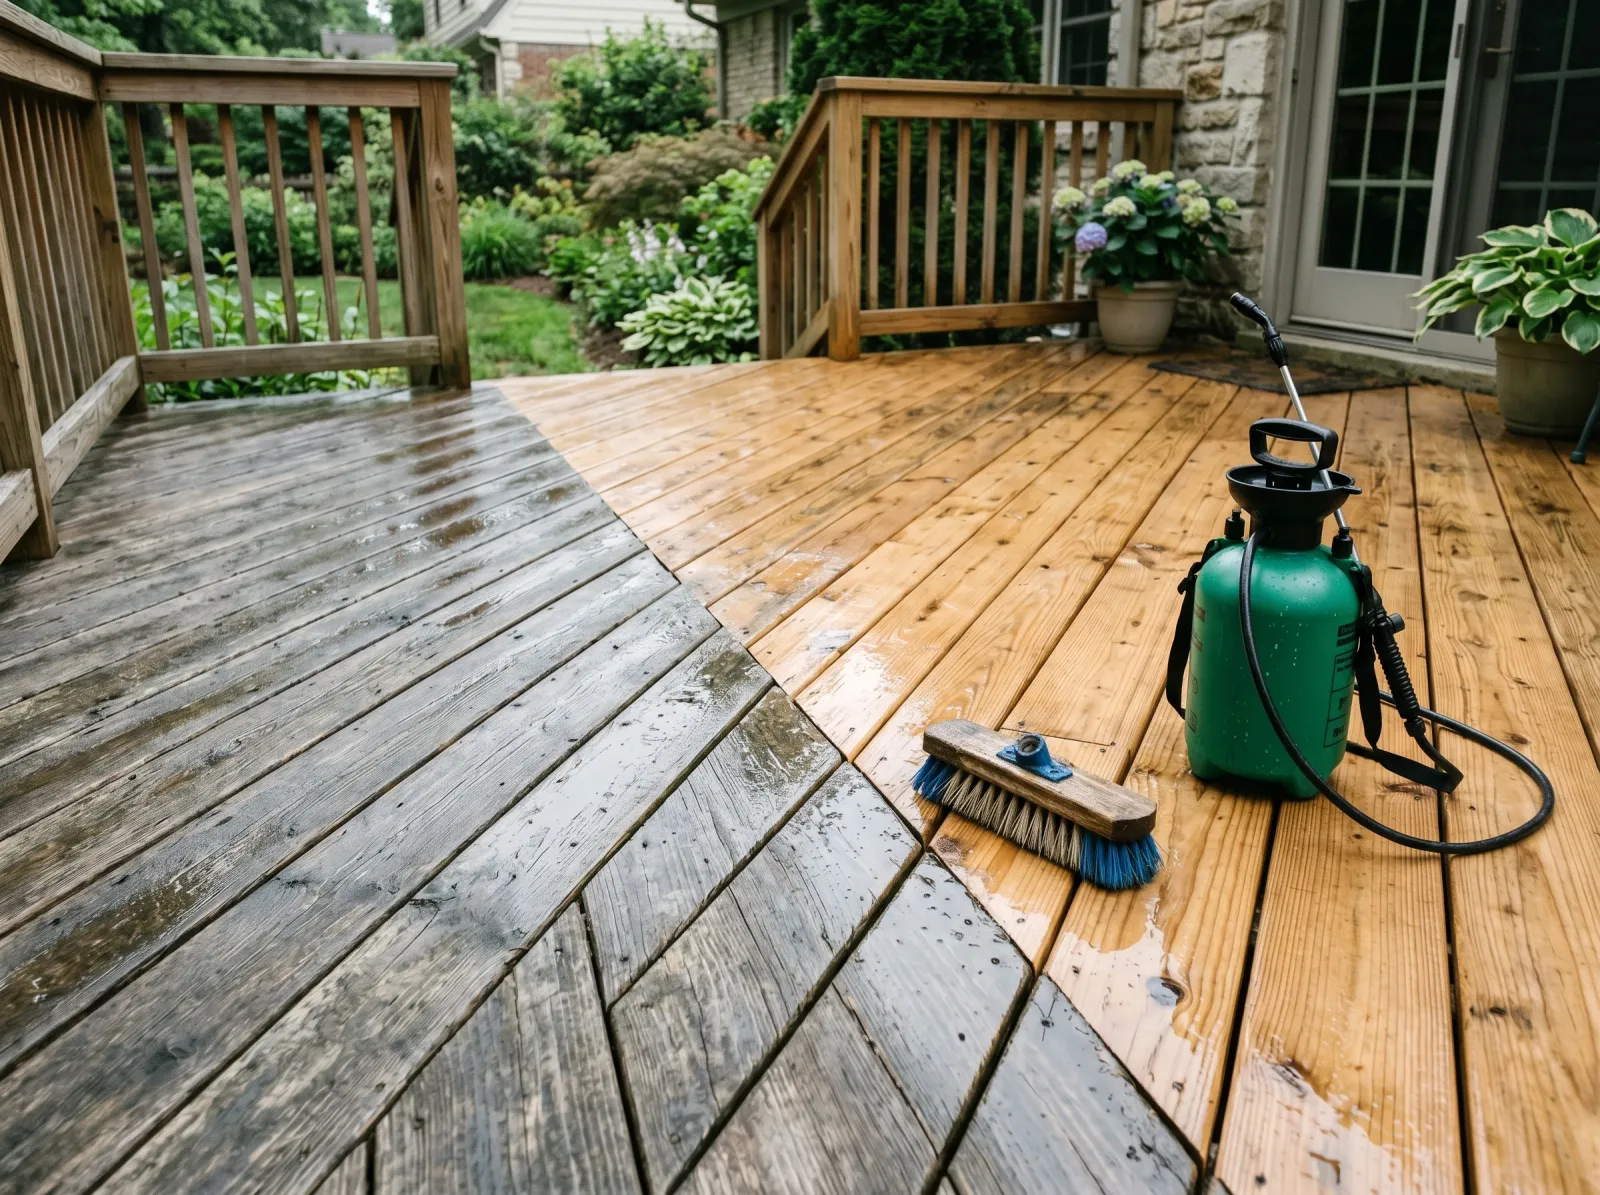
Cleaner scrubbed in, rinsed off, the gray gone and the bare wood showing its real color again.
Gray wood is dead surface fiber. Stain laid over it grabs the dead layer, not the wood, and peels with it. Cleaning strips that layer back to sound wood.
Wet the deck, then apply the cleaner with the pump sprayer and let it dwell the time on the label, usually 10 to 15 minutes. Don’t let it dry on the boards; mist it again if it starts to. Scrub with the stiff brush along the grain, then rinse. If you’re pressure washing, keep the tip moving and a foot off the wood, fanning with the grain. Stop and hold in one spot and you’ll cut a furry stripe into the board.
If your kit has a brightener, that’s the second pass. It neutralizes the cleaner and pulls the wood back toward its natural tone so the stain takes evenly. Skip it on a stripped deck and the stain can blotch.
Watch out for old solid stain or paint that’s still hanging on in patches. A cleaner won’t lift a film finish. Those spots need scraping and sanding, or the new stain sits on top of them and fails along every edge.
Step 3 — Let It Dry, Then Sand the Fuzz
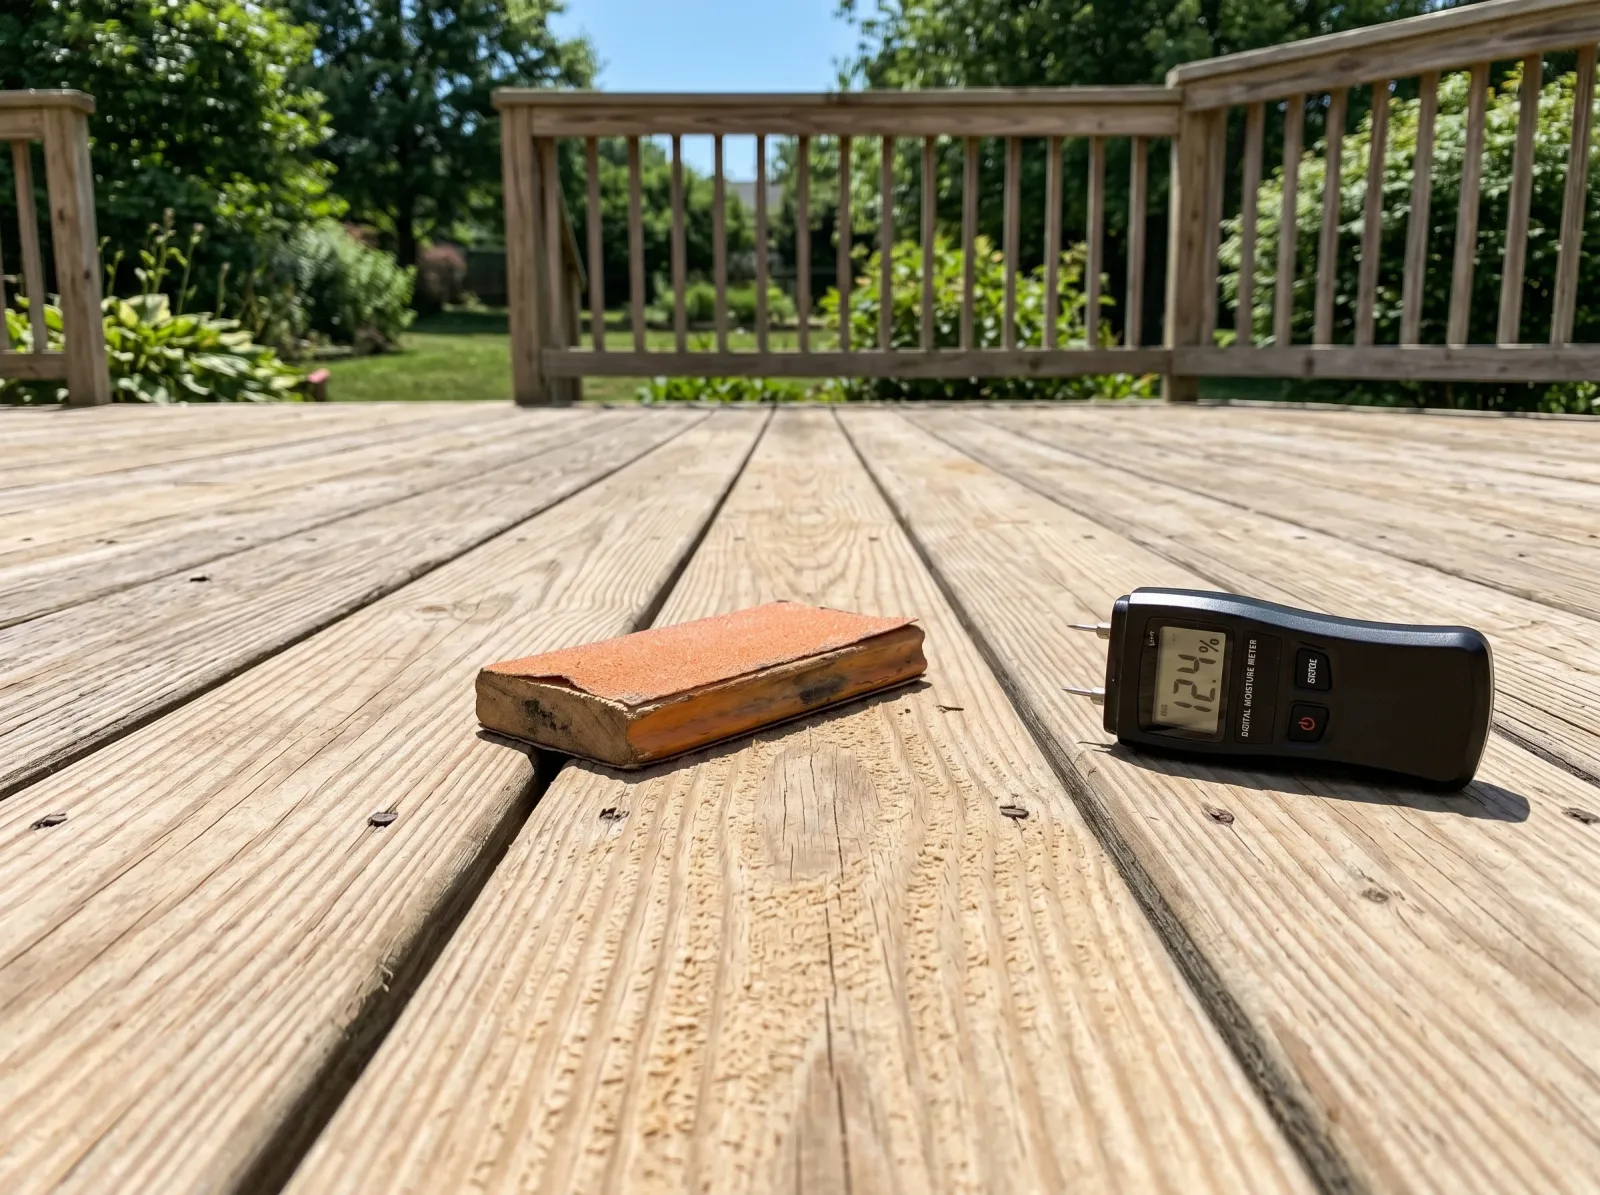
Two clear days later. The wood is dry through, raised grain knocked back, ready to take stain.
This is the step nobody wants to wait out. Cleaning soaks the wood, and it has to dry all the way through before stain will soak in. Give it 48 hours of dry weather minimum, longer if the deck is shaded or the boards are dense.
Don’t trust your eyes. The surface goes dry-looking hours before the inside is. Push the pins of the moisture meter into several boards, including the shaded ones near the house. Under 15 percent and you’re clear.
Once it’s dry, the grain will have raised into a light fuzz from the wash. Knock it back with the 80-grit block on the boards and rails. Light pass, just enough to take the splinters off. Sweep or blow the dust before you stain.
Watch out for dew. Even after a dry day, a clear cold night lays moisture into the top of the boards by morning. Wait until midmorning for it to burn off, or you’re staining damp wood again.
Step 4 — Stain the Boards, With the Grain
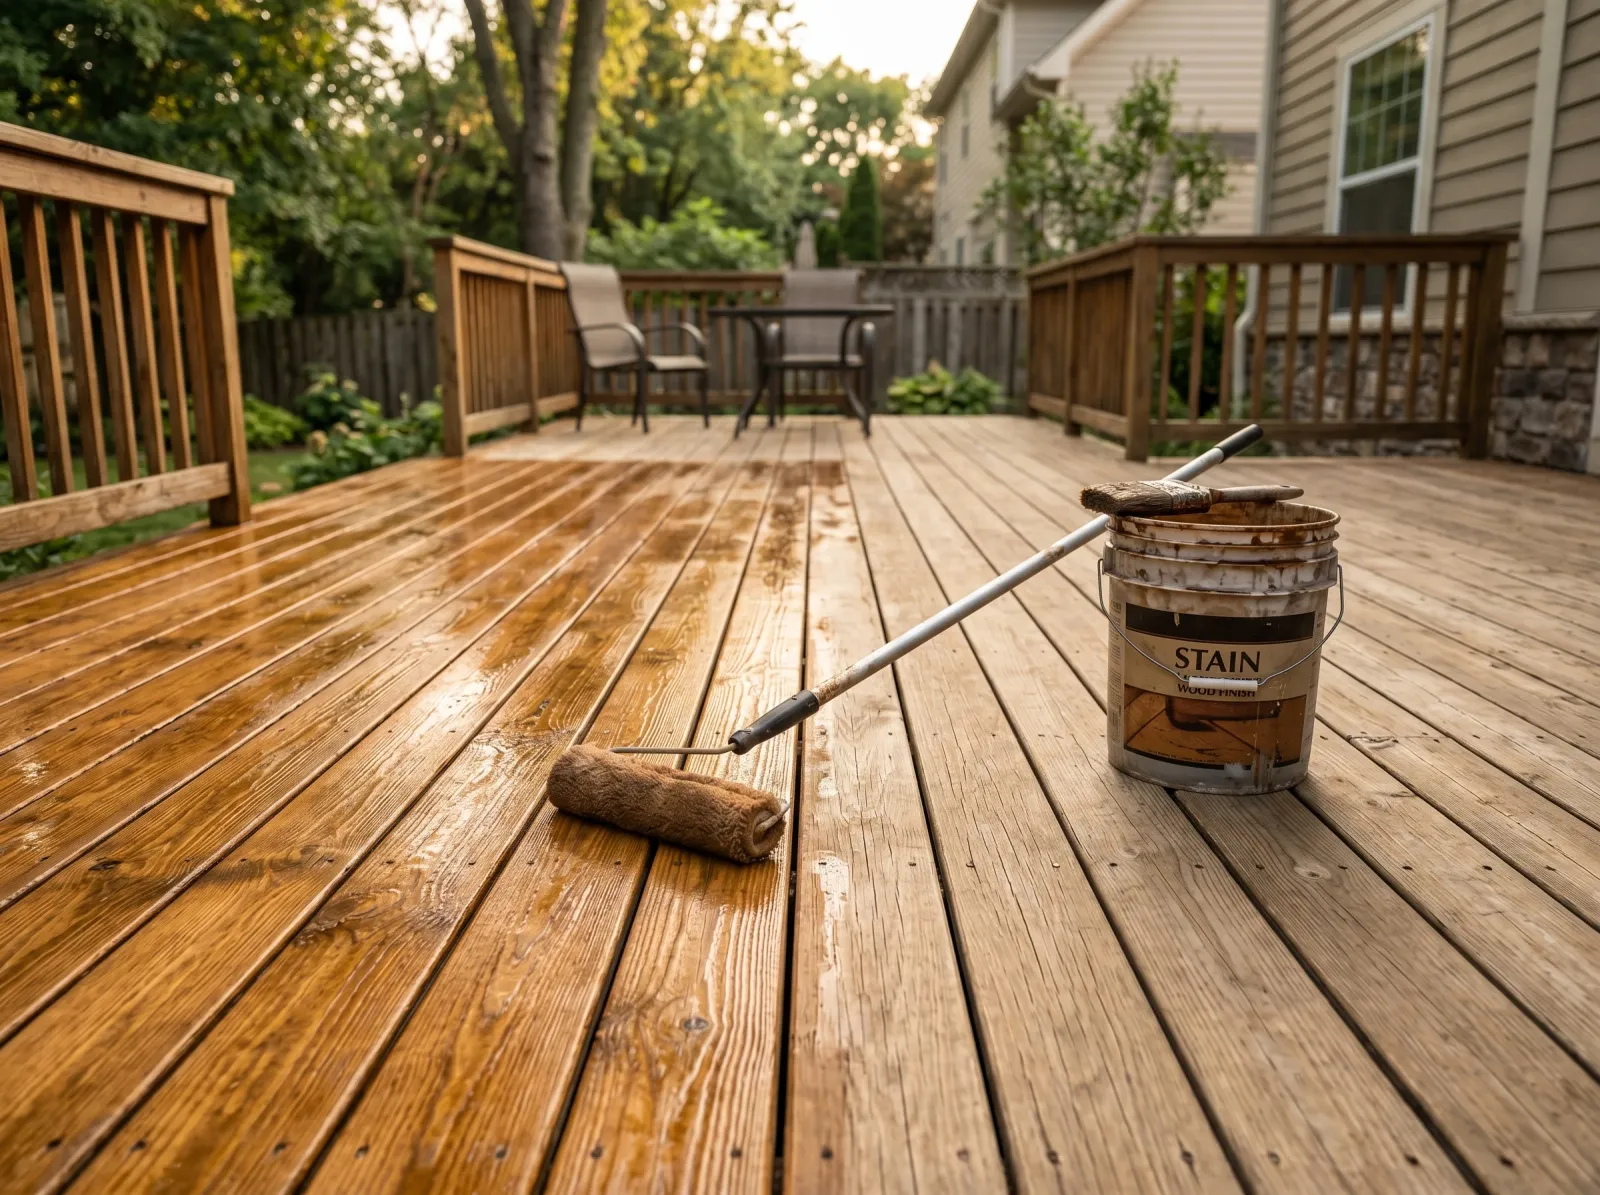
Stain flooded on a few boards at a time and back-brushed the full board length before it sets.
Stir the stain; don’t shake it. Stir again every so often as you work, because the pigment settles and your last boards come out lighter than your first if you don’t.
Work two or three boards at a time, full length, start to finish. Flood the stain on with the pad, then back-brush it, dragging the brush along the grain to work the stain into the wood and even out the lap. The reason you do whole boards end to end is lap marks. Stop in the middle of a board, let that edge set, then pick up again, and you’ll see the overlap line forever. A deck board is your natural stopping point. Use it.
Keep coats thin. A penetrating oil holds only what the wood can absorb. Anything sitting on top after 15 minutes hasn’t soaked in and won’t; wipe it off with a rag or it stays tacky and shiny for weeks and tracks onto shoes.
Watch out for the sun. Staining in direct heat flashes the surface dry before it can soak in, and that’s where lap marks and blotches come from. Work in the shade as it moves across the deck, or pick an overcast morning. Same range as any exterior coating, 50 to 85 degrees and out of the sun.
Step 5 — Railings, Cleanup, Furniture Back
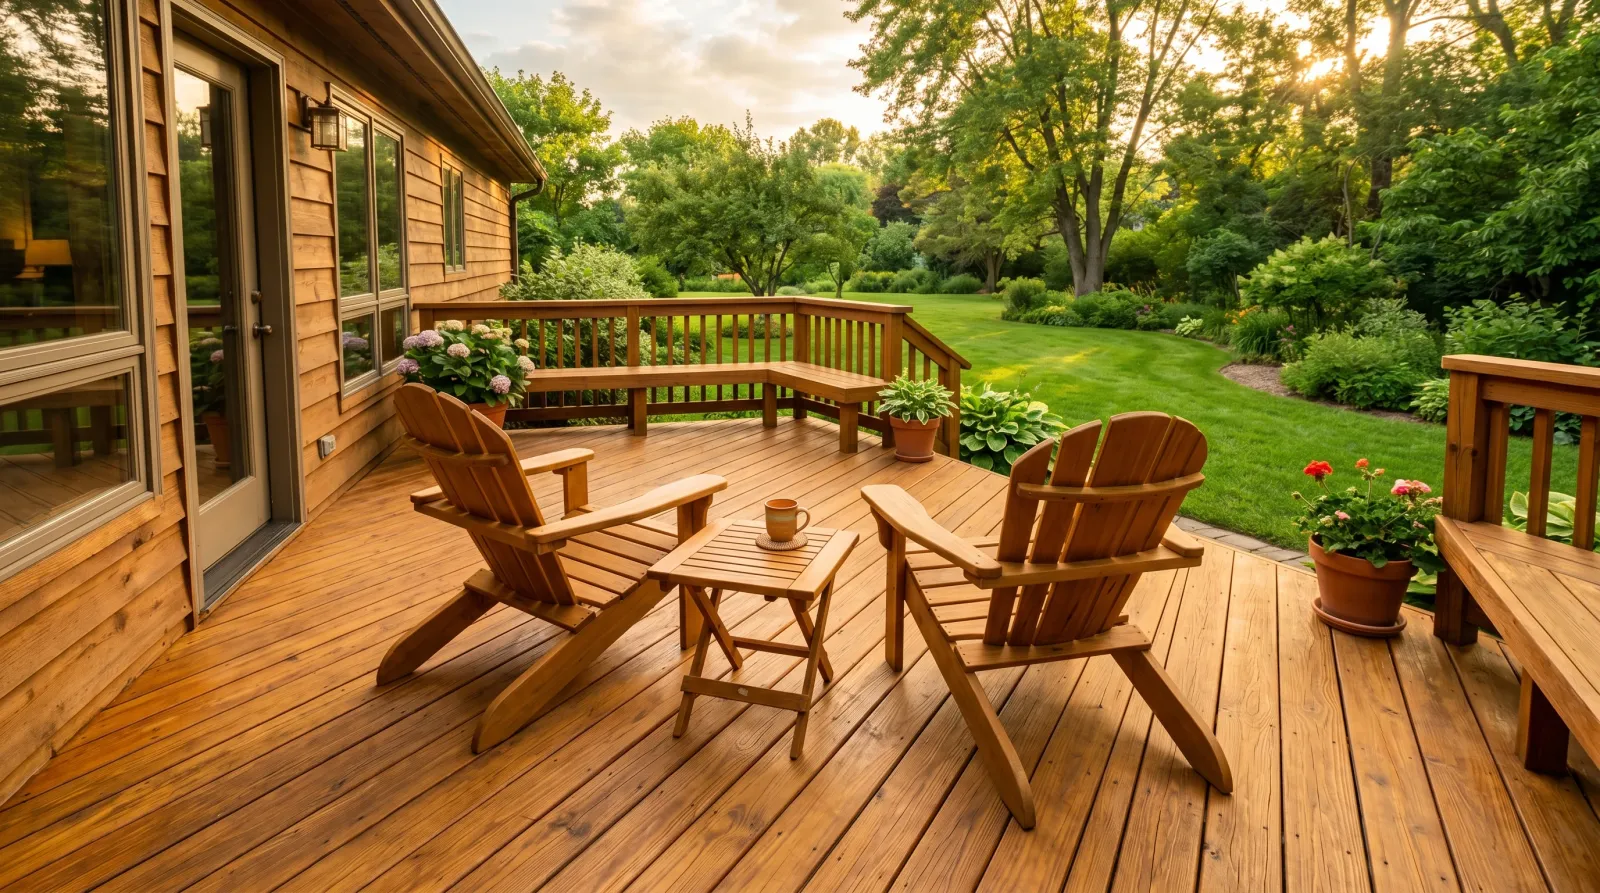
Excess wiped, fully dry, chairs and grill back on. The grain shows through the warm color.
Do the railings, balusters, and steps with the 2.5-inch angled brush. Same rule, thin and with the grain, wiping any runs that gather under the rail caps and along the baluster bottoms before they dry into drips.
A lot of pros stain rails first and floor last so you don’t kneel in finished boards. Either order works as long as you finish the floor walking yourself out a door or off the steps, not into a corner.
Let it dry per the can before anyone walks on it, usually overnight for a penetrating oil. Put furniture back after a full 24 hours, longer if the weather’s cool or damp. Set heavy planters on feet so water doesn’t sit and mark the new finish.
Common Mistakes
- Staining over damp wood. The single most common deck-stain failure. The surface dries first and lies to you. Stain can’t penetrate wet wood, so it skins over and peels off the wear paths within a season. Meter it, get under 15 percent, then stain.
- Putting on too thick a coat. A penetrating stain isn’t paint. Pile it on and the excess never cures; it stays sticky and shiny and tracks indoors. One thin coat, back-brushed, with the leftover wiped off.
- Skipping the cleaner on gray wood. Gray is dead fiber. Stain bonds to it, then it sloughs off and takes the stain with it. Clean back to sound wood every time, even on a deck that “doesn’t look that bad.”
- Stopping in the middle of a board. The set edge shows as a lap mark you can’t sand out without redoing the board. Always run a board its full length before you set the pad down.
- Staining in full sun or before rain. Hot boards flash the stain and leave lap marks. Rain inside 24 to 48 hours washes uncured stain right off. Check the forecast and chase the shade.
Cure Schedule
| Time after staining | What’s safe |
|---|---|
| 15 min | Wipe off any stain that hasn’t soaked in |
| 2 to 4 hrs | Touch dry (penetrating oil, mild weather) |
| Overnight | Walk on it in socks or bare feet |
| 24 to 48 hrs | Furniture and grill back on |
| 72 hrs | Light rain is fine; finish is set |
Oils dry slower in cool or humid weather. If a board still feels tacky, give it another day before you load the deck back up.
Maintenance
The floor boards take all the sun and traffic and wear first. Plan to recoat them every 2 to 3 years; the railings and verticals stretch to 4 or 5. The good news with a penetrating oil is the recoat is easy. No stripping. Clean the deck, let it dry, and put another thin coat on the worn boards.
The simple test: splash water on the deck. Beads up, the finish is still working. Soaks in dark, the wood is drinking water and it’s time to recoat. When the boards start graying at the edges, you’re already overdue.
Keep a quart of the stain with the color and brand on the lid for spot touch-ups on a high-wear board or a step.
Cost Breakdown
| Item | Cost |
|---|---|
| Deck stain, 2 gallons penetrating oil | $50–$110 |
| Cleaner + brightener kit | $25–$45 |
| Stain pad, brush, rags | $20 |
| Masking paper and tape | $10 |
| Total | ~$105–$185 |
Numbers assume you own or borrow a pressure washer. Renting one runs about $40 to $75 for a day. A 300 to 400 square foot deck fits inside the range above; bigger decks add roughly a gallon of stain per 200 square feet.
What’ll Bite You in Two Years
The thing that comes back to get people isn’t the staining. It’s the boards against the house and the steps that stay shaded. They dry slowest, hold moisture, and that’s where the rot and the early stain failure start, while the open sunny middle of the deck still looks fine.
So when you recoat in a couple of seasons, start your inspection there. Press a screwdriver into the shaded boards and the bottom of the stair stringers. Soft wood caught early is one board. Soft wood caught late is a framing job. For the deeper prep on wood that’s already gone gray and rough, see the weathered wood refinishing guide. And if you ever decide you want a solid color instead, that’s a different animal; the how to paint a deck walk-through covers the film route and why it peels where you walk.