How to Paint Weathered Exterior Wood — Restoring the Substrate
Weathered wood is dead surface fibers held on by UV-cooked lignin. Sand or chemically restore to sound wood, then prime and topcoat. Here's the order.

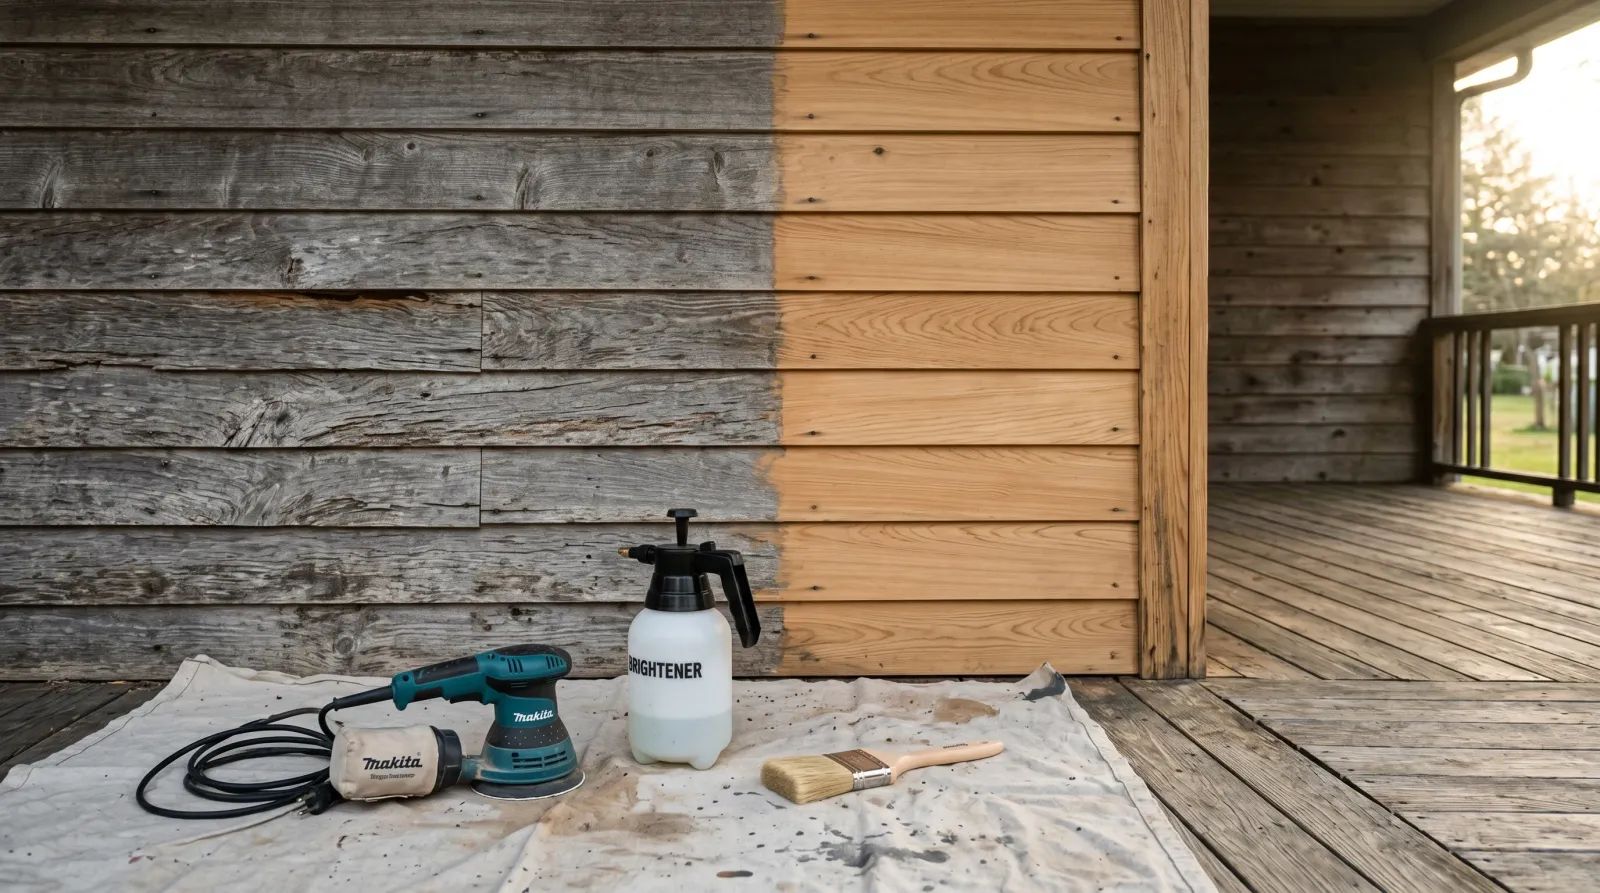
Weathered wood looks like it just needs a coat of paint. It needs a substrate, first.
That grey fuzz on the surface isn’t dirt. It’s the top layer of the wood itself, broken down by years of UV. Paint that goes on top of dead fibers peels with the dead fibers. Inside two years, you’ve got a flaking porch and a homeowner blaming the paint.
The fix isn’t a better paint. The fix is getting back to sound wood before the primer ever opens.
TL;DR
- Substrate first: sand the surface fibers off, or use a deck cleaner plus brightener, or both
- Dry time: 48 hours minimum after the final rinse, under 15% moisture
- Primer: Zinsser Cover Stain on every restored patch
- Paint: two coats of 100% acrylic exterior
- Skill: hard — this is a prep job, not a paint job
What Counts as Weathered Wood
Any exterior wood that has been left bare to the weather for more than about a year. The classic case is unpainted or stripped cedar siding, fence boards, deck balusters, porch posts, and pergolas. Pine, redwood, fir, and Douglas fir all weather the same way, just at different speeds.
The mechanism is UV breaking down lignin in the top layer of surface fibers. Lignin is the natural binder that glues wood cells together. Once it goes, those top fibers are loose. They look grey, they fuzz up under a fingernail, and they hold no primer.
Paint sticks to the fibers. The fibers don’t stick to anything.
Tools & Materials
Materials
- Deck cleaner (sodium percarbonate or oxygen bleach based — Restore-A-Deck or equivalent)
- Wood brightener (oxalic acid based — the second bottle in the same kit)
- 80-grit and 120-grit sandpaper (or 60-grit if the weathering is severe)
- Zinsser Cover Stain primer (oil-based stain blocker — 1 gal covers most porches)
- 100% acrylic exterior paint (two coats — Benjamin Moore Aura Exterior, SW Emerald Exterior, or Behr Marquee Exterior all work)
- Painter’s tape and 9 x 12 drop cloths
- Caulk — Sashco Big Stretch or OSI Quad — for any seams
Tools
- Random-orbit sander, 5-inch
- Pump-up garden sprayer (for cleaner and brightener — dedicate it to this, don’t reuse for plants)
- Stiff-bristle deck brush
- Garden hose with a fan-spray nozzle
- Pinless moisture meter (under $40 online; non-negotiable)
- 2.5-inch angled sash brush, 9-inch roller frame, 3/8-inch nap covers
- N95 or P100 respirator for sanding, nitrile gloves for the chemical step
Why This Surface Is Tricky
Bare wood that has been outside for years is two layers stacked together. The top eighth of an inch is dead — UV-degraded fibers, surface oxidation, embedded mildew, iron stains from old nails. The wood underneath is fine. The trick is removing the dead layer without losing the board, then bonding primer to the sound wood that’s left.
There are two roads. Sand the dead fibers off mechanically, or dissolve the surface chemically with a cleaner plus brightener. On a small project, sanding is faster. On 800 square feet of fence or siding, sanding will end your weekend by lunch on Saturday and the chemical route wins. Most real restorations use both — chemical on the broad surface, sander on the worst patches.
Surface Prep (the Long Part)
This is most of the job. Spend the time here and the paint application is straightforward. Skip it and you’re repainting in 2028.
Step 1 — Clean
Mix the deck cleaner per the bottle. Restore-A-Deck mixes one bag to two gallons of water in the sprayer. Saturate the wood top-to-bottom, let it dwell 15 minutes (don’t let it dry on the surface — re-wet if it does), then scrub with the deck brush along the grain. Rinse with the garden hose until the runoff comes off clear.
Cover plants below with plastic. The cleaner is mild but the runoff is alkaline.
Step 2 — Brighten
This step is the one most homeowners skip and the one pros never skip. The cleaner leaves the wood high-pH. Primer on high-pH wood crawls and beads — you’ll see it pull away from the surface as it dries. Brightener (oxalic acid) neutralizes the residue and drops the pH back to roughly 4–5, which is where wood normally lives.
It also pulls the wood back toward its original color. A grey board after cleaner-then-brightener looks honey-tan again. That’s not cosmetic — that’s the chemistry showing you the surface is now neutral.
Mix the brightener, spray, dwell 10 minutes, scrub lightly, rinse. Done.
Step 3 — Fingernail Test
Run a fingernail across the cleaned board. If it picks up grey fuzz or lifts fiber, that patch still has dead surface fibers and needs sanding. If the fingernail glides over a tight surface, the chemical step did its job and you can prime that section as-is.
Mark the patches that fail the test. Those are your sanding zones.
Step 4 — Sand the Bad Spots
80-grit on the random-orbit, with the grain. Go until the surface stops fuzzing. On heavily weathered cedar you may need to start at 60-grit. Don’t over-sand — you’re removing the dead layer, not reshaping the board. Two or three passes per spot is usually enough.
Feather the sanded edges into the surrounding cleaned wood so there’s no hard transition line. A hard line under primer reads through every topcoat.
Knock everything down with 120-grit afterward. Vacuum the dust, then wipe with a damp cloth. Let the wood dry again, 30 minutes minimum.
Step 5 — Wait for Moisture
Pinless moisture meter, under 15%, in three or four spots across the wall. If you don’t have a meter, give it 48 hours of dry weather after the final rinse and hope. Wet wood traps moisture under the primer, and by July you’ve got blisters.
This is the second-most-common failure mode I see on restoration jobs.
Safety Callout
Wood dust from old siding is not just wood dust. Lead paint residue (on pre-1978 structures), mill glaze, decades of mildew spores, and any old penetrating-oil stain are all in that powder. N95 minimum, P100 if you’re sanding all day. Nitrile gloves for the brightener — oxalic acid is mild but it’ll dry your skin out fast. Eye protection any time the sander runs.
Primer — Cover Stain on Every Restored Patch
Zinsser Cover Stain. Oil-based, alkyd, white. One coat on every section that was sanded or chemically restored. Brushed or rolled, doesn’t matter, but get it into the grain.
Cover Stain does two things that water-based primers don’t. It blocks tannin bleed (cedar and redwood will ghost brown stains through any waterborne primer within six months) and it locks down the slightly damaged fibers that survive the prep. Self-priming exterior paint is a marketing claim. Your restored cedar still needs Cover Stain underneath.
Recoat with the topcoat in 2 hours minimum, ideally the next morning. Cover Stain is a slow-cure oil — it’ll feel dry in an hour but the film hasn’t hardened yet.
If you’ve got a section that was barely weathered and passed the fingernail test cleanly, you can use a bonding waterborne primer (Sherwin-Williams Extreme Bond, INSL-X Stix) instead. But on any restored patch, Cover Stain.
Paint — 100% Acrylic Exterior, Two Coats
The paint chemistry that holds up on restored wood is 100% acrylic exterior. The three that work without drama are Benjamin Moore Aura Exterior, Sherwin-Williams Emerald Exterior, and Behr Marquee Exterior. All three handle UV, dew cycles, and the seasonal movement of solid wood.
What to avoid: cheap contractor-grade exterior with low binder load, anything labeled “deck and siding stain” if you actually want a painted finish, and any product that promises one-coat exterior coverage over bare or restored wood. One coat is one coat under perfect conditions. Restored cedar is not perfect conditions.
For SKU-level picks across the major brands, see the best exterior paint round-up.
A note on the painted-shed look. Solid-color paint on what used to be natural cedar reads as a painted shed if the color is wrong. Soft whites, warm greys, deep greens, and authentic colonial colors all sit right on wood. Pure-clean greys and saturated tropicals fight the grain and look cheap. If the structure used to be a stained or natural-wood feature, consider solid-color exterior stain instead — same protection, reads more like wood.
Application
Brush and roll for siding and fences. Spray-and-back-roll on bigger sections if you have the gear, but a homeowner is usually faster with a 2.5-inch sash brush and a 9-inch roller than messing with a sprayer for the first time.
Two coats. Always two coats. Doesn’t matter what the can says — one-coat coverage means one coat under perfect conditions, and bare or restored wood isn’t perfect conditions. Cut in the corners and trim lines first, roll while the cut-in is still wet, and don’t stop in the middle of a board run. Stopping mid-run is how you get lap marks once the sun catches the wall.
Drive the paint into the grain on the first coat. Back-roll behind the brush if you can. The second coat is the cosmetic coat.
Dry, Recoat, Full Cure
- Touch dry: 1–2 hours in 70°F, low humidity
- Recoat: 4 hours minimum, ideally next morning
- Full cure: 14–30 days
Don’t pressure-wash the wall for the first month. Don’t lean ladders against it for a week. Patio furniture pressed against fresh paint at day 3 will leave a permanent imprint.
Common Mistakes
- Painting over the dead fibers. Skip the sanding-or-chemical step and the paint peels with the fibers inside two years. The fingernail test is non-negotiable.
- Skipping the brightener. Cleaner alone leaves the wood alkaline and the primer will crawl. Both steps or neither.
- Priming wet wood. Under 15% moisture, full stop. A meter costs $40 and prevents a $4,000 repaint.
- Using waterborne primer over restored cedar. Tannin bleeds through. Cover Stain or nothing.
- One coat of finish. Restored wood drinks the first coat. The second coat is the actual film.
Maintenance & Longevity
A proper restore-prime-two-coat exterior job on cedar or redwood lasts 8–12 years on the north face, 5–8 on the south, before the next full recoat. Wash the wall once a year with a soft-bristle brush and a garden hose — no pressure washer, no bleach — and you’ll catch chalking before it turns into peeling. Touch up the south-facing trim every 3–4 years; that’s the sun-bake zone and it always goes first. The whole point of doing the prep right is buying back the decade you’d lose by doing it wrong.