How to Paint Wrought Iron — Railings, Fences, and Gates
Painting wrought iron the right way: wire-wheel the scale, convert pitting with Corroseal, prime with Stops Rust, two coats of DTM enamel. Welds get extra.

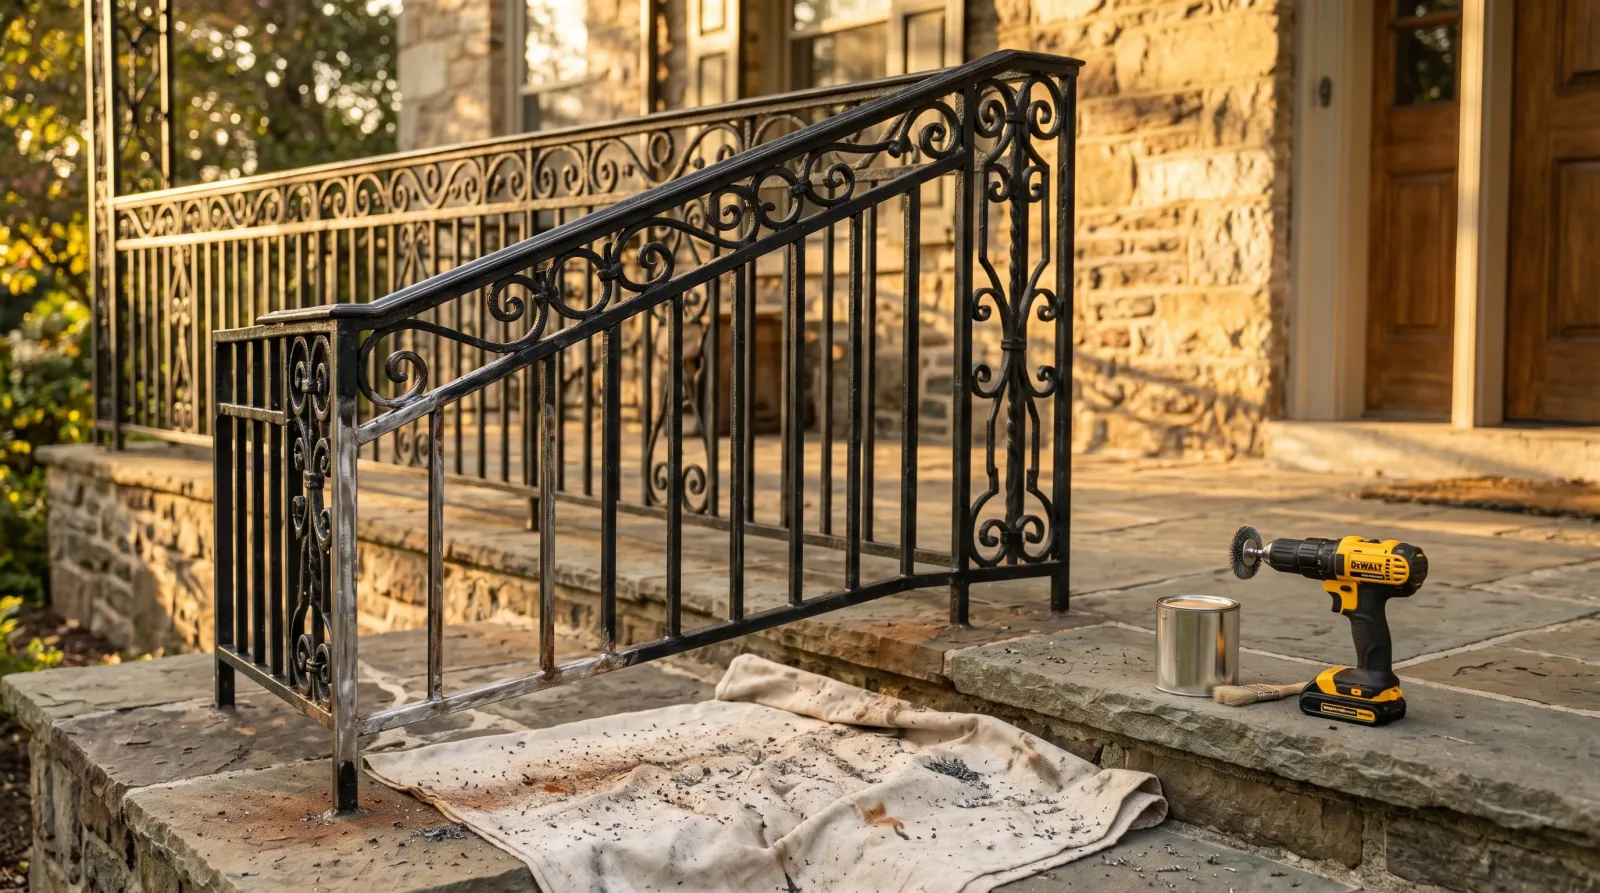
Wrought iron looks like a paint job and behaves like a rust job. The orange freckles you see on the railing after year two aren’t a paint failure. They’re rust eating up through the film from the steel underneath. Do the prep right and a black ornamental porch railing goes ten years. Skip it and the same railing sheds paint in brown sheets by summer three.
TL;DR
- Prep: Wire-wheel the loose scale and flaking paint to bright metal where it’ll come up. Brush a phosphoric-acid converter (Corroseal or Ospho) over the tight residual rust.
- Primer: Oil-based rust-inhibitive alkyd. Rust-Oleum Stops Rust or Zinsser PermaWhite alkyd primer. Two coats on bare metal, hot coat the welds.
- Paint: DTM (direct-to-metal) acrylic enamel. SW Pro Industrial DTM, Rust-Oleum Professional DTM, or Behr Premium Plus DTM. Two coats, satin or semi-gloss.
- Cure: Recoat at 4 hours. Hands off for 72 hours. Full cure 14–30 days before pressure-washing or hard scrubbing.
- Skill: Medium. The prep is 80% of the job; the welds are the other 80%.
What Counts as Wrought Iron
True wrought iron (fibrous, hand-forged, slag-streaked) basically stopped being made in the 1970s. What sits on most American front porches today is mild steel bent and welded into ornamental shapes and called wrought iron at the showroom. Prep is identical either way.
What matters more than the metal is the geometry. Wrought iron has joints, welds, scrollwork, and a horizontal bottom rail that sits an inch off the porch deck and collects water. Each of those features is a rust starter. A 20-foot railing with sixty pickets and a dozen welds is sixty plus a dozen separate rust clocks running in parallel.
Why Wrought Iron Fails So Fast
Three reasons.
The bottom rail. Water runs off the top rail, down the pickets, and pools where the picket meets the bottom rail. That junction sits wet for hours after every rain. Factory primer almost never covers the underside well. Rust starts there and works outward.
The welds. The heat-affected zone next to a weld bead is harder than the parent steel and slightly more reactive. The bead itself is micro-pitted from the welding process. Water finds the porosity, oxygen does the rest, and a freckle of orange shows up at the weld seam every year. This is the failure I see on three out of four residential railings over a decade old. New paint will cover it again only if you give the welds extra time on the wire wheel and an extra coat of primer.
The original coating. Most factory wrought iron ships with a thin powder coat or a one-coat alkyd. Fine for the showroom. Five winters in, it’s chalking, the bottom rail is bleeding, and the welds are orange.
Step 1: Mechanical Removal
The work nobody wants to do, and the work that decides whether your paint lasts ten years or two.
Wire Wheel for the Bulk
A drill-mounted 3-inch crimped wire wheel strips powdery surface rust and loose paint to bright steel at maybe 30 seconds per square inch. Knotted wire wheel is more aggressive. Use it on heavy scaling at the bottom rail and at weld seams, then come back with the crimped wheel to smooth it. Hand wire brushes get into the scrollwork, the corners, and the picket-to-rail junctions where the drill won’t fit.
Work outward from the worst rust. Don’t grind from clean paint into rusted paint. You’ll over-work the sound coating at the edge and create a feathered ridge the topcoat reads under raking light. Feather the bright bare metal into the sound old paint with 220-grit when you’re done so the primer has a soft transition to bridge.
Angle Grinder for the Bottom Rail and the Welds
An angle grinder with an 80-grit flap disc cuts through layered scaling rust fast. It also eats real metal if you stand on it, so keep it moving, light pressure, and stop the second you see bright silver. The flap disc leaves a 60-grit-ish profile the primer loves to bite.
The bottom rail wants the grinder. So does every weld bead. Spend extra time there. If a homeowner walks away after twenty minutes on the bottom rail thinking they’re done, the railing fails first at the bottom rail. That’s the rule.
Safety
Lead test if the railing was painted before 1978. RRP rule applies to contractors; smart even if it’s your own house. P100 respirator, eye protection, long sleeves. Rust dust is iron oxide; old paint dust may be lead. Both are lung hazards you don’t want to find out about in five years. Drop cloth catches the debris so it doesn’t blow into the lawn.
Step 2: Acid Conversion
What didn’t come off mechanically gets chemically converted. Skip this step on a pitted wrought-iron railing and the rust under the new paint keeps reacting under the new film.
Corroseal on Heavy Pitting
Corroseal is a 1-step waterborne phosphoric-acid converter with a latex primer in the same coat. Brush it on, let it cure 24 hours, topcoat. The acid reacts with the iron oxide and forms iron phosphate, a stable black-gray film. The built-in latex primer means you can topcoat directly if you’re feeling brave on a low-stakes piece. On a porch railing that sees ten years of sun and rain, I still hit it with a separate alkyd primer afterward. Belt and suspenders.
Ospho is acid only, no primer. Cheaper, contractor staple since the 1940s. Cures in 24 hours, may bloom a white phosphate residue that you wipe off with a damp rag before priming. Pick whichever’s at your local store; both work.
Brush, don’t spray. The acid wants contact time and a wet film to react. Use a cheap chip brush. The acid eats the bristles. Hit deep pits twice. Hit every weld twice. The welds are where the rust comes back, and the second pass of acid converter is the cheapest insurance you can buy.
When the Pits Are Too Deep
If a pit is deeper than a dime’s thickness, fill it with a two-part epoxy steel filler like JB Weld SteelStik before priming. Cures hard in 5 minutes, sandable in an hour. Leveling deep pits is the difference between a smooth railing and one that telegraphs every crater under afternoon side light.
Step 3: Rust-Inhibitive Primer
This is the layer that holds the system together. Use the wrong primer and the topcoat is along for a short ride.
Rust-Oleum Stops Rust is the workhorse. Oil-based alkyd, rust-inhibitive, lays down a tough film that penetrates the converted surface and chokes off oxygen at the metal. Two coats on bare and converted metal, brushed. Touch-dry in 2–4 hours; recoat at 24 hours; topcoat-ready at 24 hours for the same brand and 48 hours if you’re crossing chemistries.
Zinsser PermaWhite alkyd primer is the heavier-build alternative. About 2–3 mils per coat where Stops Rust builds 1.5. On a coastal-zone railing or a gate that lives under a sprinkler, the extra film thickness buys years. Same recoat window.
Two coats minimum. The welds get a third. Call it a hot coat. Brush the first coat over the whole railing, let it skin for 90 minutes, then go back and lay a second coat just on every weld and joint while the first coat is still soft enough to fuse to. That hot coat at the welds is the difference between paint that lasts ten years and paint that bleeds rust at every joint by year three.
A note on waterborne metal primers: INSL-X Aqua-Lock and SW Pro-Cryl Universal Primer are good products on sound previously-painted metal and on aluminum or galvanized where oil-based won’t grip the oxide. On freshly wire-wheeled bare wrought iron, the oil-based alkyd primers still hold up longer. Use the oil here.
Step 4: Topcoat With DTM Enamel
DTM means direct-to-metal. A 100% acrylic enamel engineered to bond to primed metal and flex with the temperature swing without micro-cracking. A black wrought-iron railing goes from 70°F at dawn to 140°F at 2 p.m. in July; the topcoat has to ride that without splitting.
Sherwin-Williams Pro Industrial DTM Acrylic Coating is the contractor default. Satin or semi-gloss, low VOC, full SW deck. Self-levels well from a brush. Rust-Oleum Professional DTM is the aerosol-friendly version for pickets and ornamental scrollwork where a brush leaves drag marks on the curves. Behr Premium Plus DTM is the Home Depot answer. Cheaper, narrower color range, performs respectably in moderate climates.
Two coats. Always two coats. The first coat looks like coverage; the second is what gives you the 4–6 mils of dry film thickness that survives ten summers. Satin or semi-gloss is the right sheen call on wrought iron. Gloss telegraphs every micro-pit and brush mark; flat reads dead and chalks faster. Semi-gloss is what most factory wrought iron ships in and what most homeowners want back.
For SKU-level comparisons across primer and topcoat, the best primer round-up and the best exterior paint round-up go deeper.
Step 5: Application Technique
Cut In Top-Down
Brush from the top rail down. Anything you drip lands on metal that’s still about to get painted. Hit the top rail, then the pickets, then the bottom rail, then the underside of the bottom rail. The underside of the bottom rail is the part nobody wants to crawl under to reach. It’s also the part that rusts first. Spend the ten minutes.
The Welds Get Two
Every weld gets the same hot-coat treatment as the primer step. Brush coat one over the whole railing. Let it set up for an hour. Come back and lay coat two just on the weld seams and the picket-to-rail joints. Then do the full second coat over everything. The welds end up with three coats of topcoat where the flats have two. That’s not over-engineering; that’s where the failures start.
Brush vs. Spray on Pickets
For 60 pickets on a 20-foot railing, an HVLP or a quart of aerosol Rust-Oleum Professional DTM beats a brush on labor and finish quality. Aerosol delivers a thinner film per coat, so you’re doing three light passes instead of two heavy ones. Brushed quarts give you film thickness and color flexibility. I usually brush the rails and spray the pickets when the budget allows the extra paint waste.
Back-Brushing the Drips
DTM enamel is thinner than house paint and drips on a vertical picket if you load the brush too heavy. Lay the paint on, then come back over the same area with a near-dry brush to feather any sags out before they set. You have a 5-minute window. After that the sag is permanent until you sand it flat at the next repaint.
Step 6: Dry, Recoat, Full Cure
Touch-dry: 1–2 hours for the topcoat at 70°F and 50% humidity. Recoat: 4 hours for the DTM acrylics named above; 24 hours for oil-based Stops Rust between primer coats. Full cure: 14 days for normal weather exposure, 30 days before any pressure wash or hard scrub.
Don’t lean a ladder against the railing for a week. The film looks dry; it isn’t hard yet. Don’t let a dog brush against a fresh gate for 72 hours. Don’t pressure-wash for a month. Run a quart of clean water over a section at day 30 and watch. If any color comes off in the rinse, give it another week.
Common Mistakes
- Skipping the bottom rail’s underside. Nobody sees it from the porch, but the railing fails there first. Spend the extra fifteen minutes with the wire brush on the parts you can’t see.
- Painting over loose rust on the welds. Welds bleed first. The wire wheel and two passes of acid converter on every weld are the cheapest decade you’ll ever buy.
- One coat of topcoat on pickets because they’re tedious. One coat is half the mil thickness you need. The pickets fail at year three. Two coats per picket is the whole job.
- Waterborne primer on bare wire-wheeled wrought iron. Acrylic primers are fine on aluminum, galvanized, and sound previously-painted metal. On bare and converted wrought iron, the oil-based alkyd holds up longer. Use the oil here.
- Painting in the wrong temperature window. Below 50°F the alkyd primer won’t flow; above 90°F it flashes off before it levels. Black wrought iron in afternoon sun reads 140°F on an infrared thermometer in July. Paint at sunrise or in shade.
- Quitting at the first coat of converter on a deep weld. The acid wants two applications on porous metal. One is for show.
Maintenance and Longevity
A properly-prepped two-coat DTM enamel system over the right rust-inhibitive primer lasts 8–12 years on a residential wrought-iron railing in zones 5 and 6, and 5–8 years in coastal salt-air zones where chloride accelerates every reaction. The film survives. The system gets shortened by the things you don’t do: the rinses you skip, the dog that brushes the gate wet, the pressure washer at full trigger.
Rinse the railing twice a year with a garden hose and a soft brush. Pollen, salt, and bird droppings are what eat your topcoat between rains. A pressure washer on full trigger eats DTM acrylic film inside three years; throttle to 1,500 psi and stand back four feet if you have to use one.
The thing that’ll bite you in two years: the welds. Walk the railing every spring with a flashlight. Any freckle of orange at a weld seam is the rust telegraphing back through. Sand it back with 80-grit, dab Corroseal, dab Stops Rust, dab topcoat. Twenty-minute fix per freckle. Ignore six freckles for a year and you’re stripping the whole railing. The system lives or dies at the welds, and the welds need a yearly look.