How to Fix Paint Runs and Drips
Paint run on a fresh coat? Drag the brush back through it wet. Catch it dry, sand level with 220, feather, spot-prime, recoat. Plus why thin coats and boxed paint stop it next time.

A paint run is a self-portrait of how heavy you loaded the brush or roller. Catch it wet and you erase it in ten seconds. Catch it dry and you’ve got twenty minutes of sanding, feathering, and recoating ahead of you. Either way, the fix is straightforward. The prevention is straighter.
Does This Match What You’re Seeing?
Look at the wall, trim, or door under raking light from a side window. You’ll see one of these.
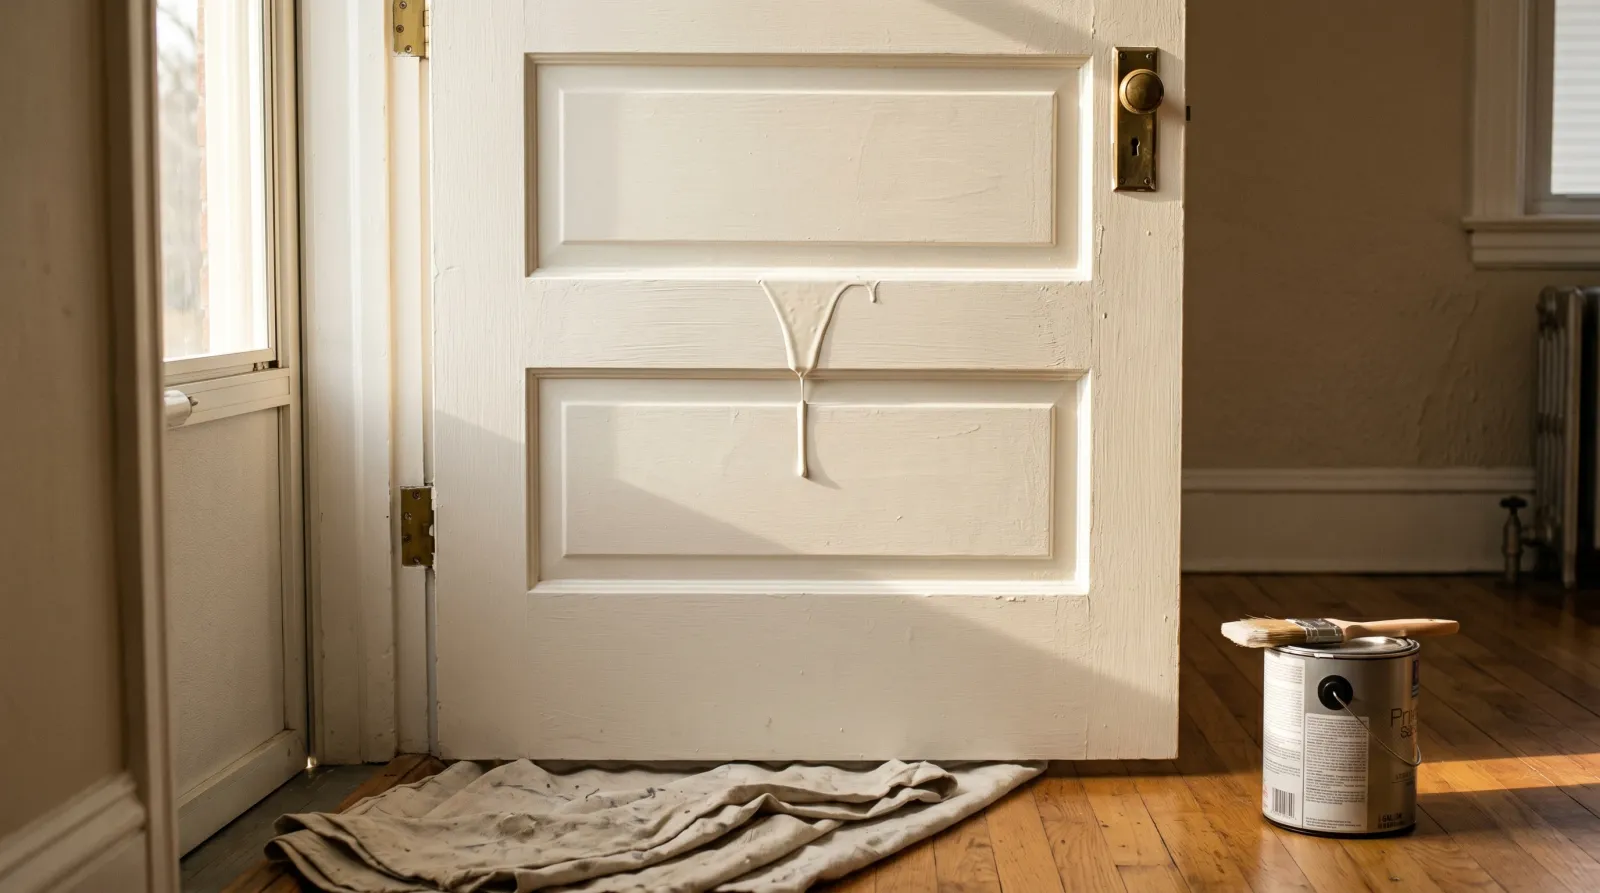
- A single teardrop dripping straight down from a heavy spot. Classic run. One loaded brush stroke or roller pass deposited more paint than the surface could hold.
- A wide flat curtain across several inches. Sag, not a drip. You laid an entire heavy section that’s slumping as a unit. Usually a roller loaded past the cage.
- Multiple small drips spread evenly down a panel. The whole coat went on too thick. You’re not catching one bad spot. You’re recoating the panel.
- A run that’s only visible under one angle of light. A skinned drip. The surface set before the body of the paint sagged underneath. Still has to come off.
- A drip at the bottom edge of trim or a door rail. Bottom-of-panel pooling. Paint flowed downhill into a corner and stopped. Catch it with the brush tip or it cures into a fat lip.
If the run is still wet, skip the rest of this page and go straight to the section below. The clock is running.
How Serious Is This
Cosmetic. The film is sealed, the surface is protected, the wall functions. What it isn’t is invisible. A cured run on an interior wall catches light from any window or fixture in the room and the eye finds it every time you walk past. On trim or a door it reads as a hump under a fingertip.
Severity ladder. Single run on a wall, caught wet: thirty seconds with the brush, done. Single run, cured: sand, feather, spot-prime, recoat the affected area. Twenty minutes. Whole panel of drips: sand the whole panel, recoat the whole panel, two hours minimum including dry time. Drips on a door or cabinet in semi-gloss or gloss: worst case, because gloss telegraphs every patch. Plan to recoat the entire face, not the spot.
Why Paint Runs (root Cause)
Three causes, ranked by how often I see them on a finished wall.
1. Overloaded brush or roller. Sixty percent of runs. The brush went into the can past the ferrule, or the roller cage soaked up half a tray. The surface can only hold so many mils before gravity takes over and the excess flows down. Wall paint on a vertical surface holds about 4 to 5 wet mils before it sags. Load to a third of the bristle, spin the roller on the tray ramp twice before going to the wall.
2. Over-thinned paint. The data sheet on every can specifies a maximum thinning, usually 4 ounces of water per gallon for waterborne wall paint, sometimes zero for premium products. Add more and the viscosity drops below what the resin system was engineered for. The paint flows when it shouldn’t. New painters thin to make the brush move easier. The brush moves easier and the wall runs.
3. Inconsistent paint across gallons. You opened gallon two and it was a hair thinner than gallon one. Or gallon three has been sitting in the garage for a year and the binder settled. Without boxing all the paint into one bucket before you start, each gallon’s slightly different viscosity hits the wall and the thinner ones run. See what boxing paint means for the full reason.
A fourth one shows up on doors and trim. Painting horizontally then standing the work back up. The paint was fine flat. Stood vertical, it flows. If you have to flat-coat a door, give it 24 hours before you hang it.
Fix It Wet — The Thirty-Second Move
You’ve got five to fifteen minutes at 70°F on most waterborne wall paint. Less in heat or sun.
- Off-load the brush completely. Wipe both sides on the rim of the can or the side of the tray until it’s nearly dry.
- Drag the brush back up through the run. Light pressure, single direction, with the grain on trim, vertical on a wall. The dry brush picks up the excess and redistributes it into the surrounding film.
- Tip-off the area with the same dry brush. One more light pass, single direction. Walk away.
That’s it. The run disappears. If the surface has started to skin, the brush will drag the skin instead of redistributing the paint and you’ll know inside two strokes. Stop, let it cure, and read the next section.
Fix It Dry — Sand, Feather, Spot-Prime, Recoat
Once the run has cured, you can’t push paint around anymore. You’re knocking it level with abrasive.
Step 1. Sand the Run Level with 220 Grit
Sanding sponge or 220 on a hard block. Light pressure, work across the ridge until your fingertip reads flat against the surrounding film. Don’t blast through to bare substrate. You’re knocking a hump, not stripping. On gloss or semi-gloss, follow with 320 then 400 so the patch doesn’t read as a duller spot under the topcoat.
Step 2. Feather the Edges
Step out an inch past the sanded area with 320 grit at a glancing angle. You’re blending the patch into the surrounding paint so the recoat doesn’t show a halo where the sanded zone meets the original film. Feathering explained in detail if this is new to you.
Step 3. Spot-Prime If You Cut Through
Vacuum the dust, wipe with a tack cloth. If the sanding hit raw drywall, bare wood, or a different-color undercoat, spot-prime with Zinsser Bulls Eye 1-2-3 (general purpose) or Zinsser BIN shellac (over stains, tannin, or unknown substrate). Forty-five minutes to dry. If you stayed in the topcoat, skip the primer.
Step 4. Recoat
Recoat the affected area on a flat wall, or the entire face on a door or cabinet panel. Gloss and semi-gloss telegraph patch lines hard, so on those surfaces plan to recoat the whole panel, not the spot. Two thin coats four hours apart, not one heavy coat.
Safety
Wear a dust mask while sanding any cured paint, especially pre-1978. Lead test first on any house older than that. See how to fix peeling paint for the RRP rules. Never mix sanding cleanup chemicals with bleach, ammonia, or hydrogen peroxide. Toxic gas. If you wipe down with a household cleaner before priming, water-rinse and let it dry before any primer touches it.
Prevention — Thinner Coats and Boxed Paint
Two changes prevent 90 percent of runs on the next job.
Thinner coats. Two thin coats beat one heavy coat every time. The film cures harder, the color reads more uniform, and gravity has nothing heavy to pull on. Load the brush to a third of the bristle, not half, not the ferrule. Spin the roller twice on the tray ramp before every wall pass to off-load the excess. If the wall doesn’t cover in two coats, that’s a hide problem (use a tinted primer next time), not a thin-coat problem.
Boxed paint. Mix all your gallons into a single 5-gallon bucket before you crack the first wall. Stir for two full minutes with a drill paddle. Every gallon comes out of the bucket at the same viscosity, the same tint, and the same sheen. No more thin-gallon runs, no more lap marks where the color shifts mid-wall.
A third one. Read the data sheet on the can before you add water. Most premium waterborne paints are engineered to run as-shipped. Adding water past spec drops the binder concentration below what the film needs to hold itself up. If the brush feels stiff, the answer is usually a better brush, not more water in the can.
When to Call a Pro
- Front entry doors or kitchen cabinets where the bar is sprayed-furniture quality. A cured run on gloss telegraphs forever. A pro will spray and tip-off in one pass.
- Exterior runs on cedar or alkyd-painted siding more than ten feet up. Ladder work plus sanding overhead is how DIY jobs become emergency room visits.
- Pre-1978 trim with peeling or flaking around the run. Lead test before any sandpaper touches it.
- Sprayed walls or ceilings with extensive sag patterns. Whole-surface refinish is faster than patching twenty drips one at a time.
What’ll Bite You in Two Years
A cured run that you painted over without sanding doesn’t get smaller. It gets shinier. Every coat after that one rides over the same hump, and on a south-facing wall under raking afternoon light the ridge reads brighter than the wall around it because the extra film mass holds tint slightly differently. By year two you’ll be sanding the same wall down to flat and starting over. Catch the run wet, or sand it before you recoat. Don’t let it ride.