How to Fix Paint Bubbling on Glossy Surfaces
Paint bubbling on a glossy surface means the new coat never gripped. Diagnose the cause, pop and sand the blisters, degloss, prime, and recoat so it holds.

Paint bubbles on a glossy surface for one reason most of the time. The new coat never gripped the slick one underneath. Pop the bubbles, repaint, skip the prep, and they come right back. The fix is in the surface, not the can.
Does This Match What You’re Seeing?
Look close at where the bubbles are and when they showed up. That tells you the cause.
- Hard, raised blisters over old gloss trim or a door: adhesion failure. The film sits on a slick surface and lifts. This is the common one.
- Bubbles on melamine, laminate, or a factory-finished cabinet: same problem, worse surface. Those finishes are slicker than paint and need real deglossing.
- Soft bubbles that pop and flatten as the paint dries: rolled-in air, not a bond problem. A foam roller or a fast roll whipped air into the film.
- Bubbles that keep coming back through every coat in the same spot: contamination. Wax, furniture polish, silicone, or grease under the paint. No primer fixes that until you clean it off.
- Blisters with water or a stain weeping out when popped: moisture coming from behind. Different fix, see below.
If the bubbles are hard and stay raised over a glossy substrate, you have an adhesion problem. That’s what this page solves.
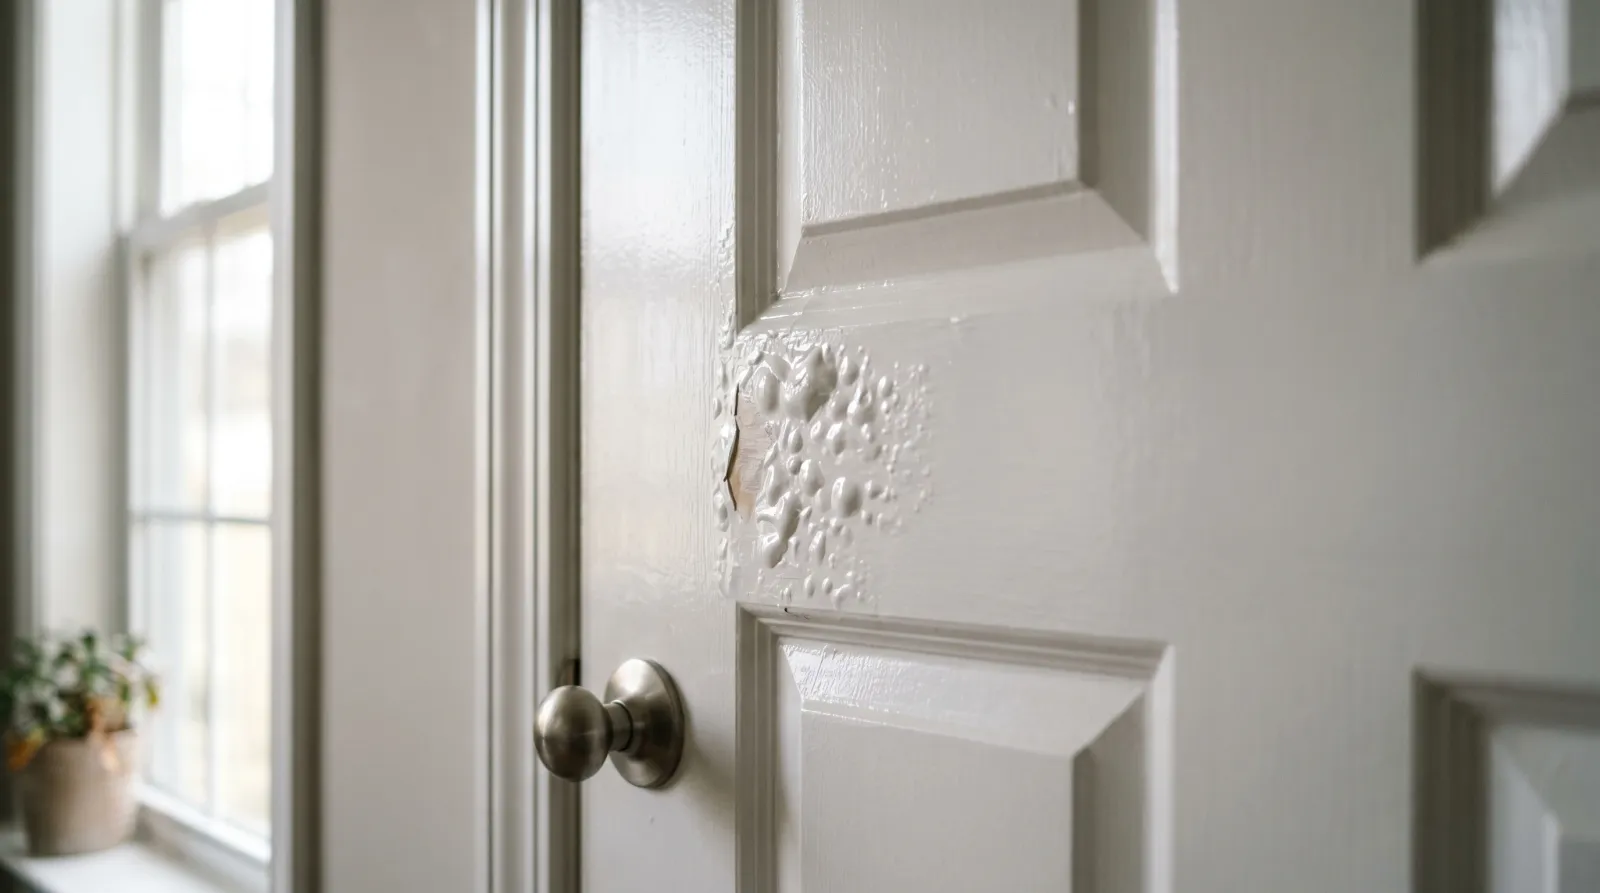
 Hard blisters over old semi-gloss. The paint bridged the gloss instead of biting into it.
How Serious Is This?
Cosmetic in most cases, but it won’t fix itself. Bubbled paint over gloss is a same-weekend repair on a door or a section of trim. The film is failing, not the wall behind it, so nothing structural is at risk.
Three things push it higher:
- It keeps returning through fresh coats. You have contamination or a moisture source. Stop painting and find it.
- Pre-1978 home with the gloss being old oil enamel. Lead until tested. Sanding it means RRP rules.
- Water weeping from the blisters. Liquid intrusion behind the surface. The bubbling is a symptom of a leak, not a paint defect.
Why This Is Happening (root Cause)
Paint bonds by biting into a surface. It needs a little tooth, a little texture to lock into mechanically while the binder does its chemical part. A glossy surface has almost no tooth. The film lays across the top like skin on pudding, and the only thing holding it on is whatever weak grip the binder managed on a slick face.
Then something lifts it. Trapped air from rolling. A trace of moisture or solvent flashing out of the film. Temperature swing on a sun-hit door. The weak bond gives, the film balloons, and you get a blister.
So the gloss is the real cause. Semi-gloss and gloss enamels, varnished trim, melamine, and factory-finished doors all read as too slick for a topcoat to grab. Painting straight over them is the single most common reason I get called back to a trim job. The homeowner saw a clean white door, rolled fresh paint on it, and watched it bubble by the weekend.
Contamination makes it worse. Kitchen cabinets carry cooking grease. Furniture carries old polish and wax. Bathroom trim carries soap film and silicone. Paint can’t bond through any of that, gloss or not.
The slick surface is fixable. You give it tooth by sanding it dull or wiping it with a liquid deglosser, and you bridge the gap with a bonding primer built to grip glass-smooth surfaces. Skip those and no paint sold will hold.
The Fix
Safety First
N95 mask while sanding. If the home is pre-1978 and the gloss is old oil enamel, stop and lead-test before any sandpaper touches it. Liquid deglossers are solvent-based, so cross-ventilate and wear nitrile gloves. Never mix a deglosser, denatured alcohol, or any solvent with bleach or ammonia. Open a window and run a fan the whole time.
Step 1. Pop and Cut Out the Blisters
Slice each blister open with a utility knife or pop it with a 5-in-1 tool. Scrape away any loose, lifted film around it. Anything that releases under light pressure was never bonded. Get it off now or it lifts later. Don’t gouge into sound paint next to it.
Step 2. Sand the Whole Surface Dull
This is the step everyone skips and the step that fixes the problem. Sand the bubbled area flat first with 150 grit, then scuff the entire surrounding surface with 220 grit until the gloss is gone and the whole face reads a uniform dull haze. No shiny spots left. Shiny means slick, and slick means the next bubble.
On a door or cabinet, sand the whole panel, not just the repair. A bonding primer needs tooth across the area it covers. See the right sandpaper for paint prep for grit and backing that won’t load up.
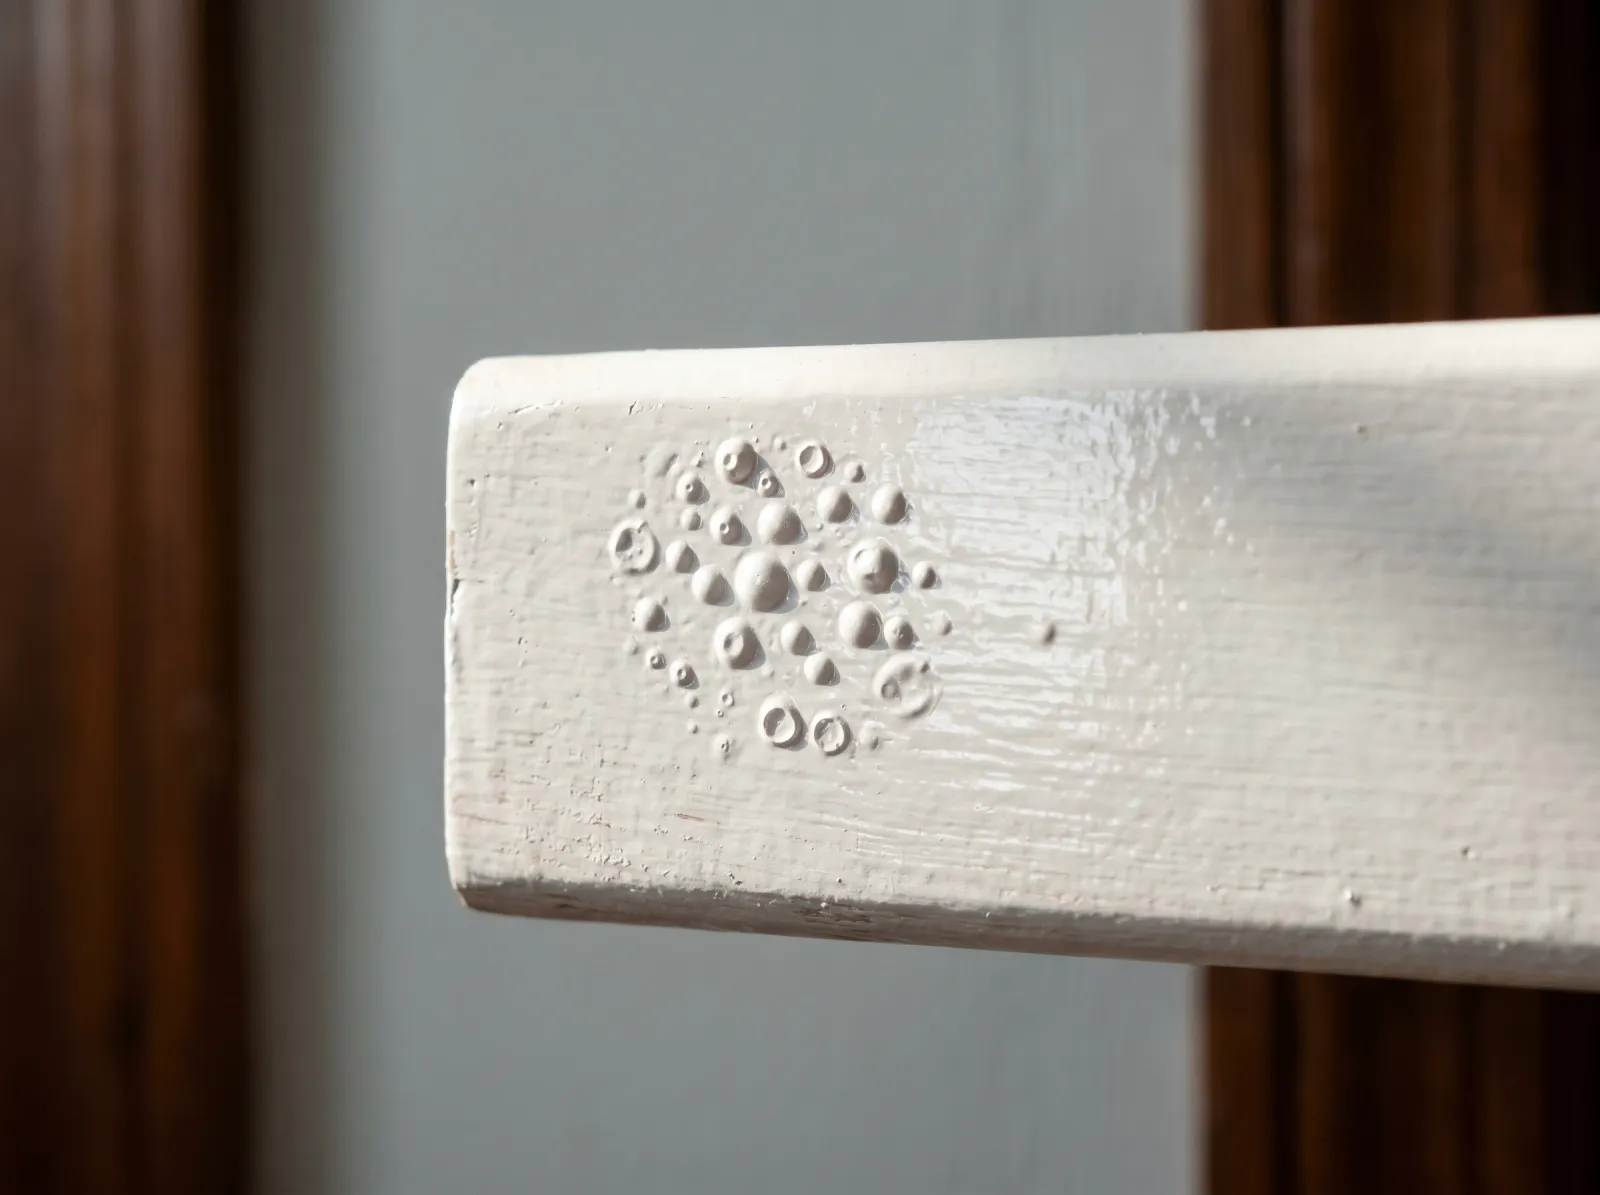
 Sanded to a dead-flat haze. No shine left anywhere. Now the primer has something to bite.
Step 3. Degloss Where You Can’t Sand
Profiled trim, raised panels, and detailed molding are hard to sand into every corner. Wipe those with a liquid deglosser (Klean-Strip Easy Liquid Sander or Krud Kutter Gloss-Off) on a clean rag. Let it dwell the time on the can, usually 10 to 15 minutes, then move to priming inside the window the label gives you. Deglosser chemically dulls the sheen so the primer grips where a sanding sponge can’t reach.
On melamine or laminate, do both. Sand the flats, degloss the edges. Those surfaces are slicker than any trim and they punish shortcuts. The full melamine painting guide walks the whole sequence.
Step 4. Clean Off Every Contaminant
Sand and deglosser don’t remove grease, wax, or silicone. They just spread it around. Wash the surface with TSP or a TSP substitute, scrub, rinse with clean water, and let it dry fully. On kitchen cabinets, do this twice. The grease is there whether you can see it or not, and it’s the reason bubbles come back through three coats.
If a stubborn spot keeps rejecting paint, it’s silicone or wax. Wipe it with denatured alcohol or mineral spirits before priming.
Step 5. Prime with a Bonding Primer
Standard PVA primer won’t save you here. You need a primer built to grip slick surfaces:
- General glossy trim and doors: Zinsser Bulls Eye 1-2-3 or INSL-X STIX. STIX is the stronger bonder for hard, slick enamels.
- Melamine, laminate, tile, and factory finishes: INSL-X STIX. Built for surfaces nothing else holds on.
- Old oil enamel under a latex topcoat: a bonding primer is mandatory. Latex over un-primed oil is classic intercoat failure.
One coat, cut in your edges, even film. Let it cure the full time on the label before topcoat, not just dry-to-touch. STIX wants a few hours.
Step 6. Recoat with the Right Enamel and Technique
Two coats. Use a cabinet and trim enamel that levels, like Benjamin Moore Advance or Sherwin-Williams Emerald Urethane. Both are acrylic-alkyd hybrids that flow like oil and clean up like latex.
Roll with a 3/8-inch microfiber or foam, but don’t roll fast and don’t shake the can. Stir it. Fast rolling and shaking are how you whip air into the film and create a new round of bubbles, this time from the can side. Lay it on, tip it off, let it level.
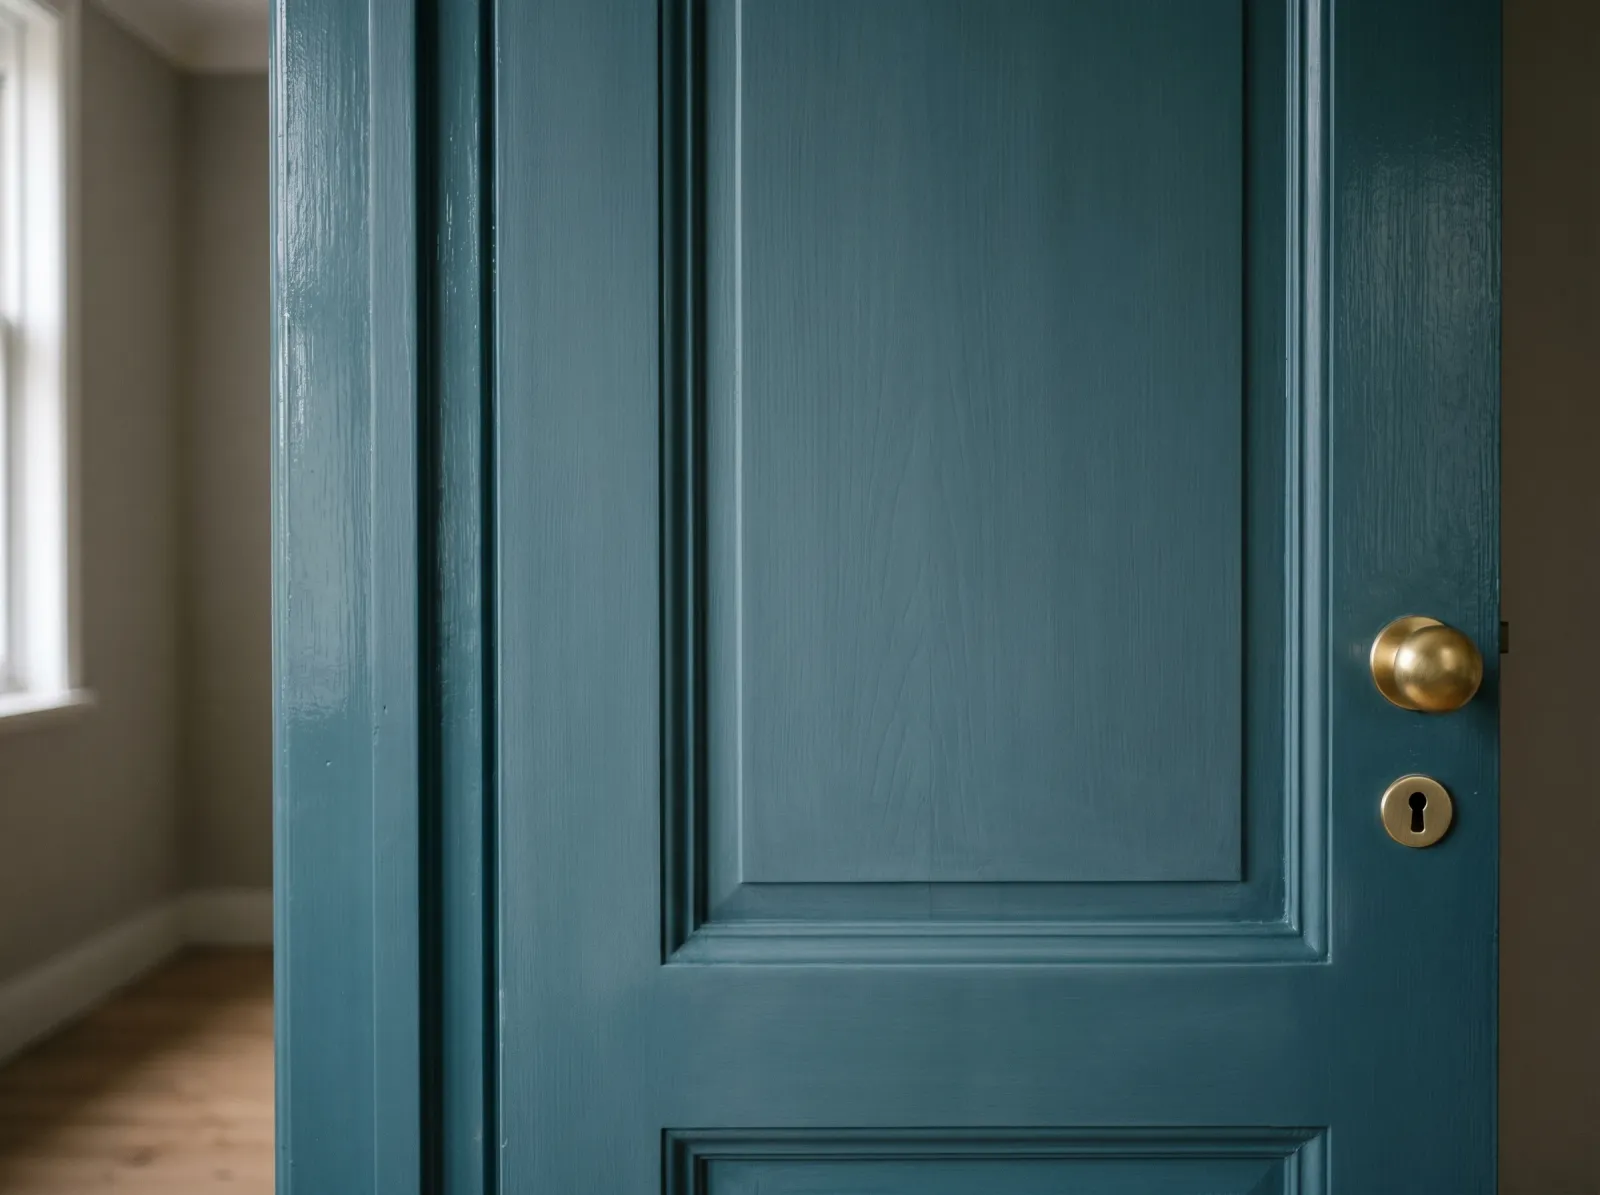
 Dull-sanded, bonding-primed, two coats of hybrid enamel. The film grips and levels flat.
Bubbles from Rolling vs Bubbles from Bad Bond
These two get confused constantly, and the fix for one does nothing for the other.
| What you see | Cause | Fix |
|---|---|---|
| Soft bubbles, pop and level as it dries | Rolled-in air | Stir don’t shake, slow back-roll, switch off foam |
| Hard raised blisters that stay | No grip on glossy surface | Sand dull, degloss, bonding primer |
| Bubbles weeping liquid | Moisture from behind | Find and stop the water source first |
| Bubbles returning through every coat | Wax, grease, silicone | Clean with TSP and solvent before priming |
If you can’t tell, push a fingernail into a cooled bubble. Air bubbles collapse. Adhesion blisters stay firm and lift a flake of paint with them.
Common Mistakes
- Priming over shiny. A bonding primer still needs tooth. Sand or degloss first, every time.
- Spot-priming just the popped blister. The slick surface around it is still slick. The next bubble rises right next door.
- Skipping the cabinet degrease. Kitchen grease is invisible and it kills adhesion. TSP twice.
- Shaking the can on a hot day. Whipped-in air plus a fast roll on a warm door is a bubble factory. Stir, slow down.
- Latex straight over old oil gloss. No deglosser, no bonding primer, peels and bubbles in sheets within the year.
Prevention
- Treat every glossy surface as a bonding job. Semi-gloss, gloss, varnish, melamine, factory enamel. Sand to a dull haze or wipe with deglosser before anything goes on. For why these sheens are so slick, see semi-gloss vs gloss.
- Degrease before you prep, not after. Clean first so sanding doesn’t grind grease into the surface.
- Match the primer to the surface. Bonding primer on slick, not bargain PVA.
- Stir, never shake. And keep the roll speed down on warm surfaces.
- Don’t paint a door in direct sun. The film flashes too fast and traps air and solvent into blisters.
When to Call a Pro
- Bubbles returning through three or more coats with no contamination you can find. Something’s wrong behind the surface.
- Liquid weeping from the blisters. That’s moisture intrusion, a wall or plumbing problem, not paint.
- Pre-1978 home with old oil gloss you’d need to sand. Lead-test first, and hire a certified RRP contractor if it’s positive and you’re not set up for containment. See the lead rules in the peeling paint fix.
- A full set of kitchen cabinets you want sprayed to a factory-smooth finish. A sprayer does it better and faster. The best cabinet spray paint round-up covers what holds up.
What’ll Bite You in Two Years
If you primed over a glossy surface without dulling it first, the new film is holding by its fingernails. It looks fine for a season. Then a humid summer or a slammed door flexes the panel, the weak bond lets go, and you’re back to bubbles. The fix that lasts is boring and physical. Knock the shine off, give the paint something to grab, and it stays put. There’s no primer that skips that step.