Best Pole Sanders for Drywall Prep
Five pole sanders tested on real drywall seams, ceilings, and skim coat. Top pick: Marshalltown RPS9H radial sander for a swirl-free 9-inch finish.

Disclosure: Some links below are affiliate links. We earn a commission if you buy through them, at no extra cost to you.
Top pick: Marshalltown RPS9H 9-inch radial pole sander. It costs around $35, sands twice the area per pass of a rectangular pad, and the cast-aluminum no-flip bracket stays flat instead of rolling over and gouging your seam. It wins on finish (the spinning head leaves no swirl marks to telegraph through primer) and on speed. It falls short on inside corners, where the round head can’t reach and you’ll want a hand block. For the cheapest tool that works, the 3M DRPS-009 is $14 and takes any pole you own. For a no-flip flat head, the Goldblatt Pro Pole Hand Sander is the steadiest manual sander in the test. For a dust cloud you can’t live with, the Hyde 09180 hooks to a shop vac and pulls most of it off the wall. For ceilings and pro-grade builds, the LEVEL5 radial system holds up to daily abuse.
There is no single right pole sander.
Most DIYers do fine with one good radial sander and a cheap rectangular block for the corners.
What I Tested and How
I bought five pole sanders the way a homeowner would, off the shelf and online, and ran them through three real drywall jobs over four weeks. A re-skimmed 12 x 14 ft bedroom that needed full-wall finish sanding. A patched garage ceiling with six taped repairs. A stairwell with a run of butt joints that had to come flat. Every tool sanded full seams from knee height up to the ceiling line, on the same compound, with the same grit screen or disc.
Five things decided the ranking, in this order: how well the swivel head stays flat instead of flipping, how clean the finish reads under raking light, how much dust the tool throws, how fast you can change a torn screen, and how much your shoulder hurts after a long ceiling run.
The flip test mattered most. A pole sander that rolls its pad over at the top of a stroke tears the screen and digs a fresh scratch into the mud you just smoothed. Every redo is wasted compound and wasted time. The tools that earned the top spots all solved the flip problem one of two ways: a no-flip joint, or a spinning radial head that has nothing to flip.
How a Pole Sander Actually Works
A pole sander is a sanding pad on a swivel, screwed onto an extension pole. You sand drywall mud with it because the long reach lets you stand back and sand a whole wall or ceiling with your body weight instead of your arm, and the swivel lets the pad follow the wall as your angle changes. Get the swivel and the head shape right and the rest is grit and pressure.
The Swivel Head: No-Flip Is the Whole Game
The pad has to pivot so it stays flat as you move up and down the wall. The problem is a cheap pivot has no resistance, so at the end of a stroke the pad rolls right over, the leading edge digs in, and the screen tears.
A no-flip joint adds a low pivot point and some drag so the pad resists rolling. The Goldblatt G05022 does this with a universal joint set low in the base. The Marshalltown and LEVEL5 sidestep it entirely with a round spinning head that has no front edge to catch. The plain 3M pivot has none of this, which is why it’s the budget pick and not the overall winner. You can run a plain pivot well, but it asks for a lighter touch.
Head Shape: Rectangular for Corners, Round for Finish
Rectangular heads (3M, Goldblatt) put a flat edge into an inside corner and along a ceiling line. They’re the traditional drywall shape and they’re cheaper.
Round radial heads (Marshalltown, LEVEL5) cover more area per pass and spin, which kills the swirl marks a back-and-forth rectangular pad can leave. The trade is they can’t tuck into a 90-degree inside corner. The fix is to keep a cheap sanding block or a rectangular pole sander for corners and use the radial head for the broad flat work where it shines.
Screen vs Paper
Drywall sanding screen is an open mesh that lets dust fall through instead of clogging the abrasive, so it lasts longer and cuts cleaner on compound. Paper clogs faster but cuts a touch finer for a final pass. Most pros run screen for the bulk of the job. Hyde’s patented screen and the hook-and-loop discs on the radial sanders both swap faster than the old slide-in clamps, which matters when you change abrasive a dozen times in a day.
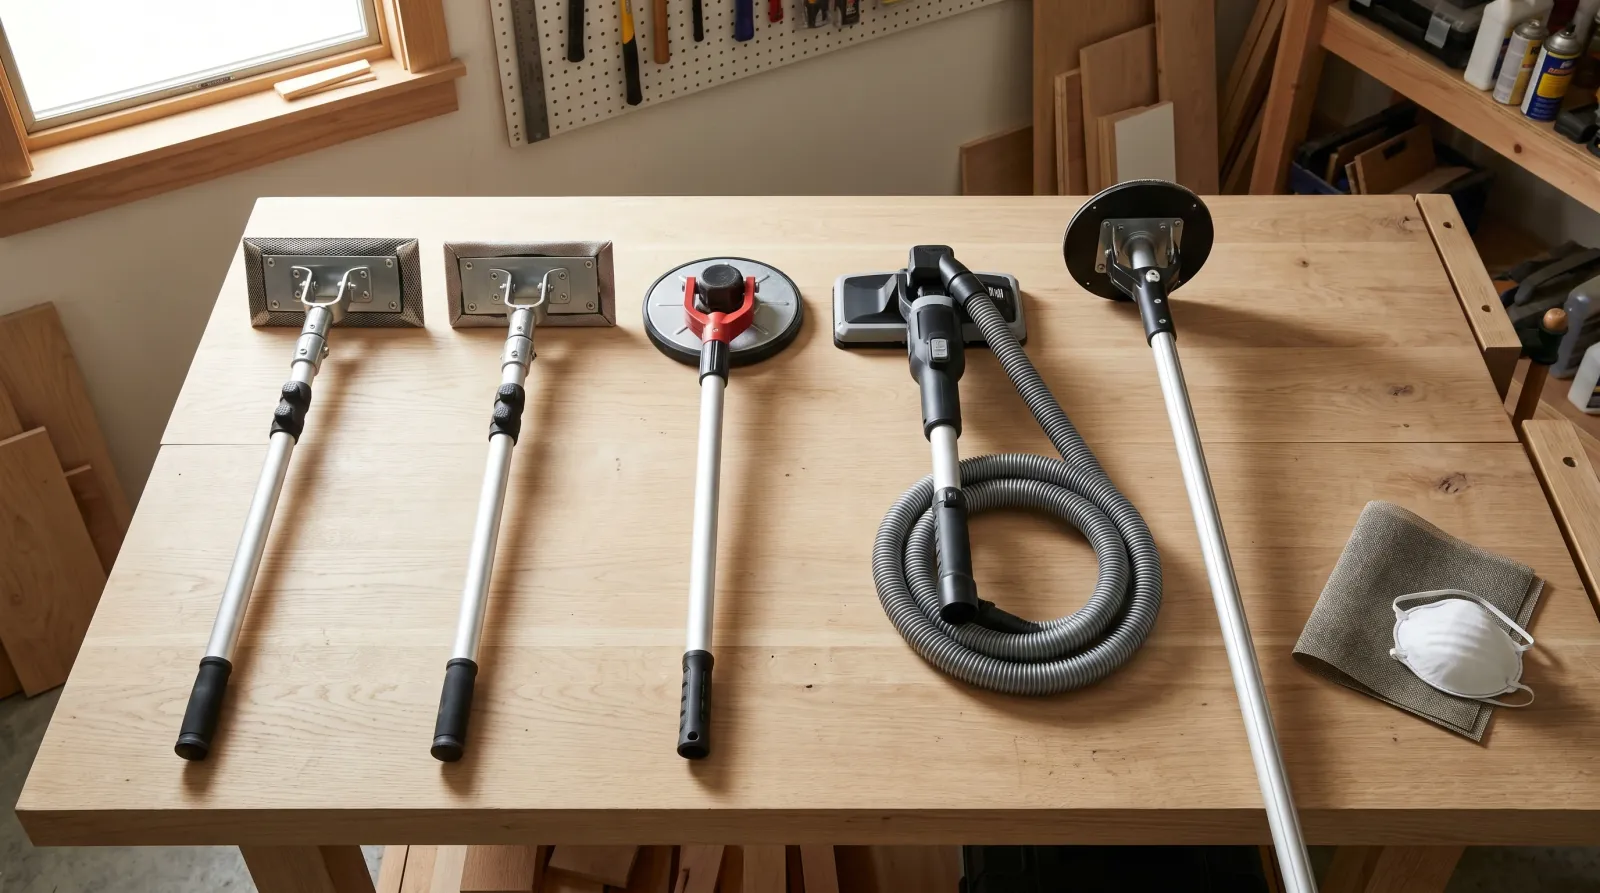
At-A-Glance Comparison
| Sander | Head | No-flip | Dust control | Best for | Price tier |
|---|---|---|---|---|---|
| Marshalltown RPS9H | 9” round radial | Yes (radial) | Hand sanding | Fast swirl-free wall and ceiling work | mid |
| 3M DRPS-009 | 3-1/4 x 8-3/4” flat | No | Hand sanding | Cheapest tool that works; corners | budget |
| Goldblatt Pro G05022 | Flat, anti-flip | Yes (joint) | Hand sanding | Steadiest manual flat sander | mid |
| Hyde 09180 | Flat, vacuum | Yes | Hooks to wet/dry vac | Dust-free whole-house sanding | premium |
| LEVEL5 5-344 | 9” round radial | Yes (radial) | Hand sanding | Pro builds, daily-use ceilings | mid |
1. Marshalltown RPS9H 9-Inch Radial Pole Sander, Best Overall
The RPS9H is the one I reached for first on every job and the one I kept reaching for. The round 9-inch head covers roughly twice the area of a standard rectangular pad on each pass, so a wall that takes four passes with a flat sander takes two or three with this. On the re-skimmed bedroom, that’s the difference between a long afternoon and a short one.
The head spins on a cast-aluminum no-flip swivel bracket, and that’s the part that earns the top spot. There’s no leading edge to roll over, so the flip-and-tear problem that plagues rectangular sanders just doesn’t happen. The spinning action also breaks up the directional swirl marks a back-and-forth pad leaves. Under a raking LED at 24 hours, the seams I sanded with the RPS9H read flat and uniform. The same seam done with a plain rectangular sander showed faint cross-hatching that I could feel telegraph through the primer.
It can’t get into an inside corner. The round head leaves about a half-inch gap in the angle, so I kept a small hand block in my back pocket for the corners and ran the RPS9H on everything else. Hook-and-loop discs also cost more per sheet than cut screen, so the consumables add up over a big job.
| Spec | Value |
|---|---|
| Head | 9” round cast-aluminum radial |
| Swivel | No-flip bracket |
| Abrasive | Hook-and-loop discs, 80–220 grit |
| Approx. price | $30–$40 |
Buy it if: you want the fastest swirl-free finish on walls and ceilings and you’ll keep a block for the corners. Skip it if: your job is mostly tight corners and small patches. The 3M flat pad does that for a fraction of the cost.
2. 3M Drywall Pole Sander DRPS-009, Best Budget
The cheapest tool in the test that I’d actually buy. About $14, takes any standard threaded extension pole you already have in the garage, and the rectangular 3-1/4 by 8-3/4 inch pad gets into corners the radial heads can’t. It loads cut drywall screen or paper, so your consumables run pennies a sheet instead of a couple dollars a disc.
What you give up is the no-flip joint. This is a plain pivot, and on the garage ceiling it rolled over and tore a screen twice in the first ten minutes until I lightened my touch at the top of each stroke. Run it with a flat pad and easy pressure and it works. Rush it and it fights you.
The pad and clamps are also the thinnest in the group. On a whole-house job they’d be the first thing to wear out. For a few patches, a single room, or the corners on a bigger job where the radial head can’t reach, it’s all the sander most people need.
Buy it if: you have a pole already, you’re sanding one room or some patches, and $14 beats $35.
3. Goldblatt Pro Pole Hand Sander G05022, Best Manual Flat Sander
If you want a rectangular head but you’re tired of flipping, this is the one. The Goldblatt’s anti-flip universal joint sits low in the base and adds just enough drag that the pad stays flat through a full stroke. On the stairwell butt joints, where I was sanding at an awkward angle and a plain sander would have rolled constantly, the Goldblatt tracked flat without a single torn screen.
The die-cast aluminum base plate is stiff. A flimsy pad bows under hand pressure and concentrates the cut in the middle, which leaves a hollow. This one spreads pressure even across the whole seam. The quick-release clamp swaps a screen in a couple seconds, and the 48-inch pole is a single fixed piece with a steel cap on the end for setting popped nails, so there’s no joint to wobble.
The fixed 48-inch pole is the limit. It’s the right length for walls and an 8-foot ceiling, but a stairwell ceiling or a vaulted room needs a separate extension, and this pole doesn’t extend. Rubber bumpers ring the head to protect window casings and door jambs, but it’s still a rectangular head, so tilt it wrong against a corner and it’ll dig.
Buy it if: you want a flat-head sander for corners and seams and the no-flip joint to keep it from tearing screen. Around $25–$30.
4. Hyde 09180 Professional Dust-Free Pole Sander, Best Dust-Free
Drywall dust is the worst part of the job. It’s fine enough to hang in the air for hours, it coats every surface two rooms away, and it’s genuinely bad to breathe. The Hyde 09180 hooks to any wet/dry vacuum and pulls up to 99% of it off the wall as you sand. On the bedroom job, the difference was stark: with the vac running, I could sand a full wall and the air stayed clear enough to see across the room.
The EasyClamp loads Hyde’s patented sanding screen, which the company rates to last about three times longer than plain screen because the dust gets pulled away instead of clogging the mesh. In my use it did outlast the cut screen on the other sanders by a clear margin. The two-piece pole extends from 28 to 56 inches, enough for low walls up to a standard ceiling.
The catch is the setup. You need a vac running the whole time, with a hose dragging behind you that snags on corners and furniture. And the tool costs four to eight times what a plain pole sander does before you’ve spent a dime on the vacuum. For one room it’s overkill. For a whole-house remodel where you’d otherwise be cleaning dust for a week, it pays for itself.
Buy it if: you’re sanding a whole house, you own a shop vac, and you won’t tolerate the dust. Around $90–$120 for the pole kit.
5. LEVEL5 9-Inch Radial Sander with 48-Inch Pole, Best for Ceilings
LEVEL5 sells to drywall finishers who run tools daily, and the build shows. Same swirl-free radial concept as the Marshalltown, but the head and pole are anodized aluminum, which shrugs off the corrosion that pits cheaper sanders left damp in a truck. On the garage ceiling, where I was sanding overhead for an hour, the spinning head plus the 48-inch pole let me work with body weight instead of shoulder, and the rubber corner bumper kept me from chewing the casing every time I drifted.
Hook-and-loop discs run 80 through 220 grit, so one tool covers knocking down knockdown texture and a final finish pass. The discs swap as fast as any tool in the test.
The 48-inch pole is fixed and on the short side for a tall ceiling. LEVEL5 sells a longer pole and a swivel pole separately, and for a stairwell you’ll want one of those. Like the Marshalltown, the round head won’t tuck into an inside corner, so a corner tool stays in the kit.
Buy it if: you’re finishing a build, sanding ceilings, or want a radial sander that survives daily jobsite use. Around $50–$60.
Sanders I Tried and Dropped
- Generic clamp-style pole sander, three-for-cheap online. Thin stamped head, plain pivot, flips constantly. The 3M does the same job and lasts.
- Drywall sanding sponge on a pole. Fine for wet-sanding a single small patch. Too soft and slow for full seams.
- Festool Planex / corded powered drywall sander. Excellent for whole-house work, but it’s a $400-plus power tool, not a pole sander. Different category.
- Hand sanding block alone. Right for corners and tiny patches. Murder on your arm across a full wall, which is the reason pole sanders exist.
How to Sand Drywall Without Wrecking It
The mistake that costs the most is over-sanding. Joint compound is soft, the paper face of the drywall under it is not, and once you sand through the compound into the paper, you fuzz it up and the spot shows through paint forever. Sand to flat, then stop. Run your bare hand over the seam in low light; feel for ridges, don’t chase shadows.
Use 120 or 150 grit screen for the bulk of finish sanding. Drop to 100 only to knock down a hard ridge, then come back over that spot with 150 so the coarse scratches don’t print through primer. Keep the pad flat to the wall. Tilting it digs the edge in and leaves a trench you’ll have to re-mud.
Light is your tool as much as the sander. A work light held flat against the wall throws every ridge and low spot into shadow. Sand under that raking light, not under a ceiling fixture, or you’ll miss defects that the first coat of paint lights right back up.
When the screen stops cutting, change it. A clogged screen burnishes the compound instead of cutting it, which polishes a low spot you can’t see until the paint goes on. Screen is cheap. Redoing a wall is not.
Care and Storage
There’s not much to a pole sander, but the swivel is where they die. After a dusty job, blow or brush the compound dust out of the swivel joint before it cakes and stiffens the pivot. A stiff swivel is a flipping swivel. On the radial heads, pull the disc and knock the dust off the hook-and-loop so the next disc grips.
Store the pole sander hanging or flat, never standing on the pad, which crushes the screen and warps the swivel over time. Anodized aluminum (the LEVEL5) handles a damp garage fine. Plain cast aluminum and steel clamps (the budget end) will corrode if you leave them wet, so wipe them down.
The screen and discs are the consumable. The tool, if you keep the swivel clean, lasts years.
Mistakes I Still See
- Sanding through the compound into the paper face. Leaves a fuzzy patch that shows through paint. Sand to flat and stop; check by feel in low light.
- Running a clogged screen. It burnishes instead of cuts and polishes a low spot you can’t see. Change screen the second it stops biting.
- Pushing too hard at the top of the stroke. That’s what flips a plain-pivot sander and tears the screen. Ease off as you reach the end of each pass.
- Sanding under a ceiling light instead of raking light. You miss ridges that the first coat of paint lights up. Hold a work light flat against the wall.
- Skipping the dust mask. Drywall dust is fine, it lingers for hours, and it’s bad for your lungs. N95 minimum. A vacuum sander or wet sanding cuts the cloud at the source.
A Drywall Sanding Kit That Earns Its Keep
For a DIYer doing one room or some patches: 3M DRPS-009 pole sander ($14), a threaded extension pole if you don’t have one ($15), a pack of 150-grit drywall screen ($8), an N95 box ($10), and a cheap work light you probably already own. About $45 and you’re done.
For someone redoing a whole house or who finishes drywall more than once a year: Marshalltown RPS9H radial sander ($35) for the broad work, a 3M or hand block ($14) for corners, and if the dust is a dealbreaker, the Hyde 09180 with a shop vac you already own ($100). The radial head saves real time once you’re past a single room.
The sander is the cheap part. Don’t cheap out on the screen and polish a low spot into a wall you have to redo.