How to Paint Hardie / Fiber-Cement Siding
Painting Hardie siding the right way: scrub the chalk, prime bare cuts, use 100% acrylic, and back-roll the spray. Here is the order that lasts 15 years.


Fiber-cement is the easiest siding to paint and the one people wreck the most. Easy because the board is stable. It doesn’t rot, it doesn’t move much, and it holds a coat for over a decade. People wreck it because they treat it like wood, skip the wash, and roll paint straight over a chalky surface that’s been baking in the sun for ten years. The paint grabs the chalk, the chalk lets go of the board, and the whole job sheets off in two summers.
Hardie is the brand most people mean when they say fiber-cement. The prep is the same for any brand. Wash off the chalk, prime the bare edges, caulk the joints, and put down two coats of 100% acrylic. That’s the job. The order matters more than the brand of paint.
What You’ll Get
A repainted house that holds its color for 12 to 15 years, sheds water at every lap, and doesn’t peel at the board ends. The kind of job a painter would charge you four grand for.
Honest Take on Difficulty and Time
This isn’t a hard skill. It’s a big surface and a lot of ladder work, and that’s what makes it medium instead of easy.
An average single-story ranch is two to three days. Day one is washing and a full day of drying. Day two is prep: prime the bare spots, caulk, mask the windows. Day three is two coats, sprayed and back-rolled, with a few hours of dry time between them. A two-story with gables runs four or five days because of the scaffold and the cut-in time on the high trim.
Don’t try to wash and paint the same day. Fiber-cement holds water in the surface, and paint over a damp board blisters. Give it 24 hours minimum, longer if it’s humid.
What You’ll Need
Paint and Primer
100% acrylic exterior paint. This is the whole ballgame on fiber-cement. Acrylic flexes with the board and breathes, so trapped moisture escapes instead of pushing the paint off. Sherwin-Williams Emerald, BM Aura Exterior, and Behr Marquee all qualify. Oil-based exterior goes brittle on cement and peels. See the best exterior paint round-up for the full picks.
Acrylic primer, spot only. The factory ColorPlus or primed field is already sealed, so you don’t prime the whole house. You prime the unsealed spots: cut ends, repairs, nail-pops, and any bare gray board where the finish wore off. Sherwin-Williams Loxon or BM Fresh Start. The primer round-up covers the masonry-rated options.
Paintable acrylic caulk for the vertical board joints and the trim gaps. Not silicone. Silicone won’t take paint.
Tools
A pressure washer at 1500 to 2500 PSI with a 25-degree tip. An airless sprayer with a 515 tip for the body, and a 9-inch roller with 3/8-inch nap for back-rolling behind the spray. A 4-inch and a 2.5-inch angled brush for trim and corners. A caulk gun. Ladders or scaffold.
The sprayer is where the job gets fast. A whole wall by brush takes most of a day; sprayed and back-rolled, it’s an hour. If you’re renting one, get the airless, not the cheap HVLP cup gun. Picks are in the sprayer round-up.
For the material-specific story on why fiber-cement behaves the way it does, the fiber-cement substrate guide goes deeper than I will here.
Step 1 — Wash the Siding and Kill the Chalk

Whole wall pressure-washed top to bottom, the chalky film gone, siding left to dry a full day.
Rub the siding with a dark rag before you do anything. Comes away dusty? That’s chalk, and it has to go. Chalk is the paint binder breaking down after years of sun, and fresh paint grabs the loose powder instead of the board.
Run the pressure washer with a siding cleaner in the mix. Hold the 25-degree tip a foot off the board and work top to bottom so the dirty runoff flows down clean wall. Keep the wand angled down, not straight in. Blasting up under the laps drives water behind the siding.
Rinse, then let it dry a full 24 hours. Rub-test again. Still dusty, wash it again.
Watch out for water behind the laps. Fiber-cement laps overlap like roof shingles, and a wand aimed up shoots water under them. Always angle down.
Step 2 — Prime the Bare Edges

Cut ends, nail-pops, and any exposed board hit with acrylic primer. Factory-finished field left alone.
Walk the house and find every spot the factory finish isn’t covering. Cut ends where boards were trimmed at corners and windows. Chips, drill holes, repairs, and anywhere the old paint wore down to bare gray board.
Brush acrylic primer onto those spots only. The cut ends are the ones that bite you. Bare fiber-cement edge wicks water like a sponge, and unprimed edges are where peeling starts. Get primer into every exposed end grain.
Sand any rough or fuzzy cut edge with the 100-grit sponge before you prime so the primer lays flat.
Watch out for the bottom edge of each board. That’s a cut edge too, and it’s the most exposed to splashback off the ground. Don’t skip it because it’s awkward to reach.
Step 3 — Caulk the Joints and Mask Off

Vertical board joints and trim gaps caulked, the bottom lap drip edge left open, windows masked off.
Run paintable acrylic caulk into the vertical butt joints where two boards meet, and along the gaps where siding meets trim, corner boards, and window casing. Tool the bead smooth with a damp finger so it reads like part of the wall, not a worm sitting on top.
Do not caulk the bottom horizontal edge where one lap overlaps the one below. That gap is a drip edge by design. It lets any water that gets behind the siding escape. Caulk it shut and you trap moisture against the board.
Mask the windows and doors with film and tape. Cover the shrubs and the deck. Overspray drifts farther than you think on a breezy day.
Watch out for the temptation to caulk every gap you see. The lap drip edges stay open. Only the vertical joints and trim seams get caulk.
Step 4 — Spray and Back-Roll the First Coat
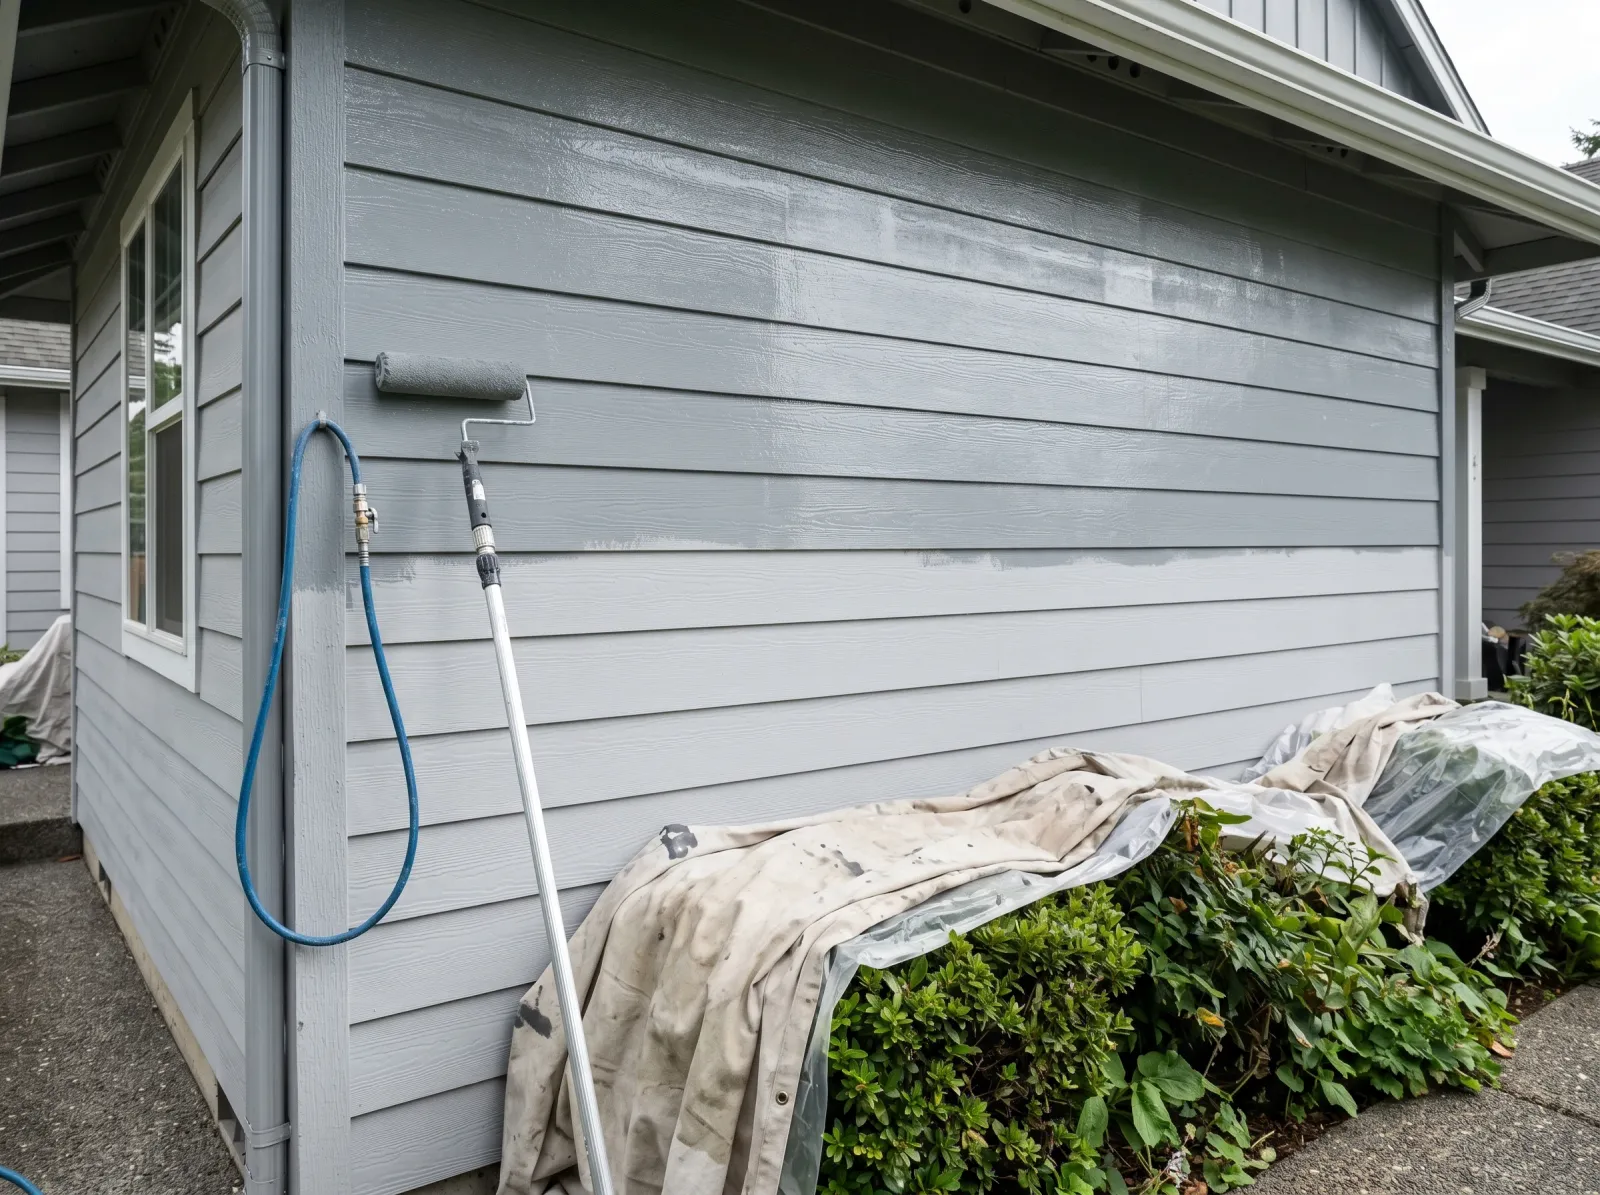
Body sprayed in even passes, then back-rolled while wet to push paint into the texture.
Spray the body in even horizontal passes, keeping the gun a foot off the wall and moving steady. Overlap each pass by half. Two people make this easy: one sprays, one follows with the dry roller.
Back-rolling is the step that makes the job last. Right behind the spray, while the paint’s still wet, run a dry 9-inch roller over the sprayed area. The roller pushes paint down into the wood-grain texture instead of letting it bridge over the surface. Skip the back-roll and the paint sits on top, looks fine for a year, then the thin spots flash through.
Let the first coat dry the time on the can, usually 4 hours in good weather. Don’t recoat in direct hot sun. Paint that flashes off too fast on a south wall lap-marks and won’t level.
Watch out for lap marks on a hot wall. Work the shady side of the house in the morning and chase the shade around. Paint going down at 95 degrees in full sun sets before you can blend the wet edge.
Step 5 — Second Coat and Cut the Trim

Second body coat down, trim and corners brushed in white, tape and masking pulled.
Second coat goes down the same way: spray, back-roll, keep the wet edge moving. Two coats is the rule on fiber-cement. The board is porous and one coat reads thin, especially over the primed spots.
Brush the trim, corner boards, and fascia by hand with the angled brush. Trim usually wants a different color and a brushed line looks crisper than a masked spray edge anyway. Cut it in clean.
Pull the masking while the paint is still slightly tacky, not bone dry. Dry paint can lift a ragged edge when the tape comes off.
Common Mistakes
- Painting over chalk. The single most common reason a fiber-cement repaint peels. The paint bonds to loose powder, not the board. Rub-test with a dark rag, and if it’s dusty, wash again before you paint.
- Skipping the bare-edge prime. Cut ends and exposed board wick water. Unprimed, they’re where the peel starts and creeps inward. Prime every bare edge, especially the bottom of each board.
- Caulking the lap drip edges. People caulk every gap to “seal it up.” The horizontal lap edges are drainage by design. Seal them and you trap water against the cement, which blisters the paint from behind.
- Spraying without back-rolling. Spray-only lays paint on top of the texture instead of in it. It covers, it looks done, and it flashes thin within a year or two. Back-roll the body every time.
- Using oil-based paint. Oil goes brittle on cement, can’t flex with the board through the seasons, and traps moisture. It peels in sheets. 100% acrylic only.
Cure Schedule
| Time after final coat | What’s safe |
|---|---|
| 1 hour | Pull the masking |
| 4 hours | Touch dry; light rain won’t wash it off |
| 24 hours | Reattach shutters, light fixtures, downspouts |
| 7 days | Lean a ladder against it, hose it gently |
| 30 days | Full cure; pressure-wash, scrub |
Maintenance and Touch-Ups
A 100% acrylic job on fiber-cement holds 12 to 15 years. South and west walls fade first from sun. Once a year, hose the siding down with a soft brush and a bucket of mild cleaner. Knocking the dirt and pollen off is most of what keeps the color alive.
For a touch-up, dab the leftover paint with a small piece of roller, not a brush. A brush leaves a different texture than the back-rolled wall and the patch shows in raking light. Keep a quart with the color code on the lid.
When the time comes to repaint the whole thing, you won’t need to strip anything. A sound acrylic coat just needs a wash and another two coats. That’s the payoff for prepping it right the first time.
Cost Breakdown
| Item | $ |
|---|---|
| Exterior acrylic, 6–8 gallons | $300–$500 |
| Primer, 1–2 gallons | $40–$90 |
| Caulk, 6–10 tubes | $40–$70 |
| Cleaner, masking, tape, drop cloths | $60–$100 |
| Sprayer rental (3 days) | $90–$150 |
| Total | $400–$900 |
Numbers run for a single-story house with mid-to-premium paint. A two-story with a lot of trim climbs from there, mostly in paint volume and rental days.