Where to Stop and Start a Paint Color (Corners, Doorways, Transitions)
Where to stop a paint color: end it at inside corners, door frames, and where the ceiling planes change. A plain guide to clean transitions in 8-inch reach.

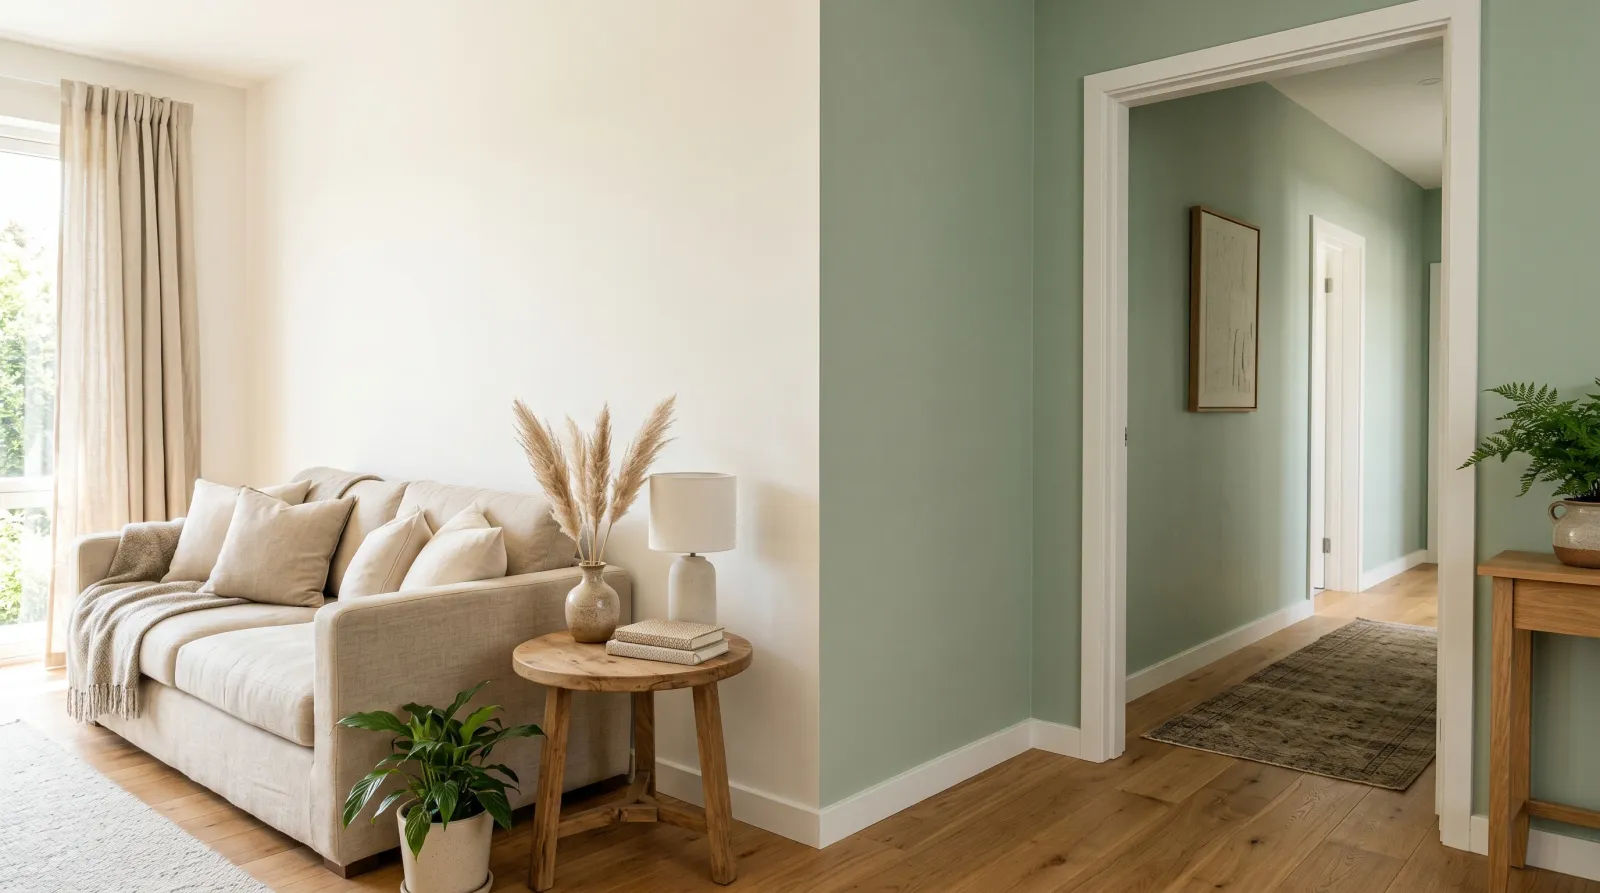
A color break is the line where one wall color stops and the next begins, and the room almost always tells you where to put it. The reliable stopping points are inside corners, door frames, and the line where a ceiling plane changes, because each one gives the seam something to hide behind. End a color on a flat, unbroken wall and your eye finds the edge instantly, even when the cut is clean within about an 8-inch reach. End it at a corner the wall makes on its own and the change reads as deliberate. The rule underneath all of it: let the architecture decide, not the tape.
Rooms break themselves up more than people expect. A doorway, an inside corner, a soffit, a half-wall, a beam. Each one is a built-in invitation to change color, and using them is the difference between a transition that looks designed and one that looks like you ran out of paint.
Where to Stop a Color
Stop a color at:
- Inside corners — the crease where two walls meet and turn away from you. The cleanest break point in any room, because the corner shadow hides the seam.
- Door and window casings — the trim frames the change, so the new color starts on the far side of a crisp white line.
- Cased openings between rooms — the same idea as a door, minus the door. The opening trim is the threshold.
- A change in ceiling height — soffits, tray edges, and beam drops are natural shelves to land a color on.
- Half-walls and pony walls — the cap rail gives you a horizontal line to stop on.
- Outside corners, on the back edge. Carry the color around and stop it where the corner turns out of the sightline.
Don’t stop a color in the middle of a flat wall, on a long uninterrupted run, or right at an outside corner’s front face. Those breaks have nothing to sit behind, and the line announces itself.
When a Color Break Reads as Intentional
A break looks chosen when it lands on a line the room already drew. Walk the space and look for where the wall turns, where the trim frames an opening, where the ceiling steps down. Those are your stopping points, and a color that ends on one of them feels built-in.
The other half is the floor and ceiling. Keep them continuous. When the accent wall or the second color changes but the oak floor runs straight through and the ceiling stays one tone overhead, the eye reads one connected home with two moods. Break the floor and the ceiling too and you get two rooms wedged together.
When NOT to Break a Color
Some walls want to stay one color, and forcing a transition onto them costs you more than it gives.
- A single long, flat wall with no corner. There is no line to hide the seam. Paint it one color or break it with two tones split by a horizontal rail instead.
- A small room. A powder room, a reading nook, a tight hallway. These usually read calmer wrapped in one enveloping color top to bottom than chopped into pieces.
- Across an outside corner that faces the room. The front of an outside corner is the first thing your eye lands on, so a color change there is the most visible cut you can make.
- Where two colors share almost the same undertone. If the shift is subtle, the break point won’t read as a choice. It’ll read as a patch. Either commit to real contrast or skip the break.
How the Break Points Compare
| Inside corner | Door / casing | Ceiling-plane change | Mid-wall (avoid) | |
|---|---|---|---|---|
| Seam hides in | Corner shadow | Trim line | Soffit or beam edge | Nothing |
| Difficulty | Easy, no taping the field | Easy, cut to the casing | Moderate, work overhead | Hard, needs perfect tape |
| Reads as | Built-in | Framed, deliberate | Architectural | Accidental |
| Best for | Open-plan zones | Enclosed rooms | Tray and step ceilings | Almost never |
For two full colors meeting on one wall by choice, the two-tone wall guide covers the rail-and-tape version in depth.
Common Mistakes
- Breaking color mid-wall to “zone” a space. Without a corner or a trim line, the seam floats. Move the break to the nearest inside corner, or split the wall horizontally with a rail so the line has a reason to be there.
- Stopping the accent partway across its wall. An accent reads as a decision when it fills one plane corner to corner. End it short and it looks unfinished. Take it to the inside corners.
- Changing color on the front of an outside corner. That face catches the most light and the most attention, so the cut shows. Carry the color around to the back edge and stop it there.
- Letting the ceiling break above a wall break. The ceiling usually wants to stay one continuous tone overhead. A continuous ceiling actually ties two wall colors together instead of splitting the room twice.
- Cutting freehand at the corner and chasing a wavy line. The crease is forgiving, but a shaky cut still shows under raking light. Cut into the corner with a quality angled sash brush, or you get the same ragged edge that turns up as visible lap marks where one section meets another.
What a Clean Transition Looks Like
The change should land exactly on the line the room gives you and stop there with no ghosting onto the next plane. At an inside corner, each wall keeps its color right into the crease, and the corner’s natural shadow hides the seam. At a door, the new color starts on the far side of the casing, so a white frame separates the two fields like a mat around a picture.
Check the transition under raking light, the low side light that crosses the surface in the morning or late afternoon. That light exposes every imperfection a flat midday glare forgives, and it’s where a roller’s texture or a missed edge shows up most. If the line holds clean there, it holds in any light.
Where to Buy / What to Look For
You don’t need a special product for a color break. You need a clean edge, which comes from tools, not the can. Pick up a 2.5-inch angled sash brush for cutting into corners and along casings, plus a low-tack painter’s tape rated for delicate surfaces if you’re protecting a finished trim line.
For the colors themselves, every wall shade is mix-on-demand at any paint counter, so the second color in a transition costs the same as the first. The part worth slowing down for is the undertone match between the two fields. Two colors that fight on temperature will make even a perfect break look off, which is the quiet trap undertones set in every palette. To test a pairing before you commit a gallon, the color matcher tool helps you see how two shades sit beside each other.
FAQ
Where do you stop painting an accent wall?
Stop it at the inside corners of the wall you’re accenting, corner to corner, never partway across a flat wall. An accent reads as a deliberate choice when it fills one full plane. Let the ceiling line and baseboard frame the top and bottom.
Should wall color change at the corner or the doorway?
Both work. Change at an inside corner when two open areas share a wall and you want the shift to feel built-in. Change at the door casing when a room is fully enclosed, so the trim becomes a clean frame between the colors.
How do you transition paint colors in an open floor plan?
Use the architecture. End each color at an inside corner, a cased opening, a half-wall, or a change in ceiling height. Keep the floor and ceiling continuous so the eye reads one home, and let furniture zones do the dividing where there are no walls to break on.
Where do you stop ceiling paint when walls are two colors?
Stop the ceiling color where the ceiling plane changes, at a soffit, beam, or tray edge, not above a wall break. A ceiling that runs one continuous tone overhead actually helps two wall colors below feel connected rather than split.