How to Save and Paint Historic Plaster Walls
Historic plaster walls crack, bulge, and fail at the keys. Diagnose what's wrong, stabilize it, patch with the right material, and paint so it holds. From a 22-year contractor.

Old plaster doesn’t fail because plaster is fragile. It fails because the keys that hold it to the lath snapped, or water got behind it, or someone painted over a moving crack and called it done. Find out which before you touch it. Paint is the last thing you do, not the first.
TL;DR
- Hairline cracks that don’t move: bridge with mesh tape, skim, prime, paint.
- Bulging or loose plaster: the keys broke. Reattach with plaster washers or adhesive before anything else.
- Crumbling, soft, or stained plaster: water. Find the leak first or you’re repainting next year.
- Patch with what’s there. Lime plaster wants a lime-compatible patch. Modern gypsum patch on a tiny crack is fine; full re-plastering of a lime wall is not a latex-mud job.
- Paint with a breathable matte or eggshell over a stain-blocking primer. Skip gloss on any wall this old.
- Pre-1978 house: the paint on top is lead until tested. No dry sanding.
Does This Match What You’re Seeing?
Old plaster shows its problems in a handful of patterns. Read the wall before you grab a putty knife.
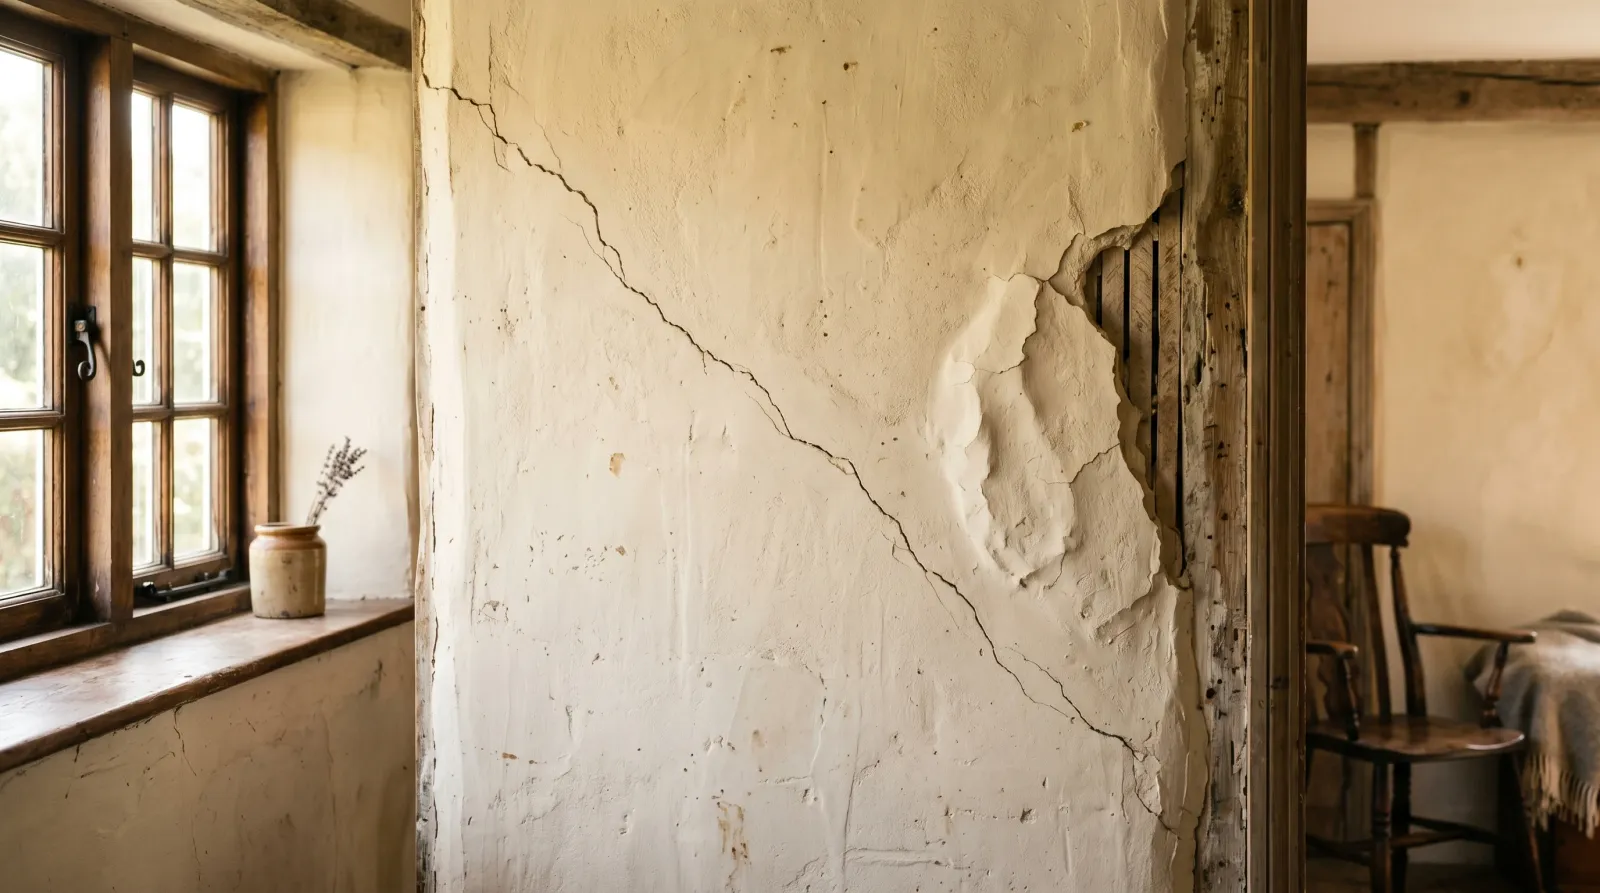
 A bulge means the keys behind the lath have snapped. Press it and it moves. That’s a reattachment job, not a filler job.
- Hairline cracks, fixed, no movement: age and seasonal cycling. Cosmetic. Mesh and skim.
- Cracks radiating from door and window corners: stress points. They reopen with movement unless you bridge them with tape, not just mud.
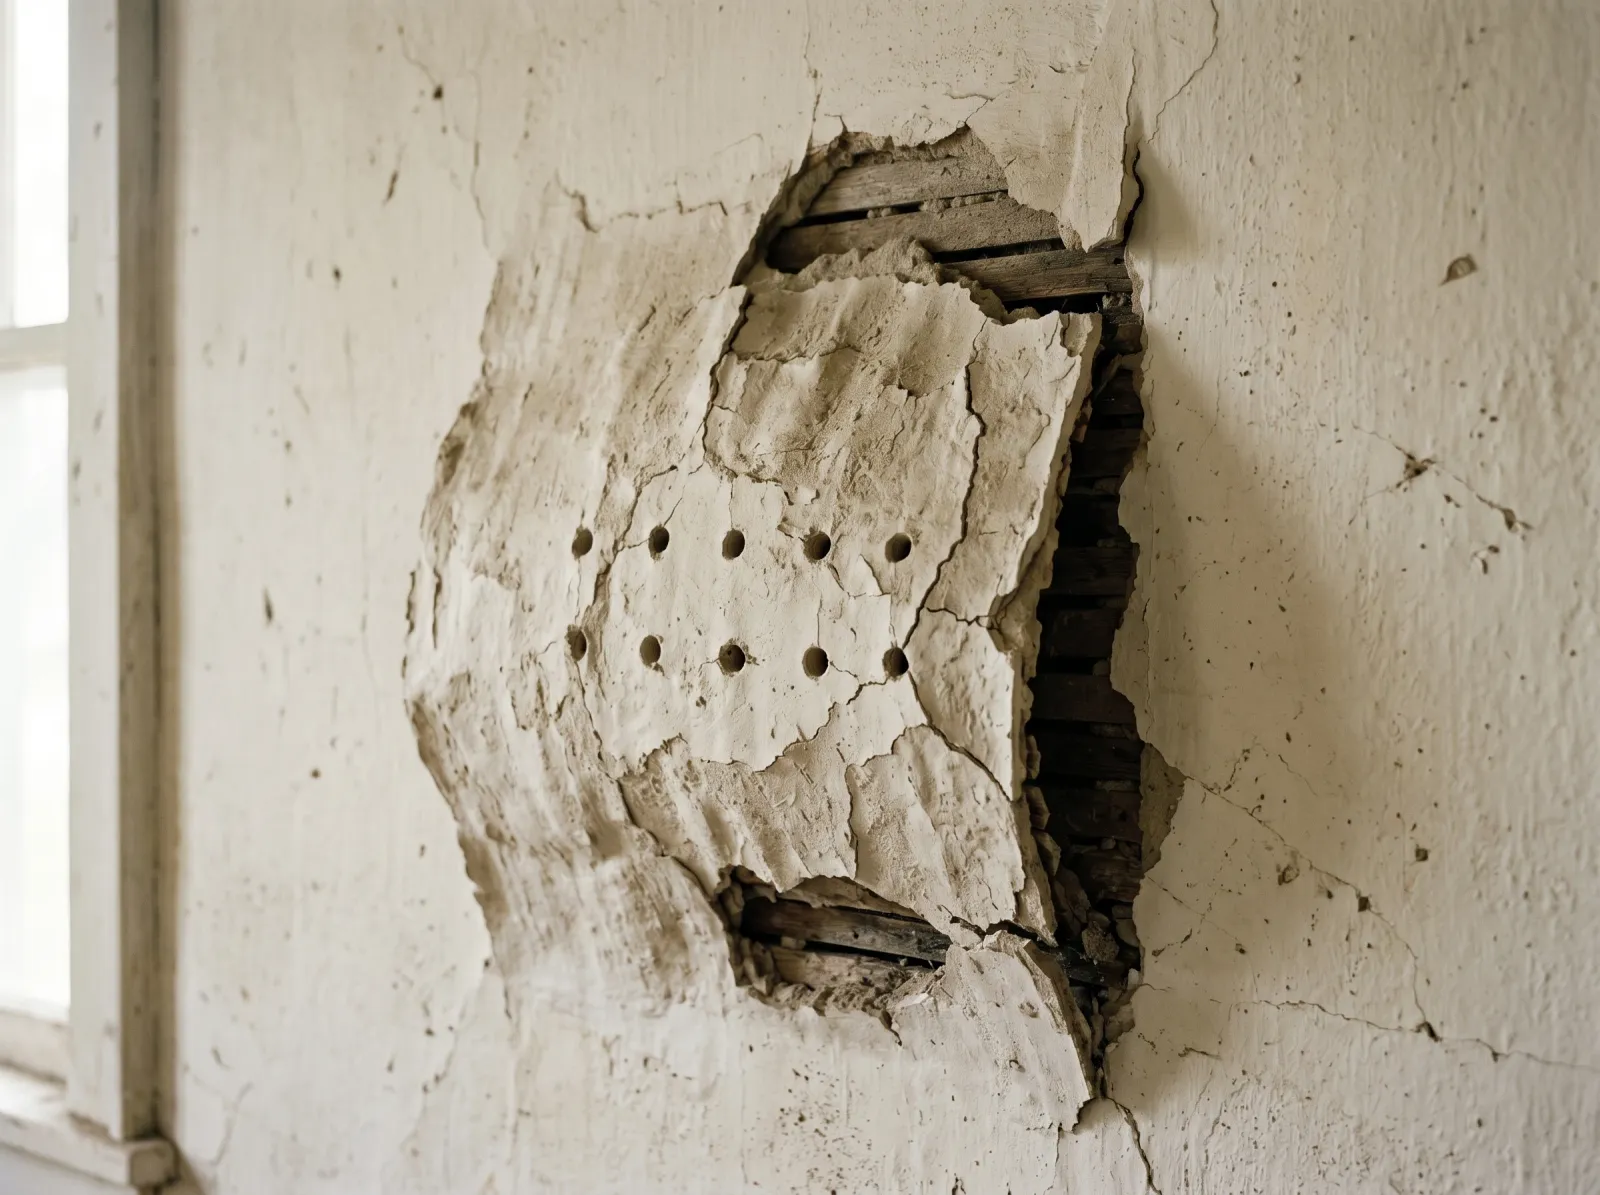
- A soft bulge that flexes when you press it: the plaster keys broke off the lath. The slab is hanging by friction. This is the one that falls on someone.
- Crumbling, sandy, or chalky plaster that won’t hold a screw: the binder is spent, or it’s wet. Sound the wall with your knuckles. Hollow means detached.
- Brown or yellow staining with soft plaster: active or past water intrusion. Fix the source before anything.
- A grid of small cracks, no bulge: old calcimine or distemper paint failing under newer coats. The top layers are delaminating, not the plaster.
If you tap the wall and it sounds hollow over a wide area, the plaster has let go of the lath behind it whether it’s bulging yet or not.
How Serious Is This?
A few hairline cracks in a sound wall is a same-weekend cosmetic fix. A bulging ceiling over a bed is a safety problem you deal with this week. Here’s the honest ladder.
- Low: tight hairline cracks, no movement, no bulge, no stain. Bridge and paint.
- Medium: cracks that reopen seasonally, small loose patches under a square foot, minor past water staining that’s now dry. Reattach, patch, prime, paint.
- High: large bulging sections (especially overhead), wet or crumbling plaster, sagging ceilings, or more than a third of a wall sounding hollow. Stabilize structurally or replace. A loose plaster ceiling weighs a lot and lets go without warning.
Pre-1978 home pushes everything up a notch because of the lead paint on the surface.
Why This Is Happening (root Cause)
Three things kill old plaster, and they don’t overlap as neatly as peeling paint does.
Failed keys. Traditional plaster was troweled over wood lath. It oozed between the strips and curled behind them as it set. Those curls, the keys, hold the whole slab up. A hundred years of vibration, settling, and slammed doors snaps them. Once enough are gone, the plaster sags away from the lath in a bulge. The plaster can be perfectly sound and still be hanging by nothing.
Structural movement. Houses move. Foundations settle, framing shrinks, seasons swing the humidity. Plaster is rigid and cracks at the weakest points: door corners, window corners, the middle of long walls. These reopen no matter how well you fill them unless the fill rides on something flexible.
Water. A roof leak, failed flashing, a plumbing line in the wall. Wet plaster loses strength, the binder breaks down, and it turns soft and sandy. Gypsum especially. Paint over stained plaster and the stain bleeds through and the patch never holds. See how to fix water stains on a ceiling if there’s brown bleed-through.
One thing that isn’t plaster failure: calcimine and distemper. Old water-based ceiling paints that newer coats can’t bond to. The new paint sheets off in a grid and people blame the plaster. It’s the old coating.
The Fix
Step 1. Find and Stop the Water
If there’s any staining, softness, or smell, stop here and find the source. Roof, flashing, plumbing, condensation. Plaster will not hold a repair while it’s wet, and it needs to read dry on a moisture meter or sit dry for a week before you patch. No exceptions. You’ll just be back.
Step 2. Reattach Loose Plaster
For a bulge that flexes, you have two routes.
Plaster washers. Cheap perforated metal discs. Drive a 1-1/4-inch coarse drywall screw through a washer into the lath or a stud, working from the edge of the bulge inward, pulling the slab gently back. Space them 3 to 4 inches apart in the loose zone. Don’t crank too hard or you’ll crumble the face. The washer sits proud and gets buried under your skim coat.
Adhesive reattachment. Drill a grid of small holes through the plaster face (not the lath), inject a low-viscosity conditioner, then a plaster adhesive (Big Wally’s Plaster Magic is the known kit), and clamp the slab back with washers until it grabs. Cure per the kit, usually 24 to 48 hours before you pull the clamps. Gentler on plaster too far gone for screws alone.
If more than a third of the wall is loose, or the lath is broken, this is a removal job, not a save.
Step 3. Treat the Cracks by Type
A stress crack and a hairline crack want different treatment.
- Tight hairline, no movement: rake it open slightly with a 5-in-1, vacuum the dust, fill with setting-type joint compound (Durabond or Easy Sand), feather.
- Stress crack at a door or window: rake it, then bridge with self-adhesive fiberglass mesh tape and at least two coats of setting compound, feathered wide. Mesh moves with the wall. A plain mud fill cracks straight back open.
- Wide or deep crack: fill the depth first with setting compound, let it set, then mesh and skim over the top. Don’t try to bury a deep crack in one pass.
For lime plaster you’re keeping breathable, use a lime-based patching compound, not gypsum mud, so the repair moves and breathes with the wall.
Step 4. Skim and Sand Flat
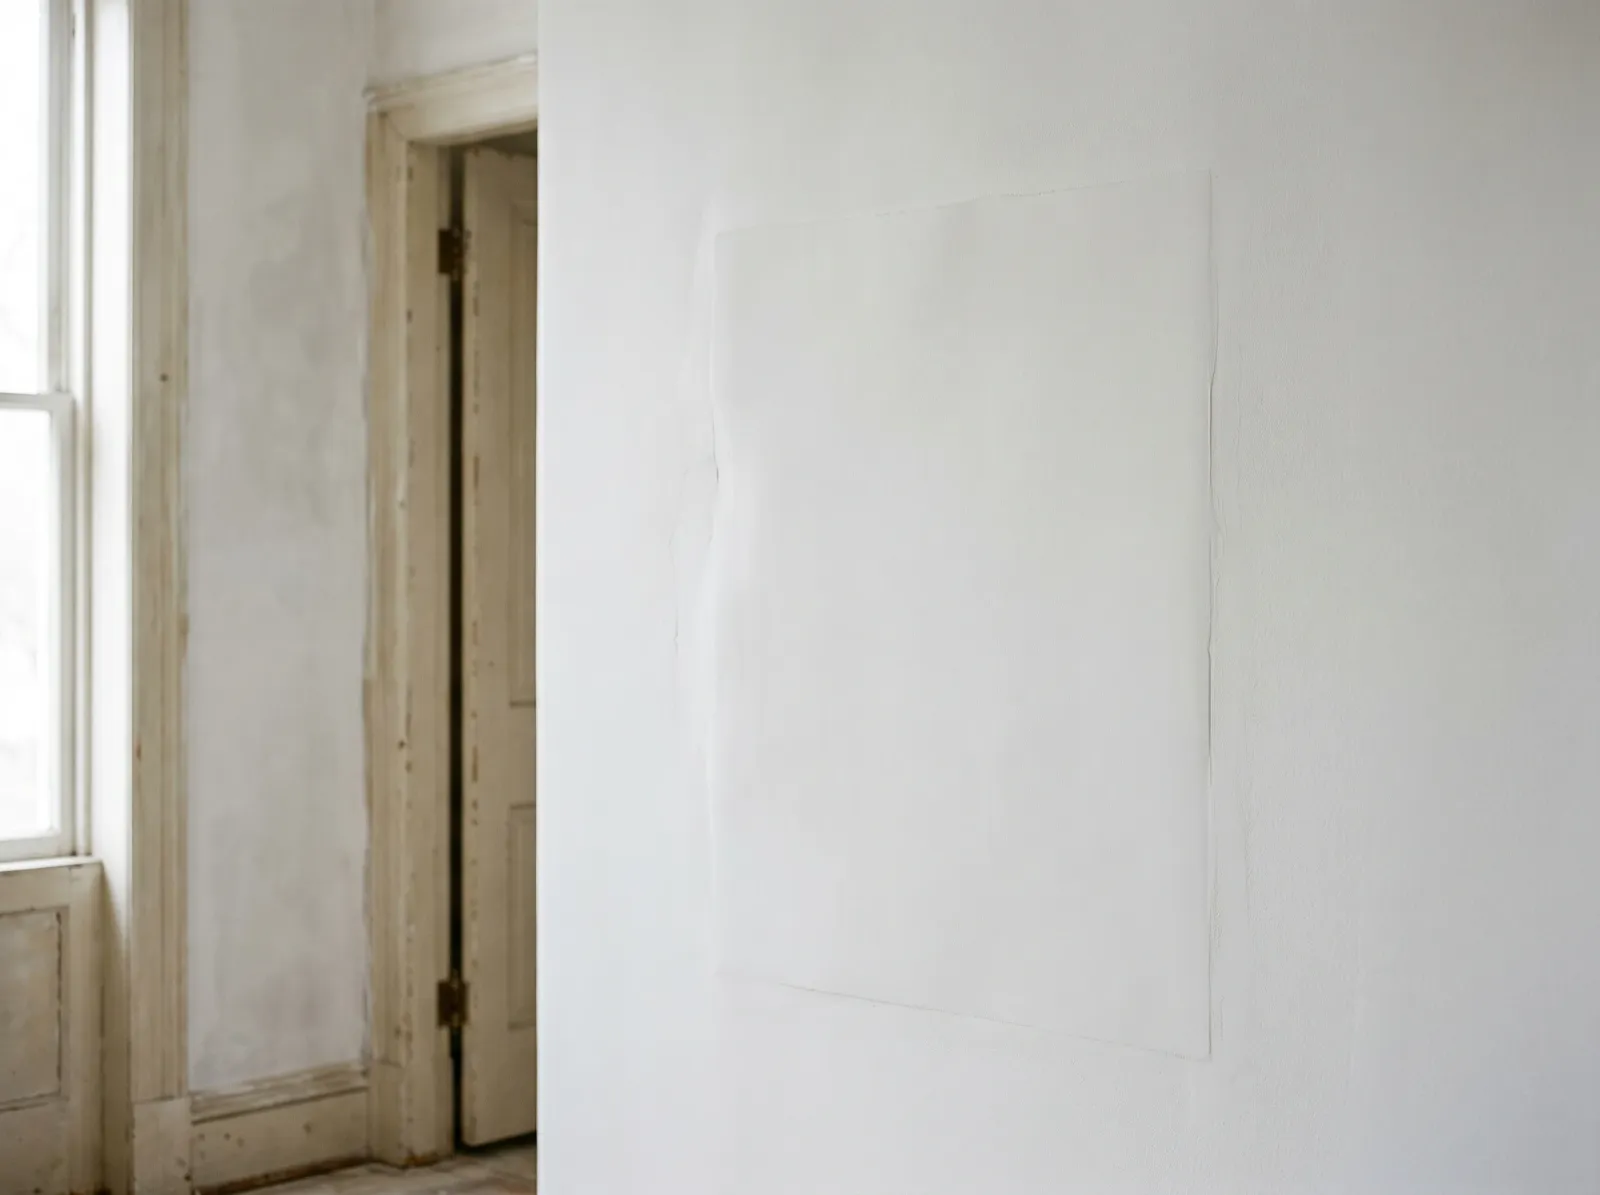 Skim over the washers and patches, feather wide, sand flush. The repair should disappear under raking light before primer ever touches it.
Skim the repairs and buried washers with joint compound, feathering wide so nothing telegraphs. On a badly cracked wall, a full skim coat gives you one flat plane. Sand to 150 then 220 grit. Run your fingertip across every transition. If you can feel it, you’ll see it once paint goes on, especially in side light.
Pre-1978 home? Wet-sand or use a HEPA sander only. The plaster isn’t lead but the paint on it is. More on that below.
Step 5. Prime, Matched to the Problem
Bare or skimmed plaster is thirsty and high-pH. Match the primer.
- Fresh lime or new plaster (high alkalinity): a high-pH-tolerant masonry or alkali-resistant primer. Latex over green lime can saponify and fail.
- Old sound plaster, general repaint: a quality acrylic wall primer. Two coats if the skim drinks the first one flat.
- Water stains, smoke, or any bleed-through: Zinsser BIN (shellac) spot or full coat. Nothing else reliably locks a plaster water stain.
- Calcimine or distemper failure: a dedicated calcimine recoater (calcimine primer-sealer), or strip the old coating. Standard primer won’t bond to it.
Step 6. Paint
Two coats of a breathable latex in matte or eggshell. Old walls are never perfectly flat, and a low sheen forgives the waviness that semi-gloss exposes under every window. Cut in, roll while the cut-in is wet, don’t stop mid-wall.
If you’re keeping a lime wall breathing the traditional way, a mineral paint or limewash is the period-correct match. It bonds to lime, breathes, and ages the way the wall was built to. See what limewash actually is before you decide, because it behaves nothing like latex.
Safety
N95 minimum during sanding, P100 for pre-1978 paint. Eye protection for overhead ceiling work. Cross-ventilate during priming and painting. Never mix bleach with vinegar, ammonia, or hydrogen peroxide if you’re cleaning a stained or moldy area first. It makes toxic gas. Rinse and dry before any primer.
Match the Fix to the Symptom
| What you see | Real cause | Critical fix | Then |
|---|---|---|---|
| Hairline crack, no movement | Age, cycling | Rake, fill, feather | Prime + matte/eggshell |
| Crack at door/window corner | Structural stress | Mesh tape + setting compound | Skim wide, prime, paint |
| Soft bulge that flexes | Broken keys | Plaster washers or adhesive kit | Skim over, prime, paint |
| Crumbling, sandy plaster | Spent binder or water | Find water; replace if soft | Re-plaster lime-compatible |
| Brown stain, soft spot | Active/past leak | Stop the leak, dry the wall | BIN primer, then paint |
| Grid of flaking top coats | Calcimine/distemper | Calcimine recoater or strip | Prime for bonding, paint |
For the full repaint sequence on sound plaster that needs no structural work, the plaster painting guide walks the prime-and-coat routine step by step.
Prevention
The plaster mostly takes care of itself once it’s reattached and dry. The job is keeping water out and movement managed.
- Roof and flashing: the single biggest threat to old plaster is water from above. Inspect after every hard winter.
- Gutters and grading: keep water off the walls and away from the foundation so the house moves less seasonally.
- Humidity: swinging indoor RH cracks rigid plaster. A steadier 35 to 50 percent year-round means fewer reopened cracks.
- Re-attach early. A small hollow spot reattached with two washers is a 10-minute job. The same spot ignored becomes a fallen ceiling.
- Caulk the right joints. Flexible acrylic-latex caulk at trim-to-plaster joints absorbs seasonal movement so the crack lands in the caulk line, not the wall.
Common Mistakes
- Filling a moving crack with rigid mud. It reopens in one heating season. Bridge stress cracks with mesh.
- Painting over a bulge. The slab is still loose. Paint changes nothing structural and the section still falls.
- Skim-coating wet plaster. It won’t bond and the stain bleeds through. Dry first.
- Gypsum patch on a lime wall you want breathing. Different material, different movement. Match what’s there.
- Dry-sanding pre-1978 paint. Lead dust everywhere. Wet methods or HEPA only.
- High-gloss on an old wall. Every wave and patch shows. Matte or eggshell hides the century of settling.
When to Call a Pro
- A sagging or bulging ceiling, especially overhead living space. The weight is real and it lets go fast.
- More than roughly a third of a wall sounding hollow, or broken wood lath behind it.
- Wet or rotted plaster with an active leak you can’t trace.
- Pre-1978 home where you’d be sanding any meaningful area. Get a certified RRP contractor. See the lead-paint section in the peeling-paint fix for the RRP rules.
- Historic homes with decorative plaster (cornices, medallions, ornamental work). Conservation, not patching.
What’ll Bite You in Two Years
Bridge the crack but skip the diagnosis, and the wall tells on you. A stress crack you mudded over without mesh reopens the first cold snap. A bulge you painted instead of reattaching keeps drifting until it lets go. Plaster is a system: lath, keys, slab, finish. Fix the layer that actually failed, not just the one you can see.