Annie Sloan Chalk Paint Wax: Honest Review (2026)
The traditional topcoat that seals Chalk Paint and gives it that soft, mellow glow. How clear, dark, white, and black wax actually work, how to buff it without fear, and exactly when to reach for lacquer instead.

Disclosure: Affiliate links. We earn a commission if you buy through them, at no extra cost to you. Picks reflect what we’d actually use on a real project, not the one with the fattest margin.
The Short Version
Okay, so you painted your dresser, the color looks great, and now there’s a little tin of wax in your hand and a voice in your head asking whether you’re about to wreck the whole thing. You’re not. Chalk Paint Wax is the step that turns a painted piece into a finished piece, and once you’ve done it once, you’ll wonder why you were nervous.
Here’s the honest framing. Wax is the prettier topcoat. It gives that soft, mellow, hand-rubbed glow that the whole Annie Sloan look is built around, and the tinted versions let you age a piece so it looks like it’s been around for fifty years. The catch is that wax is not tough. It doesn’t love water and it doesn’t love hard daily use, and every few years a hardworking piece needs a fresh coat. For a decorative dresser or a bookcase, none of that matters and the finish is gorgeous. For a kitchen table, you’d be happier with lacquer.
It earns a 4.3 from me. The finish is genuinely lovely and the technique is more forgiving than beginners fear. It loses points only because you have to know its limits going in, and a lot of first-timers wax a tabletop they should have lacquered.
Why Chalk Paint Needs a Topcoat at All
Let me explain what’s actually happening, because it makes everything else make sense.
Chalk Paint dries to that beautiful chalky matte look, but that finish is porous. Porous means full of tiny open pores, like an unglazed clay pot. Water, oils, and dirt soak straight in. Leave a piece bare and a water glass leaves a ring, fingerprints show, and the color rubs thin on the edges you touch most.
The topcoat fills those pores and puts a protective skin over the paint. Wax sinks in and sits just below the surface, where it repels everyday moisture and lets you wipe off the odd smudge. It also deepens the color a touch and brings out a soft, low sheen that flat paint can’t give on its own. So the wax isn’t an optional extra. The paint and the wax are two halves of one finish.
Clear, Dark, White, Black: What Each One’s For
There are four waxes, and the names sound fancier than the jobs they do. Here’s the plain version.
Clear wax is the one you’ll use most. It’s your everyday seal: it protects the paint and leaves that mellow glow without changing the color at all. If you only ever buy one, buy this. On almost every project, clear wax is the whole topcoat.
Dark wax is tinted a soft brown, and it’s the antiquing trick. You push it into the corners, the carved bits, and the brush marks, and it settles into the low spots and makes the piece look gently aged. Think of an old French armoire where the recesses have darkened over time. That’s the look. The thing to remember: you put a coat of clear wax down first, then work dark wax over it. The clear layer acts like a buffer so the dark doesn’t grab too hard and turn muddy. Skip the clear coat and a pale piece can go dingy fast.
White wax lightens and softens a color for a chalky, limewashed effect. Rubbed onto bare wood it makes a limed-oak look, where the grain stays visible but goes pale and soft. Black wax is the moody cousin of dark wax: it cools and darkens a color and brings drama out of mouldings and brushwork. Use it when you want depth and a bit of edge rather than a warm, aged look.
If you’re brand new and want the safe path: start with clear wax on a simple piece. Add dark wax to your next project once buffing feels natural. The tinted waxes are where the fun is, but they’re also where a beginner can overdo it, so it’s worth getting the basic move down first.
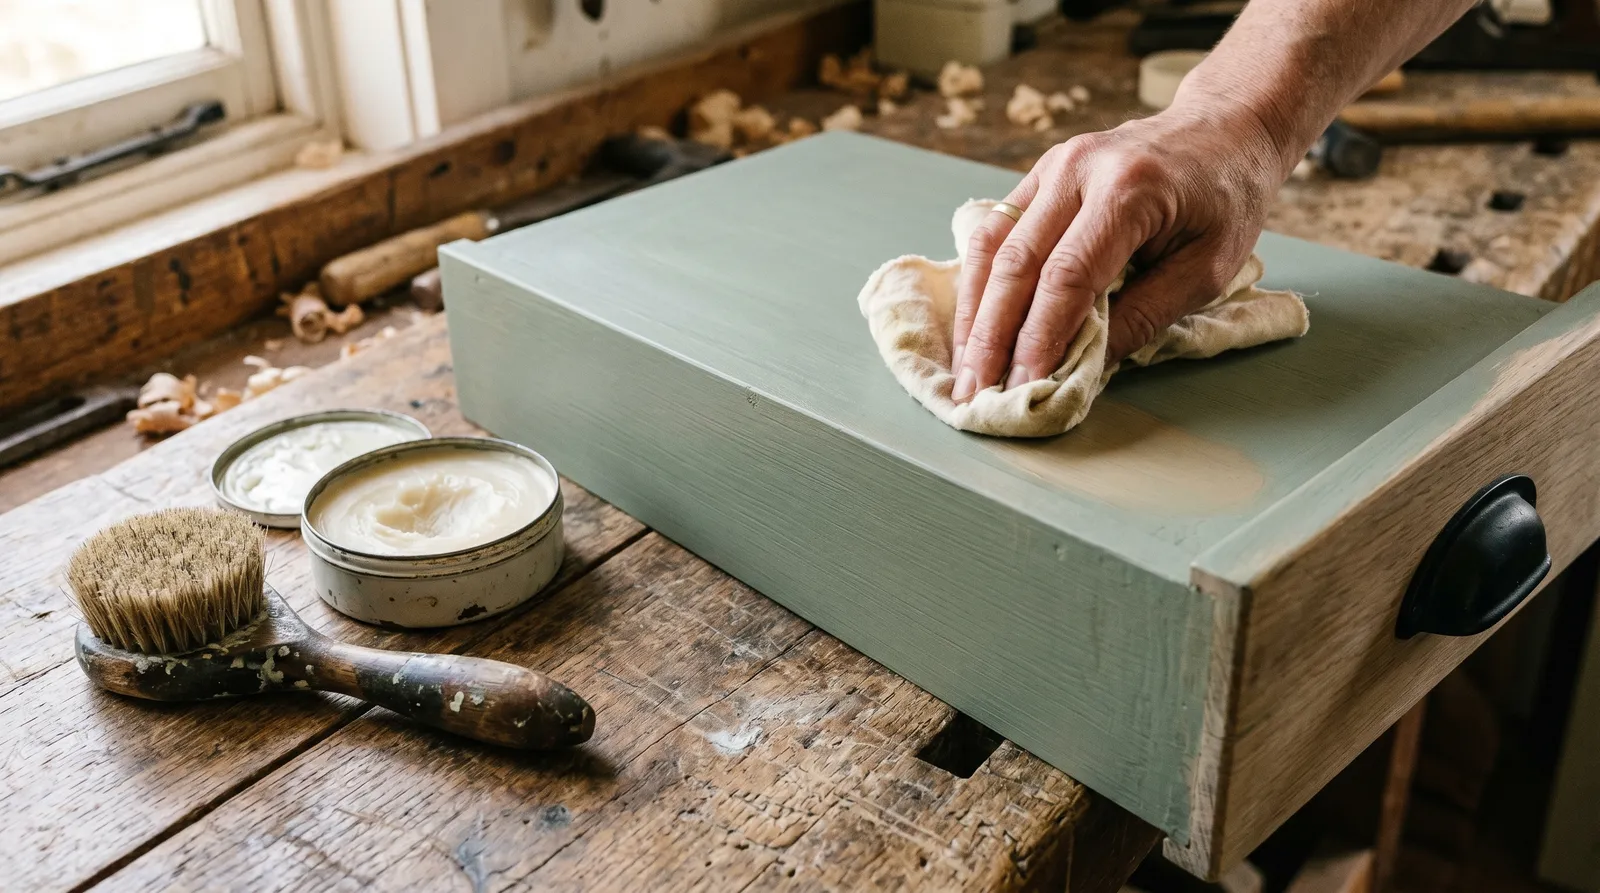
How to Actually Apply and Buff It
This is the part everyone’s scared of, so let’s walk through it slowly. There’s no rushing and there’s no single perfect technique. You’re rubbing wax into paint and then polishing it. That’s it.
1. Make sure the paint is dry. Give your last coat of Chalk Paint a few hours to dry properly. Waxing over damp paint is the one way to actually cause trouble.
2. Load a little wax. Use a wax brush (a round, stubby brush made for this) or a clean lint-free cloth. Either works. A brush gets into carved details better; a cloth is simpler and gives you more control your first time. Take a small amount. Wax goes much further than you think, and a thick gloppy coat is the main beginner mistake. You want a thin film, not a layer of frosting.
3. Work it in, one small area at a time. Rub the wax into the paint like you’re rubbing moisturizer into skin. Do a section about the size of a sheet of paper, then move on. Working small keeps you from leaving thick patches.
4. Wipe off the excess. Right after you work an area, go back over it with a clean cloth and wipe off whatever didn’t soak in. This is the step people skip, and it’s the most important one. If it feels tacky or sticky, you left too much on. Wipe more off. Done right, the surface should feel dry and smooth, not greasy.
5. Let it sit, then buff. Give it an hour or so to firm up. Then take a clean, soft cloth and buff, which just means rubbing the surface in circles to bring up the shine. The more you buff, the more sheen you get. A light buff gives a soft satin glow. Keep going and it’ll shine more. Stop wherever you like the look.
If you’re doing dark wax, do all of the above with clear wax first, let it set, then work the dark wax into the details, and wipe back any excess with a little more clear wax on your cloth. The clear wax on the rag is your eraser. Too much dark in one spot? Wipe it with clear and it lifts right out.
That eraser trick is the thing that takes the fear out of it. You’re not locked in. If a section looks off, more clear wax pulls it back while it’s fresh. You’ll know it when you see it.
The Honest Limits (and When to Choose Lacquer Instead)
Here’s where I have to be straight with you, because the wax has real boundaries and a lot of disappointment comes from not knowing them.
Wax is not for heavy wear or water. This is the big one. A waxed surface can mark, water-spot, and scuff under hard use. So a kitchen table, a bathroom vanity, kitchen cabinets, a windowsill that gets condensation, a bench by the back door, those will frustrate you if you wax them. For anything that gets wet or handled hard, use Chalk Paint Lacquer instead. Lacquer is a tougher, water-based, wipe-on sealer that handles moisture and daily abuse much better. You can pick it up wherever you buy the wax. The simple rule again: decorative piece, wax. Hardworking or wet piece, lacquer.
It needs occasional re-waxing. Wax isn’t forever. A gently used piece can go years untouched, but one you handle daily wants a fresh thin coat of clear wax every year or so. That’s a quick job, not a redo, but it’s a commitment lacquer doesn’t ask of you.
It takes a couple of weeks to fully harden. Wax is touch dry in about an hour, but it keeps curing underneath for roughly two weeks. During that window the finish is soft and not at full strength, so go easy. Don’t stack heavy books on a freshly waxed shelf or set a hot mug on a new tabletop the same day. Give it the two weeks and it reaches its real toughness.
There’s a small learning curve. Not a scary one, but not zero either. The two things beginners get wrong are using too much wax and not wiping off the excess, and both leave a tacky surface. The fix is the same for both: thinner coats, wipe back hard, buff once it’s set. Your second piece will go better than your first. That’s normal.
Where to Buy
Annie Sloan keeps the wax in the same place as the paint: trained independent stockists, plus the official US online store at anniesloan.com, with free US shipping over $99. It isn’t sold at Home Depot, Lowe’s, or backed on Amazon. Listings there are third-party resellers the brand doesn’t stand behind, and you lose the in-person help.
A little goes a long way, so don’t over-buy. The 120ml tin (around $19) is plenty for a single piece or a sample run while you learn the technique. Step up to the 500ml tin (about $40) once you know you’ll be doing several pieces; it seals a lot of furniture. There’s a 2.5 litre size too, but that’s more than most home projects ever need.
If you can get to a stockist, do. Many run hands-on workshops where someone walks you through waxing and buffing in person, and watching it done once removes most of the nerves a paragraph can’t.
Buy It / Use Lacquer Instead
Buy Chalk Paint Wax if your project is a decorative piece that won’t get soaked or beaten up, a dresser, a bookcase, a chest, a frame, a cabinet that mostly looks pretty. You’ll get the soft, mellow, hand-finished glow the whole Annie Sloan look is famous for, and if you want the aged look, dark wax in the crevices is how you get it. The technique is gentler than it looks, and the clear-wax eraser trick means you can fix as you go.
Use lacquer instead if the piece works for a living or meets water: a kitchen table, a vanity, kitchen cabinets, a high-traffic surface, anything you’ll wipe down often. And if your color looked great but you’re not sure which topcoat fits, that question (and the whole wax-versus-lacquer choice) is laid out plainly on the Annie Sloan brand hub. To see how the paint underneath performs, read the Annie Sloan Chalk Paint review, browse the full Annie Sloan color range, or compare topcoat behavior across brands in our best paint for furniture round-up.
Frequently asked questions
what's the difference between clear wax and dark wax?+
do I have to wax it, or can I leave the paint bare?+
wax or lacquer, how do I choose?+
how often do I have to re-wax, and is it durable?+
- Annie Sloan brand hub
- Annie Sloan Chalk Paint review
- Browse all Annie Sloan colors
- Best paint for furniture