Paint Viscosity Explained — Cup Tests and Why They Matter
Paint viscosity is resistance to flow, measured in Krebs Units or seconds through a Zahn cup #2. Why 70-85 KU works for rollers and HVLP wants 20-25 seconds.

Most people can tell when paint is too thick the moment they load a roller. It drags. The cover doesn’t release cleanly, lap marks show up where the wet edge stalled, and a job that should have taken an hour takes two. The fix-by-feel approach works until you have to thin paint for an HVLP gun or match a specified film build. Then the number matters.
Viscosity is resistance to flow. Honey is high-viscosity, water is low-viscosity, paint sits somewhere between depending on the formulation and the temperature. The number you care about is how the paint behaves at the moment of application: pushed through a spray tip, dragged across a wall by a brush, or transferred off a roller cover. Two paints with identical pigment loading and identical binders can flow completely differently because the rheology package is tuned to a different application method.
How Viscosity Is Measured
Two instruments cover almost everything you’ll see in a TDS.
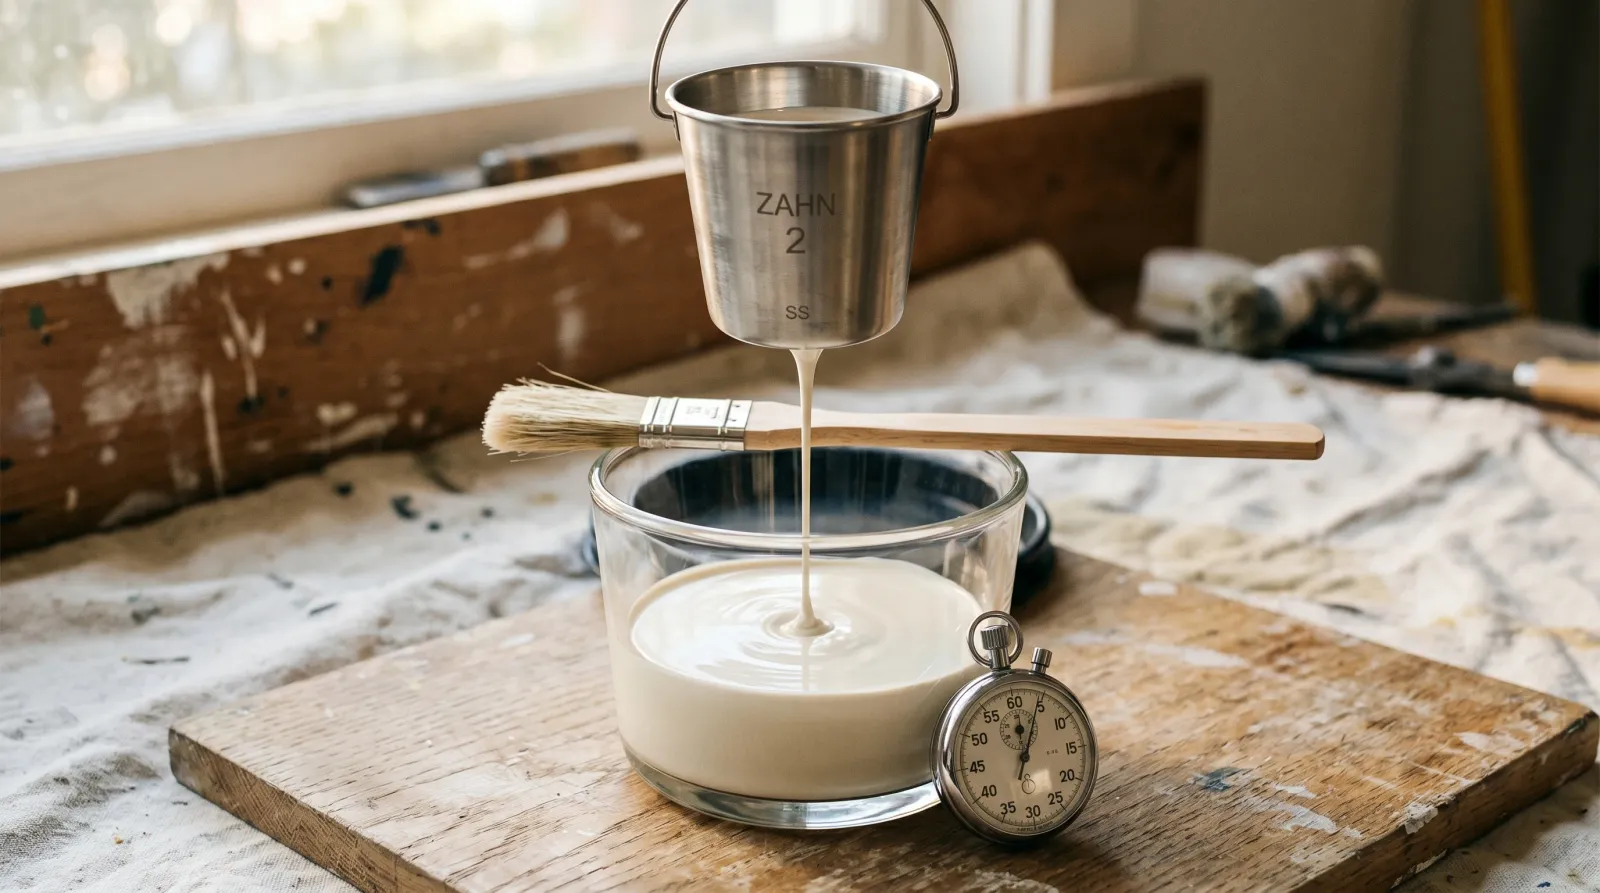
The Zahn cup is a small stainless cup with a precisely sized orifice in the bottom. You dip it in the paint, lift it clear, and start a stopwatch the instant the cup breaks the surface. You stop the watch when the stream first breaks into drips. The seconds reading is the viscosity. A Zahn cup #2 is the standard for sprayable coatings. Its orifice is sized so most thinned spray paints land in a readable 15-35 second window. Zahn #3 and #4 handle thicker fluids; Zahn #1 handles solvents.
The Krebs-Stormer viscometer is a rotating-paddle instrument. A standardized paddle spins through the paint at 200 rpm, and a calibrated weight system measures the torque needed to hold the speed. The number reads in Krebs Units (KU). Interior latex wall paint sits at 90-105 KU. Floor enamel sits at 70-90 KU.
The two scales don’t convert cleanly. Krebs reads brushable consistency. Zahn reads sprayable consistency. A 100 KU wall paint will run around 80-100 seconds through a Zahn #2, which is why you’d never use a #2 for wall paint. The cup empties in a slow, useless drip. Use the cup matched to the application.
Zahn Cup #2: The Sprayer Standard
For HVLP spraying, the working target is 20-25 seconds through a Zahn cup #2. That window lets the gun atomize the fluid into a fine, even fan without spitting, sputtering, or building orange peel.
The reason for that is the way HVLP atomization works. Air at low pressure shears the fluid stream into droplets at the nozzle. Thick paint resists shearing. Droplets come out fat and uneven, the pattern goes ropey, the air cap starts to clog. Too thin and the droplets atomize fine but carry too little binder and pigment to build a film, so coverage suffers and runs appear on vertical surfaces.
A simple field test: dip the cup, lift it clear, count one-thousand-one to one-thousand-twenty-five out loud. If the stream is still continuous at twenty-five, the paint is too thick for HVLP. Thin in 5% increments by volume and retest. Latex thins with clean water. Conversion varnish, lacquer, and pre-cat take the manufacturer’s specified reducer, not mineral spirits. Using the wrong solvent can crash the resin out of solution and ruin the batch.
Why HVLP Needs Thinner Paint Than Airless
HVLP and airless atomize paint by completely different mechanisms, and the viscosity each one tolerates follows from the physics.
HVLP uses high volume, low pressure air (typically 3-10 psi at the cap) to shear a low-velocity fluid stream into droplets. The air does the work, and air is a weak atomizer compared to mechanical pressure. The fluid has to arrive at the cap already close to a sprayable consistency or the air won’t break it down. That’s why HVLP shooters reduce almost every paint they put through the gun.
Airless skips the air entirely. A piston pump pressurizes the fluid to 2,000-3,000 psi and forces it through a tungsten carbide tip with an orifice between 9 and 23 thousandths of an inch. At that pressure, the fluid emerges as a high-velocity sheet that breaks into droplets from kinetic energy alone, no air needed. Viscosity from the can almost doesn’t matter; the pump is strong enough to atomize honey if you let it.
| Spray method | Atomization | Working viscosity | Thinning |
|---|---|---|---|
| HVLP gun | Air-shear at 3-10 psi | 20-25 sec Zahn #2 | 10-25%, almost always |
| Airless pump | Pressure at 2,000-3,000 psi | As supplied | Rarely |
| Air-assisted airless | Hybrid, 500-1,500 psi + air | 30-45 sec Zahn #2 | 5-15% sometimes |
| LVLP cup gun | Low-volume air-shear | 18-22 sec Zahn #2 | 15-30% by volume |
For the deeper comparison between the two main spray families, see the airless vs HVLP guide.
Why Thick Paint Hides and Why It Rolls Heavy
There’s a real trade-off built into viscosity. Pretending it isn’t there is how people end up with the wrong paint for their tool.
A high-viscosity wall paint carries more solids per gallon, more pigment per square foot of wet film, and a thicker dry film at the same coverage. One coat blocks more of the substrate. The stipple from the roller cover sits proud on the surface and breaks up light, which hides minor drywall imperfections (small dents, sanding scratches, taping ridges) that would otherwise read through a thin coat under raking light from a window. Premium wall paints lean into this on purpose. The rheology is tuned to flow off the roller but not flow back out flat on the wall.
The cost shows up at the roller and the brush. Thick paint loads heavy on the cover, drags during application, and won’t release at the end of a stroke without leaving a thicker ridge of paint behind. Lap marks form fast because the thick film doesn’t reblend when you come back.
Trim enamels and self-leveling acrylics deliberately run lower viscosity than wall paints. The formulator wants the film to flow back out flat after the brush leaves it. Lower viscosity, thinner build per coat, two coats instead of one, smoother final surface. Same chemistry family, different rheology, completely different job.
Common Mistakes
- Thinning with the wrong solvent. Latex takes water. Oil-based alkyd takes mineral spirits. Lacquer takes lacquer thinner. Pre-cat and conversion varnish take a manufacturer-specified reducer. Using the wrong one can crash the binder out of solution.
- Thinning more than 10-15% by volume without checking the TDS. The manufacturer designed the film build around the supplied solids. Cut too much water in and coverage drops. Some premium acrylics specifically prohibit thinning past 4 oz per gallon.
- Measuring viscosity in a cold shop. Paint viscosity climbs sharply below 60°F. A reading taken at 50°F can be 30-40 seconds higher than the same paint at 75°F. Test at the temperature you’ll spray at.
- Reaching for thinner instead of changing the tip. Most airless spray problems are tip problems, not paint problems. A worn 515 throws fingers no matter how you thin; a fresh 517 sprays the same can clean.
The Practical Takeaway
The number on the cup tells you whether the paint matches the tool. For HVLP, 20-25 seconds through a Zahn #2 is the window. Anything outside it gets thinned or rejected for the job. For airless, the viscosity from the can is almost always fine; if you’re reaching for the thinner, you’re probably reaching for the wrong tip. For roll and brush, high-viscosity formulas hide better but cost you in drag; low-viscosity formulas level beautifully but won’t bury a single drywall flaw.
Buy the paint for the substrate. Match the tool to the paint, not the paint to the tool. When you do thin, measure. Feel works until it doesn’t.