How to Fix Damp Walls and Stop Them Coming Back
Damp walls are a water problem in a paint costume. Diagnose the source — leak, exterior intrusion, or condensation — fix it, then seal and repaint. The order matters.

Damp walls are a water problem wearing a paint costume. Drylok over the patch buys you a season. The real fix is upstream. Find where the water is coming from, stop it there, then dry the wall and seal it. Skip the diagnosis and you’ll be back here next winter with a thicker can of primer and the same patch.
Does This Match What You’re Seeing?
Damp shows up four ways. Get the diagnosis right or the fix won’t hold.
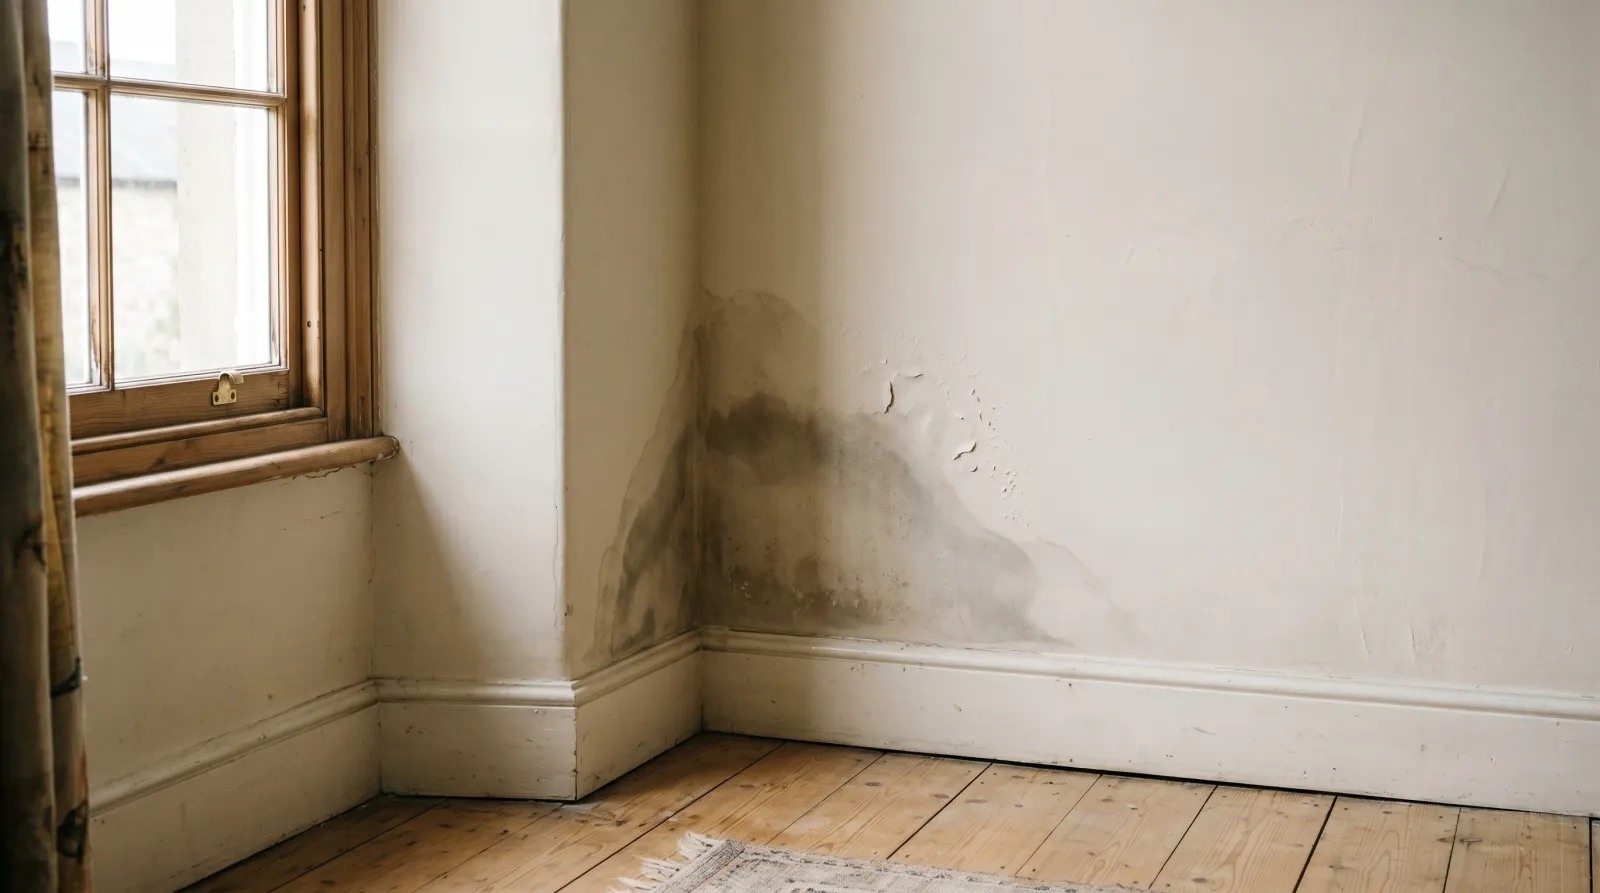
- Rising damp / tide line: a horizontal dark band 12–36 inches up from the floor, often with salt bloom or a soft fuzzy edge. Ground moisture wicks through a wall with a failed or missing damp-proof course. Common in older homes and basements.
- Plumbing leak (localised): a dark wet patch around a known pipe run, shower wall, washer hookup, or under a bathroom. Wet to the touch around the clock, often warm if it’s the hot-water line. Doesn’t move with the seasons.
- Exterior water intrusion: damp on a wall that faces weather. A corner that takes the prevailing wind, a wall under a failed gutter or flashing detail, a basement wall against soaked soil. Worsens after rain.
- Condensation: diffuse damp on cold surfaces. Exterior corners, the wall behind a wardrobe pushed against an outside wall, the ceiling above a shower. Seasonal, worse in winter, often paired with black mildew speckle.
If you can’t tell, run the two-hand test. Back of one hand on the suspect wall, back of the other on an interior partition wall. Condensation damp goes away when the room is cold and dry. Leak damp doesn’t.
The misdiagnosis I see most: condensation called as rising damp, because the homeowner saw the tide line near the floor and assumed ground moisture. Rising damp leaves salt. Run your finger across the band. Gritty white powder is salt, and that’s rising damp or efflorescence. Smooth dark stain with no grit is condensation finding the cold edge of the wall. Different problems, different fixes.
How Serious Is This?
If you can wipe the surface dry and the moisture meter reads under 15% on the substrate, this is a same-month fix. If the drywall is soft, the baseboard is swollen, or you can see staining behind the trim when you pull it, the substrate is already feeding the problem. Cut it out before you prime. If the affected area is bigger than ten square feet and there’s any black or slimy growth in the patch, that’s an EPA threshold. Stop and call a remediator.
Severity also depends on where the water came in. A localised plumbing leak is a one-day plumbing fix and a one-weekend paint fix. Chronic condensation on an exterior corner is a six-month ventilation and insulation problem before any paint goes on. Rising damp in a hundred-year-old masonry wall is a structural conversation with a damp surveyor before you spend a dime on primer.
Why This Is Happening (root Cause)
Water moves three ways inside a wall. As liquid (a leak), as vapor (condensation), or by capillary action (rising damp through porous masonry). Paint sits on the inside face of the wall and sees whichever one arrives. It doesn’t get a say in which.
The reason Drylok-and-repaint fails so often is that it treats the wall like it has one face. It doesn’t. There’s the room side, where you can see the damp, and the back side, where the water is arriving. Sealing the room side with a vapor barrier traps moisture in the substrate. The substrate stays wet, the framing stays wet, and the film blisters off the next time the wall hits the dew point. You painted the symptom shut.
The fix is to find the back-side source first. Sometimes that’s a non-paint job. A gutter, a flashing, a shower pan, a pipe joint. Sometimes it’s a ventilation change. Sometimes it’s an exterior render repair. Whatever it is, name it before you open a can of primer.
The Fix
Step 1 — Find the Source
Walk outside first. Check the gutter directly above the damp wall. Check the downspout direction. Check any flashing, weep holes, or render cracks within ten feet of the patch. Walk inside next. Pull the baseboard if rising damp is suspected. Open the access panel behind the shower wall if the patch sits behind a wet room. Run the dishwasher and the washer for a full cycle and re-check the wall. If you can’t find the source in an hour of looking, get a moisture meter and map the wet zone. The wettest spot is closest to the source.
Step 2 — Stop the Water at the Source
Non-paint work. Re-aim the downspout. Re-seal the flashing. Replace the gasket on the shower elbow. Repoint a cracked mortar joint. Add or repair the damp-proof course if a surveyor confirms rising damp. This is the step everyone wants to skip. Skip it and Step 4 fails.
Step 3 — Dry the Wall Completely
Run a dehumidifier or fan on the patch for 48–72 hours minimum. Confirm with a moisture meter: under 15% MC on the substrate before you prime. Cold drywall in winter takes longer. Don’t rush this. Primed-over wet drywall blisters within weeks and you’ve thrown the can away.
Step 4 — Prime with a Stain-Blocker
Zinsser BIN (shellac, blocks the brown tide ghost and any tannin bleed) for stained interior drywall. Zinsser Mold Killing Primer if there was any mildew in the patch. It carries a biocide and seals in one step. For below-grade masonry where you’ve fixed the exterior source and want a belt-and-braces interior seal, Drylok Extreme Masonry Waterproofer is the one. Only after Step 2 is genuinely done. One coat, full label dry time.
A note on mil thickness here. Drylok wants 75–100 sq ft per gallon for the waterproofing warranty, which is roughly half the coverage of a regular masonry primer. Going light will void the warranty and let pinholes through. Back-roll into the pores on the first coat. Don’t feather the edge yet.
Step 5 — Topcoat
Zinsser Perma-White for bathrooms, basements, and any room with a humidity history. Two coats. Self-priming over the stain-block layer, five-year mold-and-mildew warranty on the can. For a non-humid bedroom wall where the leak was the only issue, any decent interior acrylic earns its keep. Match the existing sheen and feather the edge into the surrounding paint.
Don’t stop in the middle of a wall. Cut in the corners first, roll while the cut-in is still wet, work corner to corner. Lap marks show up the second the sun hits a wall that was a damp patch six weeks ago, because the substrate behind the patch absorbs differently from the rest of the wall. Keep a wet edge.
Safety and Chemical Interactions
Never mix bleach with vinegar, ammonia, or hydrogen peroxide. Toxic gas. N95 mask, gloves, and eye pro for any biocide step. Ventilate. Shellac primers (BIN) flash off heavy solvent fumes. Open a window and skip the candle.
Recommended Product
Zinsser Perma-White. Biocide-loaded acrylic topcoat with a five-year mold-and-mildew warranty on the can. The right finish over a properly dried and primed damp wall, especially in a bathroom or basement.
See the Perma-White write-up in our mold-resistant paint round-up.
Prevention (the Part That Holds)
- Gutters and downspouts: re-aim every downspout to discharge at least six feet from the foundation. The single highest-leverage move for exterior damp.
- Bathrooms: exhaust fan running during the shower and for 20 minutes after. Target 1 CFM per square foot of room.
- Basements: dehumidifier set to 50%, drained to a sump. Permanent.
- Behind furniture on exterior walls: pull furniture two inches off the wall. The dew point doesn’t move; the air gap fixes it.
- Exterior render and pointing: walk the wall once a year. A hairline crack at year three becomes a damp patch at year five.
When to Call a Pro
- Affected area larger than 10 sq ft with any visible mold
- Soft, sagging, or stained-through drywall (the substrate is already gone)
- Damp that returns after one full treat-and-seal cycle (source is unfixed)
- Suspected rising damp in a masonry wall (get a surveyor before you Drylok)
- Pre-1978 home with peeling paint near the damp (lead test first, RRP rule)
- Musty smell from the HVAC supply (coil and duct problem, not paint)