How to Paint Kitchen Cabinets Without Sanding
A first-timer's guide to painting kitchen cabinets without sanding: TSP degrease, liquid deglosser, bonding primer, and the alkyd topcoats that actually stick.

Okay, so you want to repaint your kitchen cabinets and the idea of sanding every door, drawer front, and face-frame is the thing keeping you from starting. Here’s the thing: you can skip the sanding. Not “kind of” skip it, actually skip it. The trick is doing the degrease properly and using the right primer underneath the paint.
This guide is the no-sand version of the full kitchen cabinets project guide. Same paint, same cure schedule, different prep. If your cabinets are thermofoil (a vinyl wrap on particle board, which looks slightly plastic), skip to the thermofoil note near the bottom. The trick is different for those.
What You’ll Get
Real white cabinets that look factory-finished, without filling your kitchen with sanding dust for two days. The finish will be just as durable as a sanded prep — the primer is doing the bonding work that mechanical scuffing would normally do.
Honest Take on Time
One weekend of active work, then a month of “be gentle” before the paint is fully cured. Realistically:
- Day 1 (Friday evening): doors off, hardware bagged, TSP wipe-down
- Day 2 (Saturday): liquid deglosser pass, one coat of bonding primer
- Day 3 (Sunday): two coats of paint with a long recoat between
- Day 4 (Monday morning): doors back on, pulls reinstalled
- Days 5–30: gentle use, no scrubbing
If you brushed the boxes and rolled the doors, that’s around 10–14 hours of hands-on work. No sander, no dust mask the whole time, no garage cleanup. That’s the trade.
Why No-Sand Actually Works (this Part Matters)
Sanding does two jobs on a glossy cabinet. It removes the shiny topcoat so primer can stick, and it scratches in tiny grooves that give the primer mechanical “tooth.” Both jobs can be done other ways.
The shine comes off with a liquid deglosser, which is a wipe-on solvent that dulls the factory finish in about ten minutes. Krudd Kutter Gloss-Off and 3M Safety-Walk Liquid Deglosser both work, and they’re side-by-side at most paint stores. Wipe it on, wait the few minutes the bottle says, wipe off the residue with a clean cloth, and the gloss is gone.
The tooth comes from a bonding primer instead of a scratch pattern. Insl-X Stix is the one most cabinet painters use. It’s a waterborne acrylic primer engineered to chemically grip surfaces that regular primers slide off (laminate, glossy oil paint, sealed MDF, even some plastics). Where 220-grit sandpaper would create a scratched surface for primer to bite, Stix grips the smooth surface directly.
Here’s what no-sand doesn’t do: it doesn’t substitute for cleaning. If your upper cabinets have a years-old film of cooking grease, and they do because every kitchen does, the primer slides right off it. The degrease step is where most no-sand jobs fail. Spend an extra 20 minutes there. It’s the whole project.
What You’ll Need
Cleaning & Prep
- TSP or a TSP substitute (Krud Kutter Original Degreaser is the easy buy)
- Liquid deglosser (Krudd Kutter Gloss-Off or 3M Safety-Walk)
- Clean microfiber cloths (six of them, you’ll use them all)
- Nitrile gloves and safety glasses
- A bucket and clean water for rinsing
Primer & Paint
- Primer: Insl-X Stix Waterborne Bonding Primer, one gallon
- Paint: a waterborne alkyd. See the cabinet paint round-up. Benjamin Moore Advance and Sherwin-Williams Emerald Urethane are the two picks. Both self-level into a furniture-quality finish without sanding between coats.
Tools
- 4-inch foam roller plus two spare sleeves
- 2.5-inch angled sash brush (Wooster Silver Tip is what I use)
- Painter’s tape
- Drop cloths
- Small zipper bags for the hardware
- Sawhorses to lay doors flat
- A cabinet drying rack helps if you’re painting both sides same day
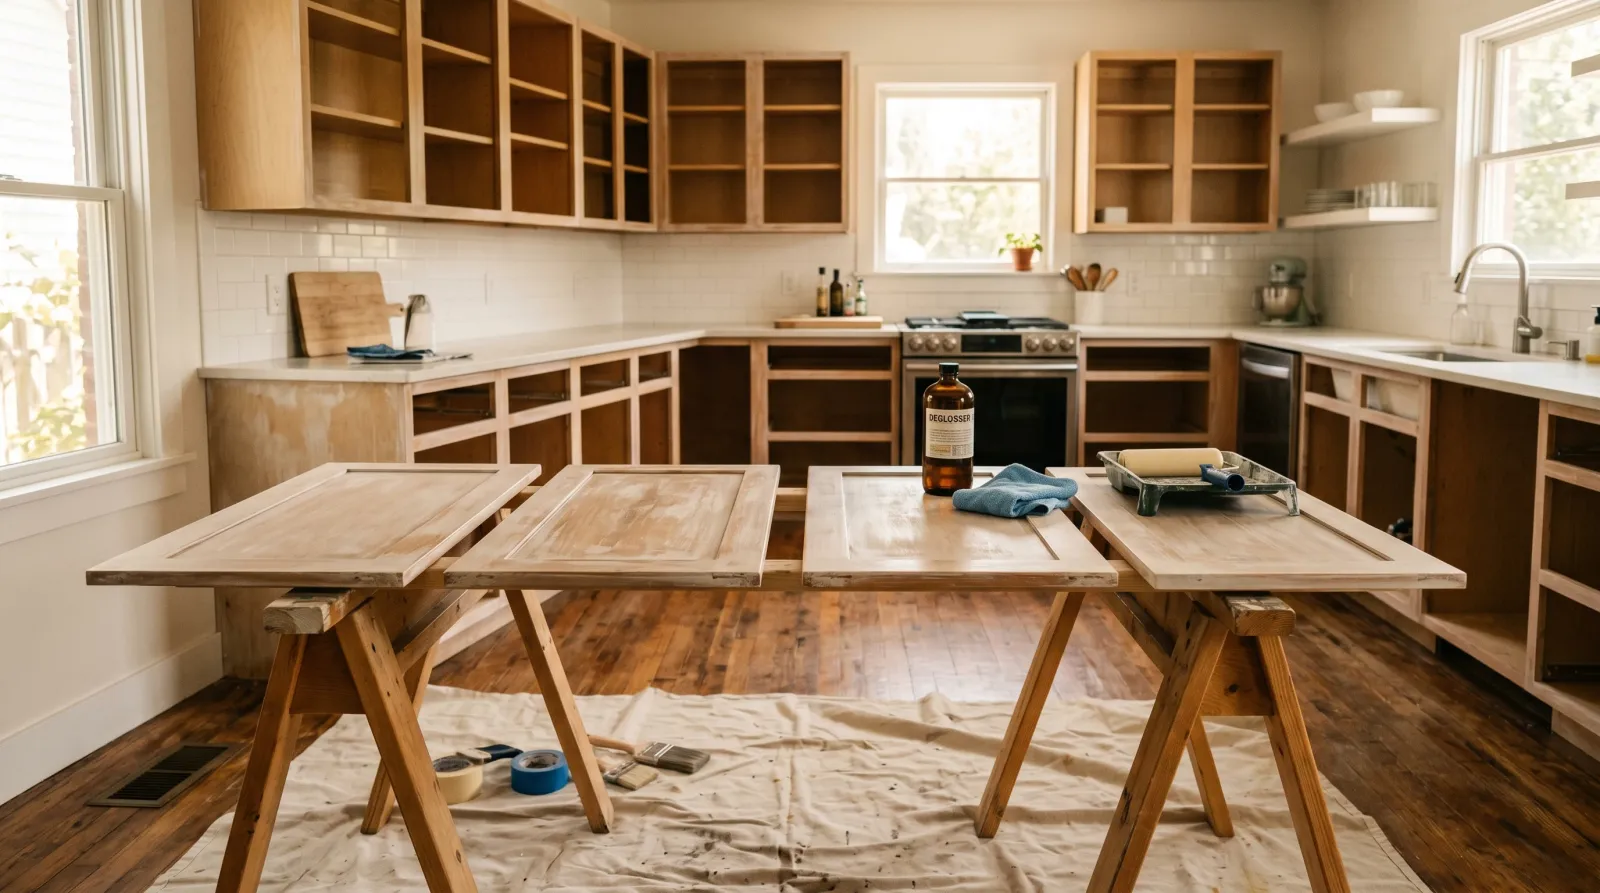
Step 1: Doors off, Hardware Bagged
Every door comes off. Every drawer front comes off. Number each door on the back with a piece of painter’s tape (1, 2, 3…), and put the matching number inside the cabinet box it came from. Throw all the hinges and screws from each door into a small zipper bag and label the bag with the same number.
This part takes 30 minutes and saves you three hours of “wait, which hinge goes where” later.
Watch out for: taking the doors off in a random order. They look identical now. They won’t six hours from now after you’ve painted them. Number as you go.
Step 2: TSP Degrease (the Real One)
Mix the TSP per the bottle (usually a tablespoon to a gallon of warm water) and wipe down every surface: door fronts, door backs, drawer fronts, the face-frames on the boxes, and the inside of each box if you’re painting those too. Pay extra attention to the upper cabinets around and above the stove. The grease there is older and thicker than it looks.
Rinse with clean water on a fresh cloth. Let everything dry overnight, or at least for four hours. Wet primer over wet TSP residue won’t bond.
Watch out for: declaring the cabinets “clean enough” after five minutes. The grease film on upper cabinets is invisible. The test is whether water beads up on the surface. If it does, there’s still grease, keep cleaning.
Step 3: Liquid Deglosser
Put on gloves. Wipe Krudd Kutter Gloss-Off or 3M Safety-Walk Liquid Deglosser onto every face you’re going to paint, using a clean rag. Wait the amount of time the bottle says (it varies, usually 5–10 minutes). Wipe off the residue with a fresh clean rag. The factory shine should be visibly duller.
You’ll know it worked when the cabinet face has a slight haze and feels less slippery to a fingertip. That’s the gloss gone. The primer will bond to that.
Watch out for: flooding the rag. A wet rag drips deglosser onto countertops and floors where it can soften other finishes. Lightly damp is enough.
Step 4: Bonding Primer
Roll Insl-X Stix Bonding Primer onto every face with the 4-inch foam roller. Brush into the corners and routed details with the angled sash brush. One coat is enough. Stix is engineered to bond, not to hide the underlying color. The brown wood (or the old paint) will still show through. That’s fine.
Dry overnight before the first coat of finish paint. Stix is touch-dry in an hour but the chemical bond keeps strengthening for 12+ hours.
Watch out for: thinking primer needs to look opaque. It doesn’t. Two coats of Stix gives no extra adhesion. You’re just wasting primer.
Step 5: First Coat of Paint
Roll the paint onto the flat panels with the foam roller. Cut in the corners and edges with the sash brush. Don’t overwork it. Get the paint on, blend the brush marks into the rolled area while it’s wet, move on. The self-leveling chemistry in BM Advance and SW Emerald Urethane needs you to leave it alone to do its work.
Benjamin Moore Advance: 16 hours before the second coat. Sherwin-Williams Emerald Urethane: 4 hours. Both are written on the can. The long Advance window is the trade-off for the smoother finish.
Step 6: Second Coat
Same as the first. Two coats of paint is not negotiable on cabinets. One coat will telegraph the underlying tone within six months, especially on dark cabinets going to white.
Step 7: Reinstall
Wait at least 24 hours after the second coat before you put doors back on the hinges. Use your numbered tape to put every door back where it came from. Snug the hinge screws, don’t crank them down. Overtightened screws crack fresh paint at the screw heads. Pulls and knobs go on last.
Cure Schedule
| Time after final coat | What’s safe |
|---|---|
| 4 hours | Touch-dry. Don’t touch. |
| 24 hours | Re-handle gently with clean hands. |
| 7 days | Normal use. No scrubbing. |
| 30 days | Full cure. Wipe down with mild soap is fine. |
That 30-day window is where most no-sand jobs fail. The paint film is soft, and a Magic Eraser or a kitchen degreaser spray during that window burnishes the surface into a dull patch you can’t get out. Be gentle for a month. After that, the film is hard.
Common Mistakes
- Treating the degrease as a rinse. Spend 30 minutes on cleaning, not five. The grease film on upper cabinets is the single biggest reason no-sand jobs peel.
- Skipping the deglosser because “the primer’s a bonding primer.” Stix is good. It’s not magic. The deglosser pass is what makes it work on factory-glossed cabinets.
- Painting before the TSP residue is dry. Wet under primer means no bond. Wait at least four hours, overnight is better.
- Using a $4 chip brush. A bad brush leaves marks that the self-leveling paint can’t fully erase. The Wooster Silver Tip is $20, and it pays for itself the first cabinet door.
- Closing doors at 24 hours. They look dry. They aren’t cured. The door will stick to the cabinet frame and pull paint off when you open it. Wait the seven days for normal use.
Thermofoil Cabinets, the One Exception
If your cabinets are thermofoil (a vinyl wrap over particle board, recognizable because the surface looks slightly plastic and the edges are seamed), Stix doesn’t bond reliably. Use Zinsser BIN shellac primer instead. BIN sticks to almost anything but it has a strong alcohol smell. Open the windows and run a fan.
Even with BIN, thermofoil near steam sources (above the dishwasher, near a stovetop kettle) may bubble or lift over time. Paint can’t save a thermofoil door that’s already heat-stressed. If a corner is already lifting before you paint, it’s going to lift more after. Honest answer: at that point, replacing the door slabs is a better project than repainting them.
Cost
| Item | Cost |
|---|---|
| Paint (3 gallons BM Advance) | $255 |
| Bonding primer (1 gallon Stix) | $50 |
| TSP and liquid deglosser | $20 |
| Brushes, rollers, sleeves | $50 |
| Drop cloths, tape, gloves, cloths | $25 |
| Total | ~$400 |
A pro cabinet refinish on the same kitchen runs $4,000–$8,000 depending on city and door count. The math is hard to argue with.
When Sanding Is Still the Better Call
The no-sand method works on 90% of kitchens. The cases where I’d still pick up sandpaper:
- Cabinets with deep scratches or dents you want to hide. Sand and fill before priming. Deglosser doesn’t level anything.
- Cabinets with old oil-based paint that’s chipping. Scrape the loose bits first, sand the edges flat, then prime over with BIN. Stix can struggle here too.
- Cabinets where the factory finish is already failing. If the topcoat is flaking, the no-sand method is painting over a problem instead of fixing it.
If you’re not sure whether your cabinets had oil paint at some point, wipe an inconspicuous spot with denatured alcohol on a rag for 30 seconds. Latex paint softens. Oil paint doesn’t. Use Zinsser BIN if it’s oil. Stix is the call for everything else.
Don’t worry if the first door looks slightly streaky. The self-leveling alkyd finish keeps flattening for about 30 minutes after you stop brushing. Walk away, come back in an hour, and the finish will look nothing like what you saw when you set the brush down. You’ll know it when you see it.