How to Paint Concrete Walls: Basements, Foundations, and Block
Painting concrete walls — calcium chloride moisture test, acid etch or grind, masonry primer or block filler, and the elastomeric topcoat that survives vapor.

Concrete walls feel like the easy job. They’re flat, they’re already gray, and the paint goes on fast. Then a year later the bottom three feet behind the workbench come off in sheets and you find out the wall was wet the whole time. This is the prep that keeps that from happening.
TL;DR
- Test: calcium chloride dome and a 24-hour plastic-sheet check before you buy paint
- Profile: acid etch the wall to CSP 1–2. Smooth poured walls won’t grip a coating without it.
- Fill: block filler on CMU. Skip on poured walls.
- Primer: masonry-rated bonding primer (Zinsser Watertite, Loxon Conditioner, Drylok Extreme as its own primer coat)
- Paint: elastomeric masonry coating or 100% acrylic exterior masonry paint. Two coats. Roll in two directions.
- Cure: 24 hours touch, 5 days before you hang anything, 14 days before you put a workbench against it
What You’re Actually Painting
Two flavors of concrete wall live in most houses, and they paint differently.
Poured concrete. Solid wall, smooth troweled face. Dense, low porosity, low absorption. The problem is it’s slick. Coatings slide off if you don’t profile the surface first, and vapor pushes through pinholes you can’t see.
Concrete masonry unit (CMU, “cinder block”). Stacked block with mortar joints. Heavily textured face, deeply porous, drinks paint. The problem is the open pores. Roll a finish coat straight onto bare CMU and you’ll see every pinhole through three coats. Block filler is the fix.
Foundation walls are usually poured. Garage walls and detached workshops are usually CMU. Older basements are a mix. Look at the wall and figure out which you’ve got before you buy paint.
Tools and Materials
Listed in the frontmatter. The two non-negotiables: a moisture test kit and a respirator with acid cartridges. The first one tells you whether the project will hold. The second one keeps you out of the ER when you etch.
Why Concrete Walls Are Tricky
Three things separate concrete walls from drywall.
Vapor drive. Water vapor moves through concrete from the wet side to the dry side. In a basement, that’s outside-to-inside. The coating you put on the inside face has to either let vapor through (breathable acrylic) or stop it cold (Drylok Extreme worked into the pores). Trap vapor under a non-breathable coating and you get blistering within a year.
Alkalinity. Fresh concrete is high pH. The surface keeps releasing alkaline moisture for the first 28 days, and an unetched mature slab still hits pH 9–10 at the face. Standard latex paint can’t tolerate that and the binder breaks down. Masonry primers are formulated for it. Wall paint isn’t.
Profile. A troweled or formed poured wall is glass-smooth at the microscope level. Nothing grips. You profile the wall with acid etch to give the primer somewhere to mechanically lock on. Skip it and the coating is held on by chemical adhesion alone, which fails the first time the wall sweats.
Step 1: Test for Moisture
This is where most basement walls get killed. Run both checks before you spend money on paint.
Plastic sheet test (free, 24 hours). Tape a 2-foot square of clear plastic flat to the wall on all four sides. Wait 24 hours. If the underside is wet or the concrete behind it has darkened, you’ve got vapor. Run it in three spots: low corner, mid-wall, near a foundation seam.
Calcium chloride test (ASTM F1869, $25 kit, 60–72 hours). A pre-weighed dish of calcium chloride sealed under a clear dome. Re-weigh after the cure. The weight gain converts to lb of vapor per 1000 sq ft per 24 hours. Pass/fail line: 3 lb or under is paintable with standard masonry coatings. Above that, you need a vapor-rated dampproofer (Drylok Extreme or Watertite) or you cancel the project.
Most basement walls older than 5 years test 3–7 lb. If you fail, your options are: install a true vapor-stop coating worked into the pore structure with a stiff brush, or stop and look at exterior drainage. A film coating over a vapor-failing wall will not last.
Step 2: Clean and Repair
Vacuum first. Shop vac the wall top to bottom with a brush attachment. Loose dust under a primer kills the bond.
Degrease. Krud Kutter or a TSP substitute on any shiny or oily section. Garage walls always need this. Rinse twice with clean water, let dry overnight.
Repoint failed mortar (CMU only). Soft or crumbling joints get raked out 3/4 inch deep and packed with type-N mortar. Cure 7 days before painting.
Patch cracks. Anything wider than a hairline gets hydraulic cement (Quikrete Water-Stop). Pack it, tool it flush, cure overnight. Active leaks need the hydraulic cement that sets underwater. Don’t caulk a concrete crack with acrylic and call it sealed. It moves and the caulk lifts.
Seal the cove. Where the wall meets the floor, run a bead of hydraulic cement into the joint. This is the #1 capillary water entry on a basement wall, and the bead stops it.
Step 3: Etch to Profile
Two ways to get a CSP 1–2 profile on the wall.
Acid etch (DIY, $40 in chemicals). Muriatic acid diluted 4:1 with water in a pump-up garden sprayer, or pre-bagged etching crystals. Pre-wet the wall. Spray bottom-up, scrub with a stiff brush until the foaming dies down (about 8–10 minutes), rinse twice with clean water. Wear a respirator with acid-rated cartridges, splash goggles, and chemical gloves. Ventilate the basement. Do not skip the second rinse. Leftover acid neutralizes your primer.
Mechanical scarifying. Available but rarely worth it on a wall. A needle gun or a wall-mounted scarifier gets you a real profile without chemicals, but it’s loud, dusty, and slow. Use it if you can’t ventilate well enough to etch.
Etched wall should feel like 100-grit sandpaper under your fingertip. Slick spots get re-etched. Don’t move to primer until the wall reads pH-neutral on a $5 strip test.
Step 4: Fill the Pores (CMU Only)
Block filler is paste in a 5-gallon bucket. Trowel it into the wall or roll it heavy with a 3/4-inch nap, then back-roll to push it into the open cells. Two products that work: Sherwin-Williams Loxon Block Surfacer and PrepRite Block Filler. Drylok also makes one. Coverage is brutal: 75 to 100 sq ft per gallon on rough block.
Let it cure overnight. The wall should look uniform with no visible pinholes when you shine a flashlight across it at a low angle.
Skip this step on poured walls. They don’t need it and block filler doesn’t bond as well to dense smooth concrete.
Step 5: Prime
Three real options, matched to the wall.
Zinsser Watertite. Water-based dampproofing primer. Rated for hydrostatic pressure. The right choice for any basement wall where the moisture test came back borderline. Two coats, brushed into the pores on the first coat, rolled on the second.
Drylok Extreme. Doubles as primer and topcoat in one product. Worked into the wall with a stiff brush on the first coat, rolled on the second. The pro version (Drylok Extreme Masonry Waterproofer) is rated to 15 psi. The standard version is rated to 10 psi. Use the Extreme for any wall that’s seen visible moisture.
SW Loxon Conditioner. Penetrating bonding primer for dry, well-profiled walls. Soaks into the etched surface and locks the dust down. Use this when the moisture test was clean and you want a standard latex masonry topcoat instead of a dampproofer.
One coat for most walls. Two coats if the wall drinks the first one in unevenly. No holidays.
Step 6: Paint
Masonry walls need a coating that flexes with the substrate and tolerates alkaline moisture. Three real options:
Elastomeric masonry coating (Drylok Extreme as topcoat, SW Loxon XP). High-build, flexible, stretches over hairline cracks without lifting. The right answer for a basement wall that sees occasional moisture. Two coats. Coverage 100–150 sq ft per gallon on a primed wall.
100% acrylic exterior masonry paint (BM Aura Exterior, SW Resilience, Behr Masonry & Stucco). Breathable, alkaline-tolerant, less flexible than elastomeric but smoother finish. Use this on dry interior CMU walls: garage interiors, workshop walls, finished basement walls that passed the moisture test cleanly.
Standard interior latex. Not recommended. The label might say “interior/exterior” but most interior wall paints can’t handle a vapor cycle. If you want the matte look of a standard wall paint, use the acrylic masonry above and ask for it in a matte sheen.
For the round-up version with current top picks, see the best exterior paint list. Most masonry-rated coatings live in that category.
Application
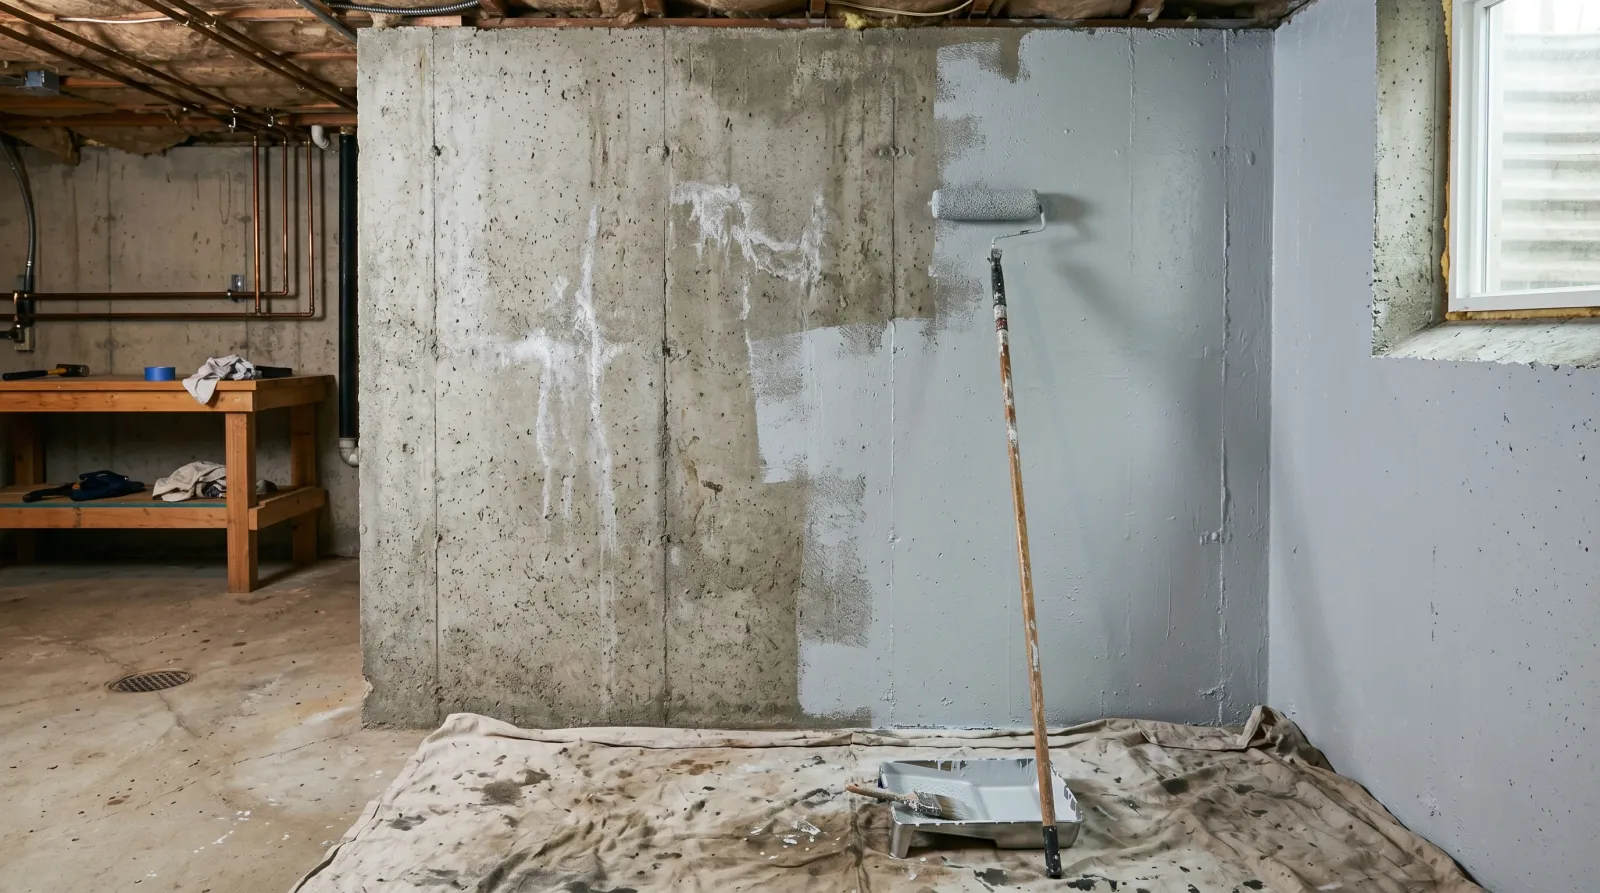
Roll with 3/4-inch nap on CMU, 1/2-inch nap on poured walls. Cut in the top, corners, and floor line with a 2.5-inch synthetic brush, then roll while the cut-in is still wet. Stopping mid-wall is how you get lap marks on a 12-foot run.
Roll in two directions. Up-down on the first pass, side-to-side on the second to lay it off. Back-rolling matters more on masonry than on drywall because the texture holds the wet edge longer.
Temperature. Wall surface 50–85°F. Air temperature lies in a basement; the wall is usually 8°F colder than the room. Use a surface thermometer.
Humidity. Below 85% RH. Run a dehumidifier for 24 hours before you start.
Recoat. Check the can, then check the technical data sheet on the manufacturer’s website. The can rounds up. TDS gives you the real numbers.
Dry, Recoat, Full Cure
Touch dry in 1–2 hours. Recoat window opens at 4 hours for water-based coatings, 24 for oil-modified. Full cure for masonry coatings is 5–7 days. During cure you can’t wash the wall, hang anything on it, or push a workbench against it. The coating feels hard at day 2 and isn’t. Wait the week.
Common Mistakes
- Painting a wall that failed the moisture test. It feels dry. It isn’t. The vapor takes the coating off in six months.
- Skipping block filler on CMU. The wall reads pinhole-spotty through three topcoats. No way to fix it without re-rolling filler from scratch.
- Interior wall paint on a basement. Standard latex can’t handle alkalinity or vapor. Use a masonry-rated coating.
- One coat of etch on a smooth pour. The wall stays slick in patches. Re-etch the slick spots and rinse again.
- Caulking a crack instead of patching it. The crack moves, the caulk lifts, the paint follows.
- Hanging shelves at day 2. The coating peels in a circle around the anchor. Wait 14 days for anything that pulls on the wall.
Maintenance and Longevity
A properly painted concrete wall lasts 7 to 10 years in a basement, 5 to 7 on an exterior foundation in a freeze-thaw climate, 10 plus on an interior garage wall that stays dry. Clean with a damp cloth and a pH-neutral cleaner. Avoid bleach. It softens elastomeric coatings over time.
Watch for chalking on exterior walls (powder on your finger when you wipe the surface) and dime-sized blisters anywhere. That’s vapor finding a way through. Recoat the affected wall the season you spot it. A wall that’s recoated at year 7 lasts another full cycle. One that gets ignored until year 10 needs to be stripped back to bare concrete and started over.
That’s the warning. The prep is one weekend. The cure is one week. Skip either and the wall bites you in two years.