How to Paint Butcher Block
Painting butcher block done right: 220 sanding, Stix bonding primer, BM Advance topcoat, and the cure window before food touches it again.

Butcher block paints fine. The catch is the cure window, and the catch under that is what people do to a countertop on day three. Skip the wait and the first hot skillet glues itself to your finish.
TL;DR
- Sand: 220-grit, whole surface, including the edges
- Prime: INSL-X Stix bonding primer, one coat
- Paint: BM Advance or Cabinet Coat semi-gloss, two coats
- Cure: 7 days for light use, 30 days before hot pans or cutting
- Skill: medium
What Is Butcher Block?
Butcher block is solid hardwood strips glued edge-to-edge or end-to-end into a thick slab. Usually maple, oak, walnut, or birch. You see it most often as countertops, islands, and workbench tops. Sold either oiled (mineral oil finish, food-safe out of the box) or unfinished. Both paint fine if you prep right. What matters for paint is that it’s real wood with real grain and real movement, not a manufactured panel.
Tools and Materials
Materials:
- INSL-X Stix bonding primer (1 quart covers a kitchen island twice)
- Benjamin Moore Advance OR Benjamin Moore Cabinet Coat, semi-gloss (1 quart)
- 220-grit sanding sponge
- 120-grit sanding paper for any oiled or weathered spots
- Mineral spirits or denatured alcohol (degreasing only, not as solvent for the paint)
- Painter’s tape, 1.5-inch
- Tack cloth
Tools:
- 4-inch foam roller, 1/4-inch nap
- 2-inch angled brush (Wooster Silver Tip or Purdy XL)
- Putty knife
- Vacuum with brush attachment
- Drop cloth
Why Butcher Block Is Different
Butcher block isn’t the substrate that fails you. It’s what’s on the butcher block.
If the counter has ever been oiled (and most have; that’s the standard factory finish), there’s mineral oil or beeswax sitting on the surface AND soaked into the top quarter-inch of grain. Skip the degrease step and your primer fish-eyes. Latex topcoat over un-bonded primer peels off in sheets the first time you wipe it with a sponge.
The second problem is movement. Wood expands and contracts with seasonal humidity. A butcher block counter mounted to a cabinet box can shift 1/8 inch across its width between February and August. Rigid finishes crack along the glue lines. Waterborne alkyd has enough flex to ride that movement; oil-based enamel doesn’t.
Step 1 — Strip the Oil Out
This is the step everyone skips and everyone regrets.
Wipe the entire surface with mineral spirits on a clean rag. Two passes, fresh rag each time. The first pass turns the rag amber. That’s the surface oil. The second pass should come up almost clean.
Let it flash off for 30 minutes. Wood feels dry-to-touch but cool to the hand. That cool sensation is residual mineral spirits evaporating; you want it gone.
If the counter is heavily oiled (kitchen island that’s been re-oiled every six months for years), hit it with denatured alcohol after the mineral spirits. Alcohol pulls residual oil out of the top fibers of grain in a way mineral spirits doesn’t.
Don’t skip this on a counter that “looks dry.” Mineral oil penetrates deep. The factory finish is in there even if the surface reads matte.
Step 2 — Sand to 220
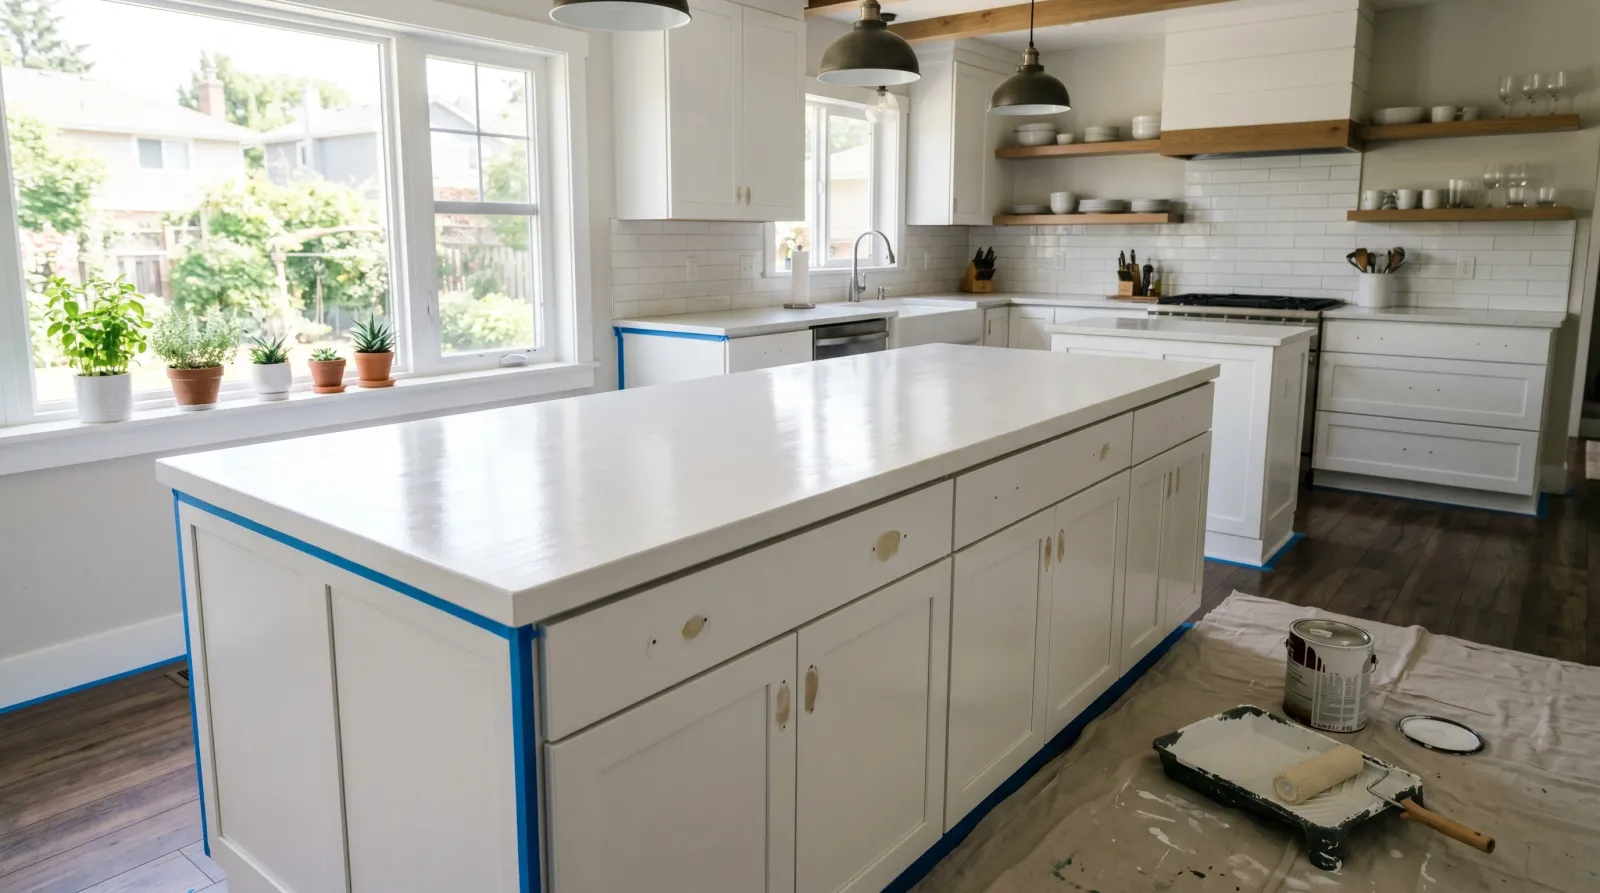
220-grit sponge, whole top, edges, and any vertical lip. You’re not removing finish. You’re scuffing the open grain so the primer keys into the wood and so the surface accepts a uniform film.
Go with the grain. Cross-sand only on a heavily oiled spot that won’t release, and even then, finish the area going with the grain so the cross-scratch doesn’t telegraph through the finish.
If the counter has visible scuffs, knife cuts, or scorched spots from a hot pan, hit those areas with 120 first. Then 220 the whole surface to even out the scratch pattern.
Vacuum everything. Brush attachment for the grain lines, then a tack cloth over the whole top. Dust under the primer reads as fine grit under your hand once it cures.
Step 3 — Prime with Stix
INSL-X Stix is a urethane-acrylic bonding primer. It grips slick surfaces (pre-finished oak, melamine, glossy lacquer) and bonds to butcher block even after the oil-purge in step 1. Zinsser BIN works too, but Stix has better flex on a substrate that’s going to move with humidity. BIN goes brittle. Don’t sweat the choice between them for a flat panel; for a counter, pick Stix.
One coat. Roll the field with the 4-inch foam roller; cut in edges with the angled brush. Aim for 3–4 mil thickness, which is a thin, fully coated film with no streak of bare grain showing through. Don’t overload the roller; thick primer dries with foam-roller texture you’ll see in the topcoat.
Recoat ready at 4 hours. Sand light with 220 after the primer flashes. Knock down any raised grain, vacuum, tack cloth. Yes, you sand the primer. Yes, it matters.
Step 4 — Topcoat: BM Advance or Cabinet Coat
Two waterborne alkyds work for this:
Benjamin Moore Advance. Self-levels under a brush as well as anything short of a sprayer. Semi-gloss. 16 hours between coats. Cures harder than Cabinet Coat at the 30-day mark; the trade-off is the longer recoat window and a finickier brush technique.
Benjamin Moore Cabinet Coat (sold under the Insl-X brand at most stores). Slightly softer film at full cure but easier to apply. 4 hours between coats. The pragmatic choice if you’re working a weekend.
Both come in semi-gloss, which is what you want here. Satin reads dead on horizontal surfaces and shows water rings. High-gloss telegraphs every speck of dust in the film. Semi-gloss is the right sheen for a counter you’ll wipe weekly.
See the best kitchen cabinet paint round-up for the full waterborne-alkyd field. Same products work here.
Step 5 — Apply
Field with the foam roller, edges with the brush. Don’t overwork the wet edge. Waterborne alkyd flashes faster than oil, and brush-back-into-tacky-film is how you get lap marks.
Cut in the edges first, roll the field while the cut-in is still wet. Back-rolling lightly to lay down the foam roller’s stipple. If you can see roller texture after 2 minutes of leveling, your coat is too thick. Thin it down for the next pass.
Two coats. Sixteen hours between coats on Advance, four hours on Cabinet Coat. Don’t try to push these times. The film locks the moment it skins, and the second coat applied early picks up the first coat with it.
Step 6 — Cure
Touch-dry at 1 hour. Re-handle at 24 hours. Light use at 7 days. Full cure at 30 days.
What “full cure” means in practice: at day 7 you can set down a plate, a glass, a roll of paper towels. At day 30 you can set a hot pot on a trivet, slide a cutting board across the surface, scrub a spill with a wet sponge.
What “don’t do during cure” means:
- No hot pans direct on the surface, not at day 5, not at day 14
- No cutting directly on the paint, ever (this is a permanent rule, not a cure-window rule)
- No abrasive scrubbing until day 30
- No standing water; wipe spills within a few minutes for the first month
The 30 days is real. Waterborne alkyds cure outside-in. The film feels hard at day 3 because the top 1 mil has crosslinked. Underneath, the rest of the film is still soft. Pulling a hot cast-iron off a day-10 finish lifts paint with the pan.
Food-Safe — What That Actually Means
Cured waterborne alkyd is rated for food-contact incidental, meaning food can touch the surface briefly without contamination concerns. Bread on the counter, a sandwich, a stack of clean plates, a cooling rack with biscuits. That’s fine at full cure, and that’s how most kitchens use a counter anyway.
The “incidental” part matters. The rating covers brief food contact on a finished, intact film. It does not cover wet food sitting on a scratched-through spot for days. Keep the film intact and keep wet food on plates and you stay inside the rating without thinking about it.
It does NOT mean you cut on it. Painted surfaces are not cutting boards. The knife slices through the film, exposes raw wood, and creates a hygiene problem on day one. Keep a dedicated cutting board for prep. Same rule applies to oiled butcher block, by the way.
And it does NOT mean you set a 500-degree skillet on it. Even fully cured alkyd softens at high heat. Use a trivet.
Common Mistakes
- Skipping the oil purge. Result: primer fish-eyes, paint peels in sheets at week two. Strip and start over with mineral spirits.
- Latex paint instead of waterborne alkyd. Result: soft film that scratches, blocks against anything that sits on it, and won’t take a wipe-down. Latex isn’t built for horizontal high-traffic surfaces.
- Painting in summer humidity. Above 70% RH, alkyd flashes uneven and the film locks before it levels. Run a dehumidifier or wait for a drier weekend.
- Skipping the inter-coat sand. Result: roller stipple and dust nibs in the cured finish. 220 between every coat. Tack rag after every sand.
- Using the counter before day 30. This is the one that bites you. The finish looks fine for two weeks, then the first hot pan or hard scrub tears it. Reset the calendar in your head: 30 days, not 30 hours.
Maintenance and Longevity
A properly painted butcher block counter lasts 5–7 years before showing meaningful wear. The wear patterns are predictable: scuffs around the sink, a worn spot in front of the most-used burner, a sheen change wherever a cutting board sits.
Clean it with warm soapy water and a soft cloth. Skip bleach, ammonia, and abrasive scrubbers. Those etch the alkyd finish and dull the sheen. A microfiber and dish soap handle everything daily.
When wear shows up, scuff-sand the affected area with 320 and re-coat with one thin coat of the original topcoat. The repair blends if you feather the edge out 6 inches past the worn spot. Don’t recoat the whole counter for one wear spot.
The whole-counter refresh comes every 5–7 years, and it’s an easier job than the original. The primer’s still bonded, so it’s just sand to 220 and two coats of topcoat.
If the counter is in a wet zone (next to the sink, under a coffee maker), watch the seams between hardwood strips. Movement opens micro-gaps over time and water can wick in. Caulk preventively before the gap shows water staining.