How to Fix Nail Pops in Drywall
Nail pops come back unless you drive a screw beside the old fastener, scrape the popped head, and refill with setting compound. Two feathered passes, then texture, then paint.

A nail pop isn’t a hole. It’s a fastener that’s worked loose. Hammering it back in is the same thing somebody already did before you bought the house, and it’ll pop again next summer. The fix is to add a screw beside the old nail, kill the popped head, and refill flat.
Does This Match What You’re Seeing?
Three things look similar and need different fixes:
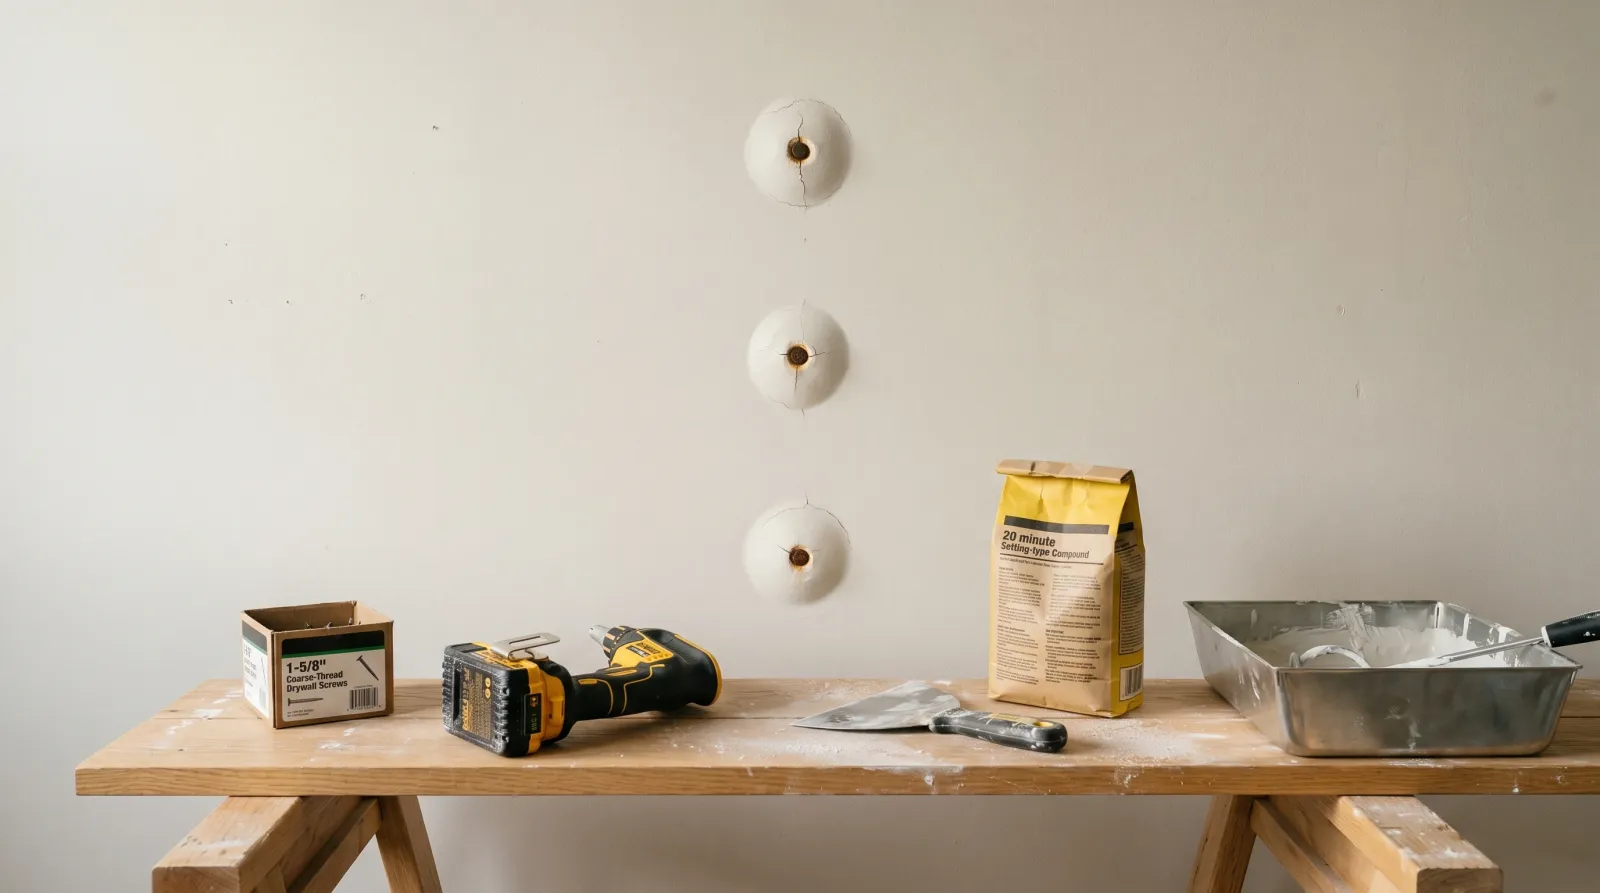
- True nail pop. Round bump about a dime to a nickel across, hairline crack ring around the rim, sometimes a rust-tinted dot in the middle where the nail head pushed through the paint. Most common on ceilings and on walls 8 to 15 years after construction.
- Drywall screw pop. Same bump shape, but you’ll see a tiny cross or star where the bit pushed up. Less common in older homes, more common in builds from 2005 on.
- Bubble or blister, not a pop. No fastener under it. Soft to the touch, sometimes shiny. That’s a tape lift or paint film failure. See fixing holes in drywall for tape lifts.
If the bump is on a textured ceiling and there’s a brown ring around it, stop. That’s water, not a fastener. Fix the leak above, dry the cavity, then come back to this page.
How Serious Is This?
Cosmetic. Drywall doesn’t hold the house up, and one loose fastener doesn’t change that. The board is still held by a few dozen other nails along the same stud.
What it is, is a forever problem if you don’t fix the cause. Hammer it back in March, it pops again in August. The crack ring around the head gets a little wider every cycle, and at some point the paper face tears and you’ve got a small hole instead of a small bump.
One exception: a whole vertical line of pops on the same stud means that stud is moving more than its neighbors. Re-anchor the entire line and watch that bay for soft spots or moisture staining.
Why This Is Happening (Root Cause)
The framing behind your drywall is wood, and wood moves. A 2x4 stud cut green at the mill loses 5-8% of its width over the first heating season after the house was built. Even a kiln-dried stud cycles a percent or two every year as indoor humidity swings between summer (50-60% RH) and winter (15-25% RH with the furnace running).
A drywall nail is a straight shank driven into that moving wood. When the wood shrinks, the nail doesn’t shrink with it. The board is held tight to the stud by the nail head, so as the stud pulls back, the nail rides forward relative to the drywall paper. Over a few seasons, the head walks through the paint film. That’s the pop.
Screws fail the same way, just slower. The threads grip the wood better than a smooth shank. But cheap drywall screws that bottomed out below the paper face during install end up with no paper holding them, only the gypsum, and the gypsum crumbles, and the screw rides back out too.
Bottom line: the original fastener has lost its grip on the stud or its grip on the paper face. Pushing it back in doesn’t restore either. The new fastener has to grab fresh, undamaged wood and undamaged paper, which means an inch away from the old hole, not into the same hole.
The Fix
Step 1 — Find the Stud and Mark the Pop
Run a stud finder over the pop. The fastener will be dead-center on a stud or a ceiling joist. If your stud finder doesn’t read clearly through old plaster-over-drywall or a heavy texture, push a pin into the wall just above the pop. A sixteenth of an inch of resistance means you’ve found gypsum only. Hard stop means you’ve hit the stud.
Mark a spot one inch above the pop and one inch below it with a pencil. Both spots need to be over the stud. If you only catch wood for half an inch on either side (common on a 2x3 framed garage wall), one screw above is enough.
Step 2 — Drive Screws Beside the Old Fastener
Use 1-5/8 inch coarse-thread drywall screws for 1/2-inch board, or 2-inch screws for 5/8-inch board (most garages and ceilings). Coarse thread, not fine. Fine thread is for metal studs and will spin without grabbing in wood.
Drive each screw with a screw gun set to dimple the head just below the paper face, not through it. The paper has to stay intact around the screw or the gypsum crumbles and the screw rides right back out, same problem as before. A dimple about 1/32 inch deep is right. If you can feel a crater with your fingertip, you went too far. Back the screw out and drive a new one a half-inch to the side.
Two screws per pop, one above and one below. Same rule on a ceiling joist.
Step 3 — Kill the Old Fastener
Two ways to deal with the popped head. Pick by feel.
If the head is barely proud (a sixteenth of an inch or less), set it. Hold a nail set on the head, give it one moderate tap with a hammer. Push the head about 1/16 inch below the paper face, breaking the paint film cleanly. Don’t pound it. You’ll crater the gypsum and have a real hole.
If the head sits proud higher than that, or has already torn the paper, scrape it off. Take a sharp 1-inch chisel or a stiff putty knife and shear the head clean at the gypsum surface. Sounds crude. Works. The shank stays in the stud, the new screws hold the board, and you’ve got a clean flat spot to refill.
Either way, quick sand around the spot with 150-grit to knock off the broken paint ring and any loose paper. Light pressure. You’re roughing the surface, not removing material.
Step 4 — Fill With 20-Minute Setting Compound
Setting-type joint compound, USG Easy Sand 20 or Easy Sand 45, mixed from the bag. Not premix tub mud. Setting compound chemically cures in the time printed on the bag regardless of humidity, and it barely shrinks. Premix takes 24 hours, shrinks as it dries, and on a fastener fill you’ll watch the patch sink overnight.
Mix a small batch. Half a cup is enough for a dozen pops. Stiff peanut-butter consistency, no dry lumps. The 20-minute working time is real. After 18 minutes it gets gummy.
First pass: 6-inch knife. Skim a thin coat across the pop site, the two new screw dimples, and any scraped or set-in fastener. Feather 3 to 4 inches past the patch in every direction. Don’t pile it on. Let it set 25 minutes (not dry, set, that’s the chemical cure).
Second pass: 10-inch knife. Skim a thinner coat over the first, feathering 6 to 8 inches past the patch. The wider the feather, the more invisible the fix reads under sidelight. A 4-inch feather catches light like a halo around the patch. An 8-inch feather disappears.
Sand after the second coat is fully set. 220-grit on a sanding sponge, light pressure. Run your hand over the spot with eyes closed. If you can feel a ridge or dish, you can see it.
Safety and Dust
Wear an N95 when sanding setting compound. Gypsum dust is fine and goes everywhere. Eye pro especially for ceiling work. Compound dust falling into your eyes while your neck is craned back is its own punishment.
Never mix setting compound in a bucket with bleach or ammonia residue. Compound treated with mold spray won’t cure properly while the spray is still wet. Let any antimicrobial treatment dry fully before you skim.
If the wall was painted before 1978 and the popped fastener tore loose paint chips around the rim, lead-test the chips before you scrape or sand. Test kits are $15 at the hardware store.
Texture Match Before Paint
If your wall has texture (orange peel, knockdown, popcorn), a smooth patch reads as a smooth patch the second the morning sun hits it. Spot-prime the dry patch first with PVA drywall primer. Then hit it with a matching aerosol texture from the hardware store.
Spray a test card from 18 inches first. The spatter from a fresh can is heavier than what’s on your wall. Adjust distance until it matches. For knockdown, wipe the high points flat with a wide knife about 60 seconds after spraying.
Let the texture dry 4 hours, then prime over it again before topcoat. Two prime coats sounds excessive. It isn’t. Texture spray dries chalky and sucks up wall paint unevenly without a sealing primer between.
For popcorn ceilings, don’t spray-match. Patch flat, prime, and topcoat the whole ceiling instead of trying to spot-blend.
Recommended Product
USG Easy Sand 20 setting compound, 18-pound bag. Cures in 20 minutes by chemistry, sands easily despite the name. The unused powder keeps for a year if you fold the bag closed.
For screws, any 1-5/8 inch coarse-thread drywall screw (Grip-Rite or Hillman). Don’t use deck screws. The heads are too thick to dimple cleanly below the paper.
Prevention
You can’t stop wood from moving. You can reduce the swing.
Whole-house humidity control is the actual prevention. A furnace humidifier in winter (keep indoor RH above 30%) and a dehumidifier in summer (keep it under 55%) cuts the seasonal stud movement roughly in half. Most homes built before 2005 ride 15% RH in February to 60% RH in August without any control. That’s the swing that pops nails.
If your house is in its first or second year after build, expect more pops than later. Don’t invest in expensive wallpaper that first year. The framing is still finding its dry weight.
Old houses that were nailed should get screws on the next remodel. Any drywall you take off and reinstall, put it back with coarse-thread screws on 12-inch centers, not nails.
When to Call a Pro
- Pops follow a clear pattern across a wall that’s also bowed, sloped, or cracking diagonally. Framing is moving more than seasonal.
- Brown ring around the pop, soft drywall to the touch, or a musty smell. Water above the fastener. Find the leak first.
- Pre-1978 home with paint chipping around every pop. Lead-test first; consider a certified abatement contractor for whole-ceiling work.
- Whole-ceiling pop epidemic, dozens of fasteners in one room. Re-screwing the entire ceiling on a grid is faster than chasing pops one at a time. A drywall finisher charges a couple hundred.
- Diagonal cracks from door and window corners with pops along the same line. That’s settling. A pop fix is cosmetic only. The crack walks back in 12 to 18 months.
What’ll bite you in two years: hammer the pop flat without driving a new screw, the same pop is back next summer and the patch ring gets wider every cycle. By year three the paper face has torn and you’re patching a quarter-size hole. Add the screw the first time.
Related
Frequently asked questions
Can I just hammer the nail back in and paint over it?+
Should I pull the old nail out?+
Do I need to prime the patch before painting?+
Why are all my nail pops in a straight line?+
- Fixing holes in drywall
- Spackle vs joint compound
- Fixing lap marks after touch-up