How to Fill Holes and Gaps in Wood
Nail holes get spackle. Gouges get two-part wood filler. Rotted exterior trim needs epoxy. Match the filler to the damage or it telegraphs through your paint by next summer.

Three kinds of damage, three kinds of filler. Finish-nail holes get painter’s putty or spackle. Gouges, dents, and small missing corners get a two-part wood filler that sets in 15 minutes. Rotted exterior trim — softened sills, punky fascia ends, hollow corner trim — gets a two-part epoxy. Mix the categories up and your patch either shrinks back, flashes through the paint, or rots out again next spring.
Does This Match What You’re Seeing?
Five shapes of damage cover most calls:
- Finish nail and brad holes. Pinhole dots in trim, casing, baseboard. Some still have the nail head set below the surface. Cosmetic only.
- Dents and small gouges. Quarter-inch to half-inch divots from a dropped tool, a moving truck, a kid’s chair. Wood fiber crushed but intact.
- Open joints and gaps. Miter joints that opened up, gaps between trim and wall, the dark line where two pieces of casing pull apart. This is a caulk problem, not a filler problem.
- Missing chunks on interior trim. Chewed corners on baseboard (vacuum cleaner, dog), gouged door jambs, broken-off ovolo. Wood is gone, not crushed.
- Soft, punky, fibrous exterior wood. Sill ends you can push a screwdriver into. Bottom of a fascia board that crumbles. Window stool with a dark stain and a spongy feel. That’s rot, and a regular filler will fall right out of it next year.
Soft, dark, and damp is rot, not damage. Don’t fill it like damage. See the exterior steps below.
How Serious Is This?
Almost always cosmetic. Trim and casing don’t carry load. The studs and headers do. A bag of fillers and an hour fixes most of what a house throws at interior trim in a decade.
The exceptions: rot at a window sill that’s letting water into the wall, rot at a fascia board that’s about to drop a gutter, soft wood at the bottom of an exterior door jamb where water is wicking up from a bad threshold. Fix the water first. Filling rotted wood without stopping the leak is filling the same spot in 18 months.
Why This Is Happening (root Cause)
Interior holes are mechanical. A finish nailer punches a hole, a vacuum hits a corner, a chair leg backs into a casing. Wood fiber moves or breaks. The fix is just restoring the missing volume with something that paints the same as the wood around it.
Exterior rot is biological. Fungus eats cellulose, and the only thing that lets fungus do that is liquid water sitting against unsealed wood. Look up from the rot and you’ll usually find the cause: a failed paint film, a missing piece of flashing, a gutter overshooting the fascia, a sill that slopes the wrong way. The rot is the result. The water path is the problem.
Gaps in trim are wood movement. Wood shrinks across the grain in winter, expands again in summer. A miter joint that opened up isn’t broken — it’s seasonal. Caulk flexes; filler doesn’t. That’s why miter joints get caulked, not filled.
The Fix
Step 1 — Finish Nail Holes Under Paint
Painter’s putty or lightweight spackle. DAP Fast’N Final, 3M Patch Plus Primer, or any pink-to-white indicator spackle works. Press a dab in with your fingertip, drag flush with a 1-inch putty knife. Don’t pile it on. Proud filler means sanding, sanding means dust, and on already-painted trim it means re-priming.
Dry 30 minutes. Sand only if you feel a ridge. 220-grit, light pressure. Spot-prime the patch with the same primer or wall paint, then your topcoat. One coat of primer over the dot is enough. Skip it and the spackle drinks the sheen out of your paint and you get a dull dot under sidelight.
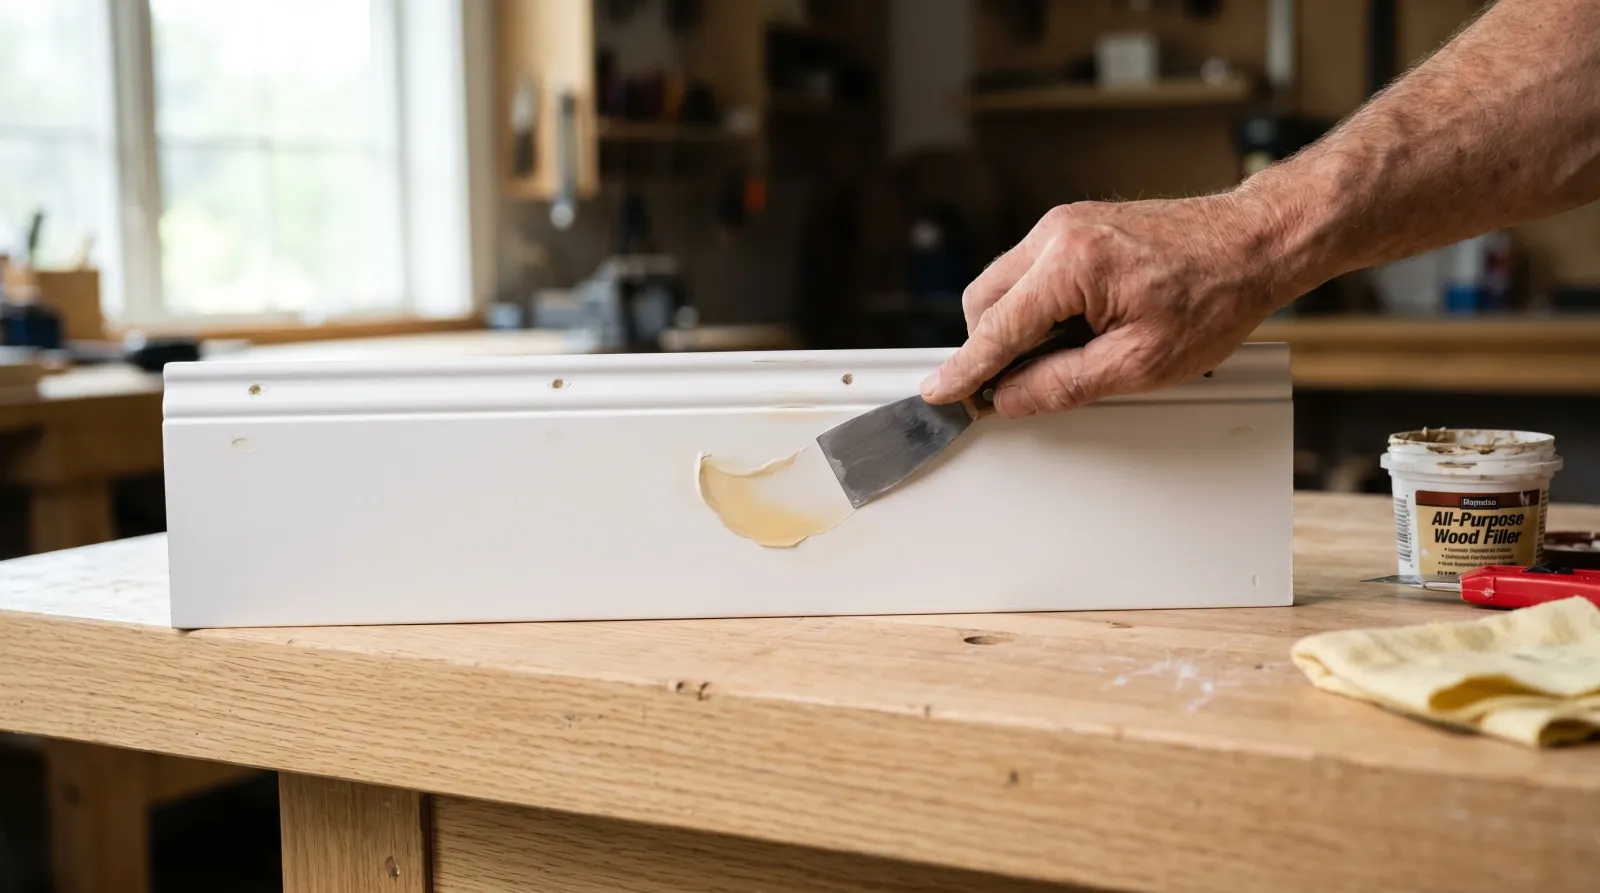
Step 2 — Dents, Gouges, and Small Missing Corners (interior)
DAP Plastic Wood-X, Elmer’s ProBond Wood Filler, or Bondo Wood Filler. For a dent up to about half an inch, the one-part fillers (Plastic Wood-X, ProBond) are easier — squeeze in, smooth, dry an hour, sand. They shrink a little, so a deep gouge needs two passes.
For anything bigger than a thumbnail, or any spot you need to re-drill, mix Bondo Wood Filler. Two-part polyester, hardener squeezed in, mixed to uniform pink on a scrap piece of cardboard. Working time is about 5 minutes. Press it in proud, wait 15 minutes, plane or rasp the high spots off, then sand with 80 then 150 then 220. Holds a screw, drills clean, paints fine. Stinks like a body shop for an hour after — open a window.
Neither one of these takes stain well. If the trim is getting stained, use a stainable filler and test on a scrap first.
Step 3 — Open Joints and Gaps
Paintable acrylic-latex caulk with silicone, not filler. DAP Alex Plus or Sherwin-Williams 950A. Run a thin bead into the gap, wipe with a wet finger, let skin over before painting. A miter that opened a sixteenth gets a bead, a thicker gap up to a quarter inch gets the bead plus a backer of fiber or backer rod pushed in first so the caulk has something to bridge to.
Filler in a moving joint cracks out by next winter. Caulk flexes through the wood’s seasonal movement. Use the right one.
Step 4 — Exterior Rotted Wood
Two-part wood epoxy. Abatron LiquidWood (the consolidant) plus WoodEpox (the filler) is the system pros use on historic sills and porch posts. Bondo Wood Filler is a budget alternative that holds up if the rot is shallow and the surface stays painted.
Dig out the punky wood with a sharp chisel until you hit firm fiber. Vacuum the dust. Brush LiquidWood consolidant into the remaining wood — it soaks in, cures hard, and turns the soft fiber back into something the filler can grip. Wait the time on the can (usually a couple of hours to overnight, depending on temperature).
Mix WoodEpox 1:1 from the two tubs, knead like dough until the color is uniform, press into the cavity proud of the surface. Working time is about 30 minutes — you can sculpt a missing corner, rebuild a profile with a putty knife, push it into the back of an exposed grain. Cure overnight, then rasp, plane, or sand to shape. Prime with an exterior oil primer (Cover Stain or Zinsser BIN). Topcoat.
For a softened door-jamb bottom or a sill end on a job that has to be done today, Minwax High Performance Wood Filler is the faster option — two-part, sets in 15 minutes, sandable in half an hour. It doesn’t soak into surrounding fiber like Abatron does, so use it on shallow rot or full chunks where you’ve cut back to clean wood, not on deep punky sections you’re trying to consolidate.
Safety
Wear an N95 when sanding any filler. Wood-filler dust is fine and gets in everything. Eye pro too. Bondo and two-part epoxy cure exothermic — they get warm in the can — and the fumes are strong. Open a window. Outside is better.
Never mix two-part filler hardener with anything other than the matched base. Don’t substitute auto-body Bondo hardener into a wood-filler tub or vice versa even though they look similar. Cure chemistry is different and you’ll get a soft set that crumbles.
Pre-1978 home with chipping paint around the damage: lead test the loose paint before sanding. EPA RRP rules apply if you’re paid to do the work.
Recommended Product
For interior nail holes and small dents on trim that’s getting painted, DAP Plastic Wood-X. Doesn’t shrink on a single-pass fill at any depth a brad nailer leaves, sands at 30 minutes, takes paint without flashing.
For exterior rot on a sill, fascia, column base, or any wood you’re trying to save instead of replace, Abatron LiquidWood + WoodEpox. The consolidant-plus-filler system is what restoration carpenters use. Expensive per kit, but a kit fixes more rot than you’d expect, and it’s still holding 15 years later when a cheaper filler would have failed twice.
Prevention
Interior trim damage is mostly traffic. Felt pads on chair legs, a vacuum with a soft bumper, hinge-pin stops on doors that swing into casing. None of this is paint.
Exterior rot is water. Walk the house once a year looking up: gutters draining clean, downspouts pointing away from the foundation, sill tops sloped to shed water, no paint failure on horizontal wood surfaces. A south-facing fascia that loses its paint film loses three years off its life. Touch it up the spring you notice it, not the spring after.
End-grain on exterior wood is where rot starts. Cut the end of a piece of trim or a deck baluster, that end-grain wicks water like a straw. Seal cut ends with a paintable end-grain sealer (Anchorseal, or two heavy coats of exterior oil primer) before you install the piece, and re-seal anytime you cut into existing trim.
When to Call a Pro
- The rotted area exposes structural framing — header rotted at a window opening, rim joist behind a deck ledger, post bottom carrying a porch roof. Patching is cosmetic; the load path needs a carpenter.
- Rot extends more than half the thickness of the board across more than two feet. Cheaper and stronger to replace than fill.
- Window sills with rot plus interior water damage on the wall below. There’s a flashing failure behind the trim and the filler is the last thing to address.
- Insect damage (carpenter ants, powderpost beetles, termites). Filling over active insects buries the problem. Identify and treat first.
- Pre-1978 home, large area of damaged painted wood. Lead-safe prep on big surfaces is a licensed-pro job.
Related
Frequently asked questions
Can I just paint over a nail hole?+
Spackle or wood filler for nail holes in trim that I'm painting?+
What filler works under stain?+
Bondo on wood — is that really a thing?+
How big a rotted spot can I fix with epoxy versus replacing the board?+
Why does my filled nail hole show through after I paint?+
- Painting bare interior wood
- Best interior trim paint
- Painting exterior wood