How to Repair Stucco: Holes, Chips, and Blown Corners
Cut back to sound stucco, rebuild in layers, match the texture wet, then wait out the cure before you paint. A 22-year contractor's stucco patch playbook.

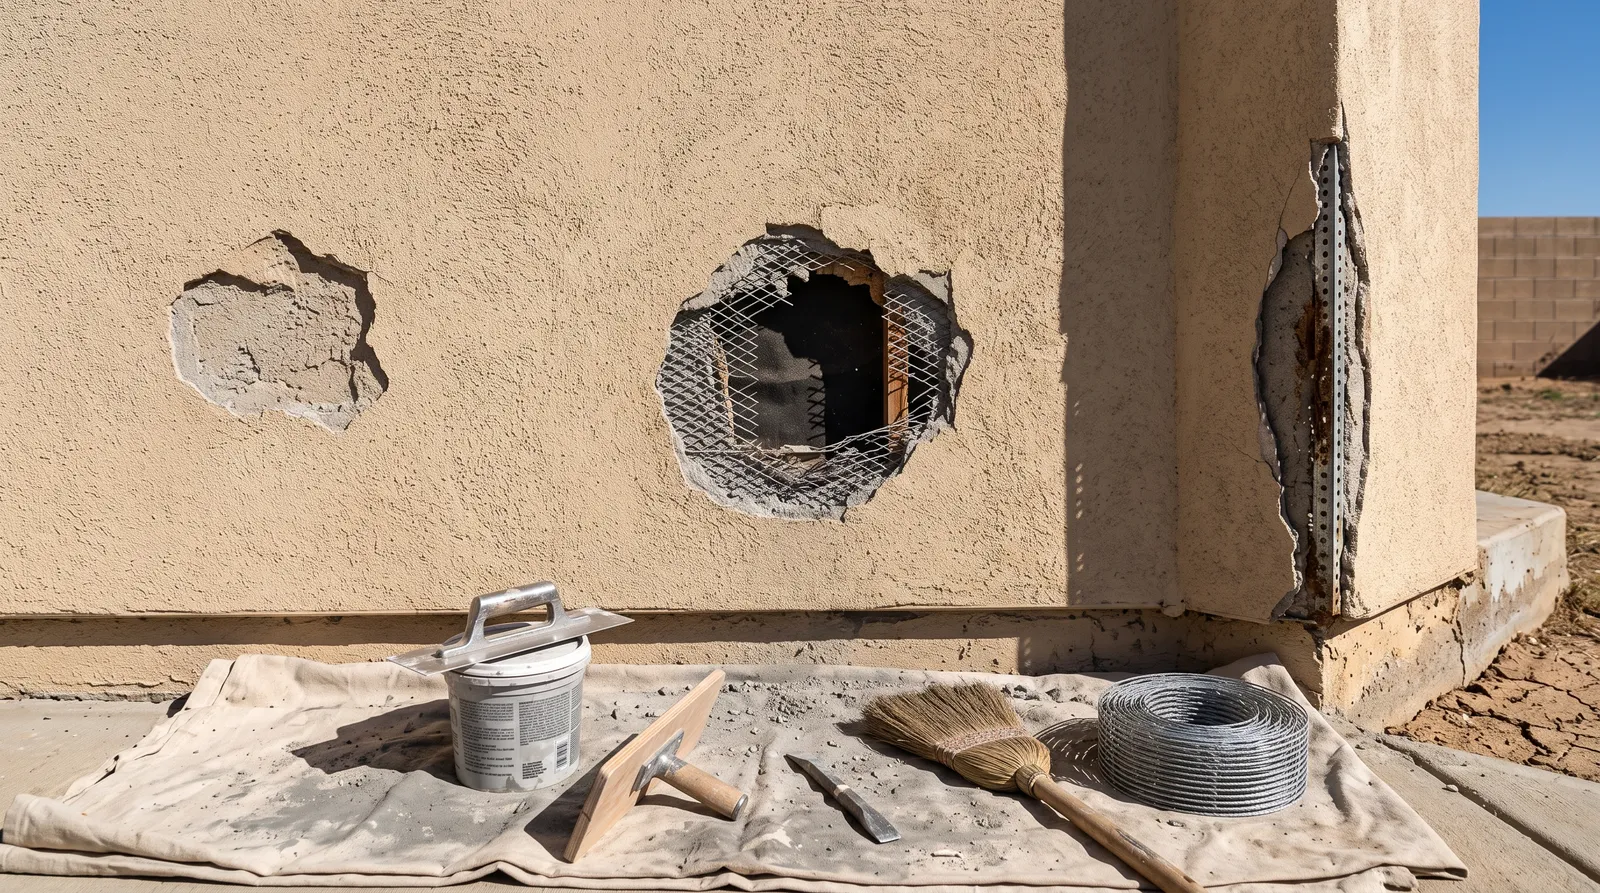
Small chips and gouges take pre-mixed stucco patch straight from the tub. Holes through to the lath get new paper, new lath, and two layers of bagged stucco built up in stages. Blown corners need a corner bead before anything else. Hairline cracks are a different job — that fix lives at how to fix cracks in stucco. This one is about real damage.
Does This Match What You’re Seeing?
Five patterns cover almost every stucco repair call.
- Chip or gouge in the finish coat. Shallow, maybe 1/8 to 1/4-inch deep. Grey or tan brown coat showing through the color coat. Hose reel, ladder foot, weed trimmer, or a hail season. Cosmetic.
- Hole through to the lath. You can see wire mesh or dark felt paper. Removed light fixture, old hose bib, satellite mount, or a real impact. Water path. Fix before the next storm.
- Blown or broken outside corner. The stucco has spalled off the corner and you can see the metal corner bead, often rusted. Corners take every bump and every rain-driven wind. Common on garage returns and porch columns.
- Drummy patch. Sounds hollow when you knuckle it. The stucco is intact but no longer bonded to what’s behind it. Small drummy areas are a patch. Large ones are a symptom.
- Soft, dented EIFS. Synthetic stucco over foam board. You can push it in with a thumb. Different system, different materials — base coat, mesh, and matching finish, not portland cement.
Two flags to check before you mix anything. Press hard around the damage. If the wall gives, or the sheathing behind the hole is dark and spongy, water has been getting in for a while and the repair is bigger than the hole. And if there’s white crystalline bloom around the damage, that’s efflorescence — salts riding moisture out through the wall. Find the water first.
How Serious Is This?
Depends on whether the weather barrier is still doing its job.
A chip in the finish coat is cosmetic. Stucco is three layers thick and the bottom two are still keeping rain out. You have months, not days. Patch it when you get to it.
A hole to the lath is not cosmetic. Behind that wire is a layer of grade D building paper, and behind that is your sheathing. Once water gets a route past the paper, it wets OSB or plywood and does not dry — stucco holds moisture against the wall. Six months of that rots sheathing and rusts the lath nails. Tarp it if you can’t fix it now.
A drummy field bigger than a couple of square feet means the bond has failed across the wall, usually from long-term water intrusion behind a window or a missing kickout flashing at a roof-wall junction. Patching that is decoration. Get the flashing looked at before you spend a weekend on mud.
Why This Is Happening (Root Cause)
Traditional stucco is a three-coat cement system: a scratch coat pushed into galvanized wire lath, a brown coat rodded flat, and a thin finish coat that carries the texture and often the color. It all rides on building paper over the sheathing. It’s hard, it’s brittle, and it has no give.
That brittleness is the whole story. Cement handles compression fine and impact badly. A ladder foot concentrates load on a half-inch of surface and the finish coat shears off. Corners have even less material behind them, so a bump that would leave a mark on a flat wall takes a chunk out of a corner.
Water does the slower version. Rain gets behind a poorly sealed penetration, wets the paper, and rusts the lath and the nails. Rusting steel swells to several times its original volume and pushes the stucco off the wall from behind. That’s the spalling you see around old fixture mounts and along the bottom of walls that run down into wet soil. Freeze-thaw finishes it: water sits in a hairline crack, freezes, and lifts the finish coat. Two or three winters turns a crack into a chip and a chip into a hole.
EIFS fails differently. It’s foam board with a thin fiberglass-mesh base coat and an acrylic finish. It doesn’t rot or rust, but it dents like a cooler lid, and old barrier-style EIFS has no drainage plane, so water that gets in has nowhere to go.
What You’ll Need
For chips and shallow gouges: pre-mixed stucco patch, a 4-inch or 6-inch finishing trowel, a stiff brush or sponge float for texture, and a spray bottle.
For holes and corners: bagged base coat stucco or sand mix, concrete bonding adhesive, grade D building paper, galvanized self-furring lath, 1-1/2-inch galvanized roofing nails or lath staples, tin snips, a cold chisel and a 2-pound hammer, a hawk, a finishing trowel, and metal corner bead if a corner is involved.
For the topcoat: masonry conditioner or alkali-resistant primer, and your exterior masonry paint. The coating side is covered in detail at best stucco paint.
The Fix
Step 1 — Cut Back to Sound Stucco
Knuckle the wall in a ring around the damage. Solid stucco rings; failed stucco thuds. Mark the outer edge of every drummy spot with a pencil.
Chisel back to that line. Cold chisel and hammer, held at a shallow angle, working from the middle outward. On bigger areas score the perimeter first with an angle grinder and a diamond blade so the break stops where you want it. Cut wet or with dust extraction — dry-grinding cement throws crystalline silica and that’s a respirator job, not a bandana job.
Leave the edges roughly square and slightly undercut. Do not feather the old stucco down to a paper-thin edge. Thin edges break off in your hands and again next winter.
Step 2 — Check the Paper and the Lath
If you can see wire, look at it. Bright galvanized wire that’s still tight to the wall stays. Rusted, loose, or snapped wire comes out.
If the building paper behind it is torn, cut it back to sound paper and let in a new piece of grade D. Lap it shingle-style: the new piece tucks under the paper above and over the paper below, so water runs down the face and never behind. Get that backwards and you’ve built a funnel into your sheathing.
Cut new self-furring galvanized lath a couple of inches oversized, cups facing out, and nail it through the paper into studs every 6 inches. The furring dimples hold the wire off the paper so the scratch coat can key behind it. Lath flat against the paper has nothing to grab.
Step 3 — Build the Patch in Layers
Shallow chip, under 1/2-inch, no lath showing: dampen the old stucco, brush on concrete bonding adhesive, and press pre-mixed patch in with a trowel. One pass. Fill slightly proud, then cut it flush.
Anything deeper goes on in layers, same as the original wall.
- Scratch coat. Mix bagged base coat to a stiff, peanut-butter consistency. Press it hard into the lath until it keys through and comes out the back. Fill to about half the total depth. Before it sets, drag a scarifier or the corner of your trowel across it in horizontal lines about 1/4-inch deep. Those grooves are the mechanical key for the next coat.
- Cure it. Mist twice a day for 24 to 48 hours. Cement needs water to hydrate, not to dry. A patch that dries fast is a patch that’s weak.
- Brown coat. Fill to about 1/8-inch below the finished surface. Rod it flat with a straightedge run across the sound stucco on both sides, so the patch sits in the same plane as the wall. Float it with a sponge or wood float to bring the sand up. Mist-cure another 24 to 48 hours.
- Finish coat. Thin, 1/8-inch, textured to match. That’s the next step and it’s the one people get wrong.
Two thin coats hold. One thick coat shrinks, cracks in a map pattern, and you get to do it again.
Step 4 — Rebuild a Blown Corner
Corners need steel. Cut the rusted corner bead out, cut new galvanized or PVC corner aid to length, and nail it through the lath into framing every 8 inches. Check it with a level — a corner that wanders reads from across the street.
Fill both sides with base coat, working up to the bead but not over it. Let it set. Then finish coat both faces and pull a corner trowel or a wet brush down the arris. Leave the corner slightly soft-edged, not razor sharp. Sharp corners chip the first time somebody carries a bike past.
Step 5 — Match the Texture
This is what gives an amateur patch away. Not the color — the texture.
Figure out which pattern you’ve got:
- Dash. Sprayed or flicked on with a stiff brush. Coarse and popcorn-like. Flick from about a foot away, in layers, until the density matches.
- Sand float. Uniform fine grit. Apply flat, let it firm up, then work a sponge or rubber float in tight circles to raise the sand.
- Knockdown. Dash it on, wait until it loses its wet shine (usually 10 to 30 minutes), then flatten the peaks with a clean trowel held almost flat. Timing decides everything. Too early and you smear it; too late and nothing moves.
- Lace or skip trowel. Blobs troweled thin in random passes so bare patches of the base show through. Practice this one.
- Smooth or Santa Barbara. Troweled flat with a soft, mottled surface. Hardest to match because there’s nothing to hide behind.
Practice on a scrap of cardboard or a spare board until it looks right, and keep the material a little wetter than feels comfortable — dry mud won’t texture. Always work a few inches past the patch onto the sound wall and taper it out. A hard stop at the patch line shows in every sunset for the life of the house.
Step 6 — Let It Cure Before You Paint
Here’s the rule people skip and pay for.
Cement-based patch needs 7 days minimum before paint and 28 days to be fully cured. Fresh portland cement is strongly alkaline, pH 12 to 13. Ordinary latex paint saponifies on that surface — the binder breaks down chemically, the color goes blotchy, the film chalks, and it peels within a year. That’s alkali burn, and it costs more to strip than the patch did to make.
Three ways to handle it:
- Wait 28 days. Free, and correct.
- Wait 7 days plus an alkali-resistant primer. Sherwin-Williams Loxon Conditioner, Behr Masonry Primer, or an equivalent high-pH masonry primer. This is what most pros do.
- Use acrylic pre-mixed patch instead. Not cement, not alkaline, paintable in 24 to 72 hours. Only works for shallow repairs.
Cheap pH strips and a wet sponge will tell you where you are. Under 10 and you’re safe with a normal masonry primer.
Step 7 — Prime and Paint
One coat of masonry conditioner or alkali-resistant primer over the repair, brushed and worked into the texture — rolled primer bridges the top of the texture and leaves the valleys bare.
Then two coats of exterior masonry paint. Back-roll behind the sprayer if you’re spraying, or you’ll get a coat that looks full and measures half the mil thickness it should.
Last thing: repaint the whole wall corner to corner if the patch is bigger than a dinner plate. Exterior color drifts with UV. A perfect texture match painted only over the patch reads as a bright rectangle in low sun. The full guide is at how to paint stucco.
Patch Materials: Which One?
| Product | What it is | Use it for | Skip it for |
|---|---|---|---|
| Pre-mixed stucco patch (Quikrete Pre-Mixed Stucco Patch, Sakrete Stucco Patch) | Acrylic-modified sanded paste, no mixing | Chips and gouges under 1/2-inch, small texture blends | Deep fills, holes to lath — it shrinks and drops out |
| Stucco repair caulk (sanded textured sealant) | Flexible sanded sealant in a tube | Gaps around penetrations, small moving joints | Any repair you need to texture or trowel flat |
| Bagged base coat stucco / sand mix | Portland, lime, and sand, mixed on site | Scratch and brown coats, deep holes, corners | Anything you want to paint this week |
| Rapid-set stucco mix | Fast-hydrating cement, sets in about an hour | Cold-season work, jobs you must finish in a day | Beginners — you get one shot before it stiffens |
| Color-matched finish coat (LaHabra, Omega, Merlex) | Factory-tinted finish, integral color | Matching an unpainted stucco wall without repainting it | Painted walls — you’re painting over it anyway |
| EIFS base coat plus mesh | Polymer-modified base with fiberglass mesh | Synthetic stucco over foam | Traditional three-coat cement stucco |
Recommended Product
Quikrete Pre-Mixed Stucco Patch for everything shallow. It sticks without a bonding agent, textures well while wet, and paints in a day or two. One tub covers a lot of chips.
For anything with lath showing, bagged base coat stucco and patience. Nothing pre-mixed builds 3/4-inch of depth without cracking. Cheap material, two weekends of work, done right once.
And a masonry primer that handles high pH — Loxon Conditioner is the one I keep in the truck. It’s the difference between a patch that disappears and a patch that peels next August.
Safety
Cutting, grinding, or chiseling stucco releases crystalline silica. N95 minimum, P100 if you’re grinding, and wet-cut whenever you can. Silicosis is permanent.
Wet cement is caustic. Gloves, long sleeves, eye protection. Rinse skin contact right away — cement burns don’t hurt until hours later.
Most stucco damage is high on a wall or at a corner, so it’s ladder work. Set the feet on plywood on soft ground and don’t reach past your belt buckle.
Pre-1978 house with chipping paint on the stucco: lead-test before you grind or scrape. The RRP rule covers exteriors too, and grinding lead paint puts it in the soil around the house.
Prevention
Keep water off the wall and out of the wall. Gutters clean, downspouts extended away from the foundation, and kickout flashing where a roof edge meets a wall. That missing kickout is behind more failed stucco than every ladder in the neighborhood combined.
Keep stucco at least 4 to 6 inches above grade and above hard surfaces. Stucco buried in soil or mulch wicks moisture up and spalls from the bottom.
Seal penetrations with the right material. Hose bibs, light fixtures, vents, and pipes get a flexible urethane or hybrid sealant, not a lump of patch. Cement in a moving joint cracks by spring.
Repaint on schedule, every 7 to 10 years with a quality masonry topcoat. Paint is the wear layer. Once it chalks off, the stucco surface starts taking rain directly.
And watch the corners. A corner guard on the garage return costs less than one corner rebuild.
When to Call a Pro
- Drummy stucco over more than a few square feet, or a whole wall that sounds hollow.
- Soft, spongy sheathing behind the hole, or a musty smell when you open it up.
- Damage under a window or where a roof meets a wall — that’s a flashing problem wearing a stucco costume.
- EIFS with visible moisture staining. Barrier EIFS has no drainage plane and needs a moisture survey, not a patch.
- Repairs on unpainted, integrally colored finish stucco. Matching factory color is a specialist’s job and a bad match is worse than the hole.
- Cracks that keep reopening through repeated patches — see how to fix cracks in stucco first, then get eyes on the framing.
- Pre-1978 painted stucco with peeling paint over a large area.
What’ll Bite You in Two Years
Painting a cement patch too early. It looks perfect the day you finish. Then the alkali works up through the film, the color goes pale and chalky in that one rectangle, and by the second summer it’s lifting at the edges. Everyone who does this thinks the paint was defective. The paint was fine — the wall was 12 pH.
Wait the 28 days, or wait 7 and prime with something alkali-resistant. That’s the whole difference between a repair nobody notices and a repair you get to do twice.
Ask a Question