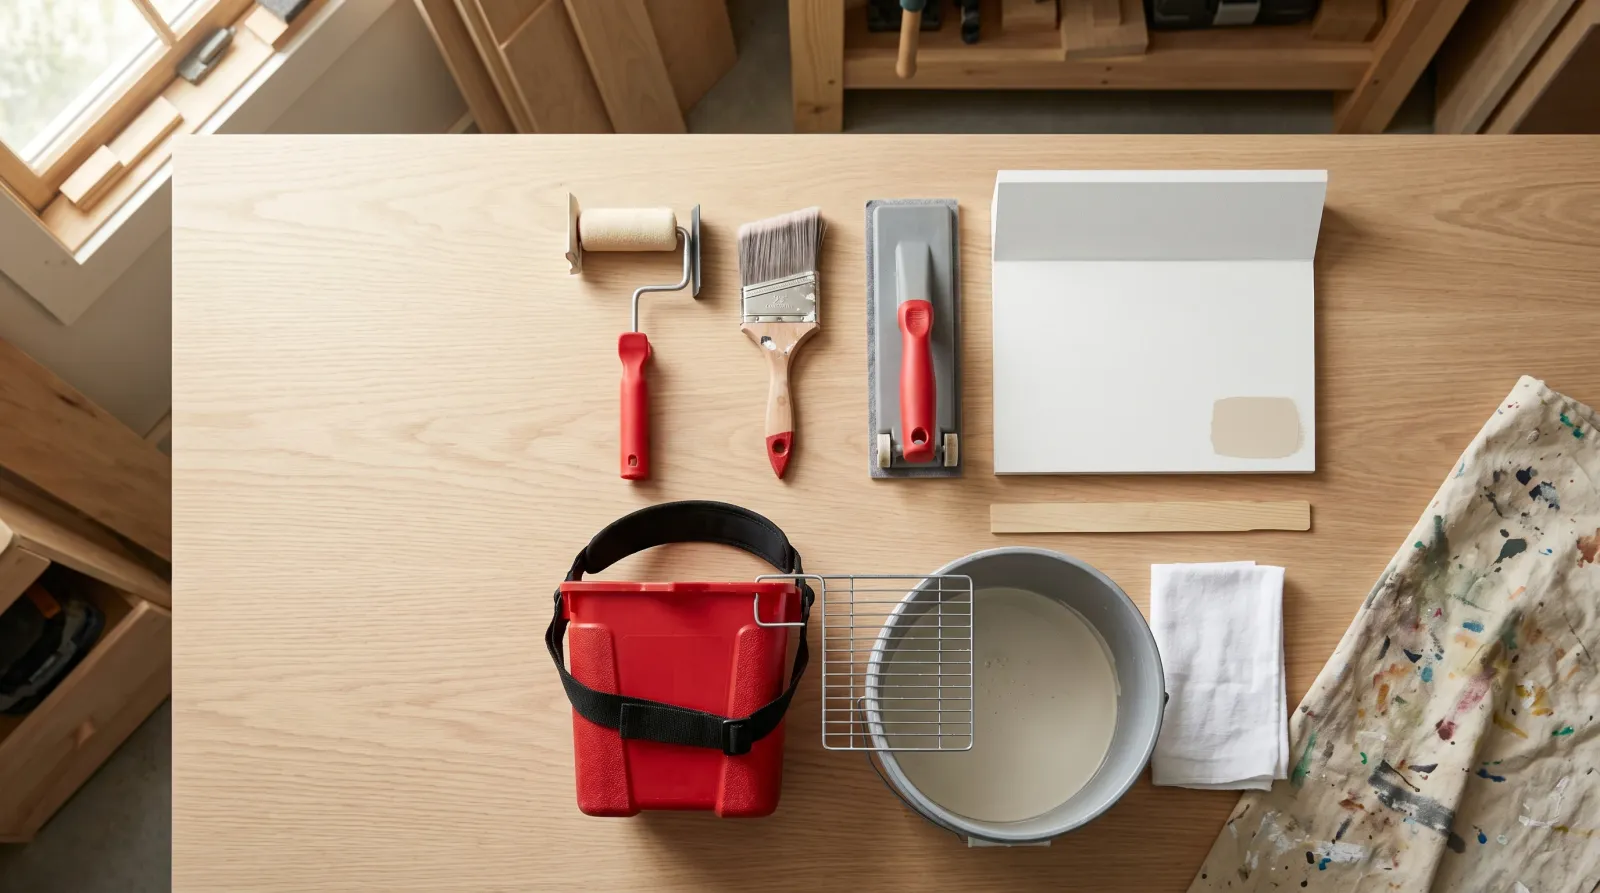
Best Bucket-Edge and No-Tape Cut-In Tools
Six bucket-edge and no-tape cut-in tools tested on walls, ceilings, and trim. Top pick: the Accubrush MX, the edger that cuts a clean line without painter's tape.

Disclosure: Some links below are affiliate links. We earn a commission if you buy through them, at no extra cost to you.
Top pick: the Accubrush MX Jumbo Kit. It cuts a clean line against your ceiling and trim without a strip of painter’s tape, and it does it the first time you pick it up. The MX wins on the thing that matters most here, a straight edge with no skill required, because the roller lays the band and a trailing brush carves the line while a little metal shield rides the surface and keeps you honest. It falls short on tight inside corners, where you still need a brush to finish. For freehand cutting from a bucket, the Wooster Shortcut is the six-dollar answer. For carrying paint up a ladder without a tray, the HANDy Paint Pail is the setup. For a fast pad edge along baseboards, the Shur-Line Edger Pro. For cutting a whole ceiling perimeter without a ladder, the Accubrush XT. And if you’d rather master the brush than buy a gadget, the Purdy Clearcut Glide lays the sharpest freehand line in the test.
There is no single right tool here, because “bucket edge” means two different jobs.
One job is a guide that draws the line for you. The other is a brush-and-pail setup that lets your hand draw it. Most people want both: an edger for the long straight ceiling runs, a brush for the corners the edger can’t reach.
What “Bucket Edge” Actually Means
Search “bucket edge tool” and you’ll get two unrelated things mixed together. I want to separate them up front, because buying the wrong one is the main way people end up disappointed.
The first thing is a guided edger. Accubrush and Shur-Line both make these. A wheel or a metal shield rides along the ceiling, the trim, or the adjacent wall, and it physically stops the paint from crossing the line. You don’t aim. You steer. The tool keeps the edge straight whether or not you have a steady hand.
The second thing is a bucket-and-brush cut-in setup. A 5-gallon bucket with a grid, or a HANDy pail you wear on your hand, plus a sharp angled brush. No guide. The straight line comes from your wrist. This is what every pro painter actually uses, and it’s faster than any gadget once you can do it. The catch is the “once you can do it” part.
Both let you skip tape. That’s the real promise of the keyword. Tape is slow to lay, it bleeds under itself unless you burnish the edge, and half the time it lifts fresh paint when you peel it. Skipping it is the right call on walls and ceilings. Keep a roll for glass, finished hardwood, and anywhere a mistake is permanent.
So the question isn’t “which tool is best.” It’s “do you want the tool to draw the line, or do you want to draw it yourself.”
How I Tested These
I ran six tools through three real rooms over four weeks. A 13 x 15 ft living room in Benjamin Moore Regal Select eggshell. A guest bedroom with a flat white ceiling that shows every wobble under the window light. A hallway loaded with door casing and inside corners, which is where edgers go to die.
Every tool did a full cut-in lap with zero painter’s tape: ceiling line, baseboard, door trim, inside corners. I dipped from a 5-gallon bucket with a Wooster grid or from a HANDy pail, never a paint tray, because the whole point of a bucket-edge workflow is that you’re working off a bucket.
I judged the cut lines under a raking LED at 24 hours against a taped control line on the same wall. A guided edger that can’t beat a careful tape line isn’t worth the money. A brush that needs ten walls of practice gets that noted, not hidden.
I’m not going to hand you fake lab numbers. These are tools you steer with your hand, and the honest measure is how straight the line landed and how much my wrist hurt after a room.
Tools I Tried and Cut
Three didn’t make the list, and the reasons are useful.
The Shur-Line Trim and Edge Painter (the classic foam pad without wheels). Cheap, and it works for a touch-up, but with no guide wheels the line wanders the second you tilt your wrist. The Edger Pro fixes exactly this. Buy the Pro, skip the classic.
The roller-tray-style edging pads sold in three-packs at the bargain bin. The pad is fine. The plastic guide flexes and the line waves. You get what you pay for.
A generic “no-tape” edge guide (the long plastic shield you hold against the wall). It’s a shield, not a tool. It works, but you’re holding a brush and a shield at once, which is two hands for a one-hand job. A guided edger does the same thing with one hand.
Picking the Right Tool for Your Job
Do You Want a Guide or a Brush?
This is the whole decision. A guided edger (Accubrush, Shur-Line) draws a straight line for you on the first pass, which is worth real money if you’ve never cut in or you hate doing it. A brush (Wooster Shortcut, Purdy Clearcut Glide) is faster and reaches everywhere once your hand learns the move, but the line is on you for the first wall or two.
If you repaint twice a decade and dread the ceiling line, buy the guide. If you paint often or you already cut a decent line, the brush is the better long-term tool. It cleans up and lasts years where a refill roller doesn’t.
How Are You Feeding It Paint?
Guided edgers like the Accubrush want a flat plate or a shallow tray. The roller is too wide to dip clean off a bucket grid, so a bucket-edge workflow with an Accubrush still means a small tray for loading. Brushes are the ones that truly work off a bucket: a grid in a 5-gallon, or a HANDy pail on your hand. Match the feed to the tool, or you’ll fight drips all day.
Where Are the Corners?
Count the inside corners and tight spots in your room. A hallway full of door casing is mostly corners, and no edger touches those. A big open living room is mostly long straight runs, which is exactly where an edger shines. The more corners, the more your money should go toward a good brush and less toward a gadget that can’t reach them.
At-A-Glance Comparison
| Tool | Type | Cuts the line for you? | Bucket feed | Best for | Price tier |
|---|---|---|---|---|---|
| Accubrush MX Jumbo Kit | Guided roller-brush edger | Yes | Flat tray/plate | No-skill clean cut lines | $$ |
| Wooster Shortcut 2” | Cut-in brush | No (freehand) | Pail or grid | Freehand cutting, tight budget | $ |
| HANDy Paint Pail | Bucket/pail setup | No (holds paint) | Is the bucket | Ladder and trim work | $ |
| Shur-Line Edger Pro | Guided pad edger | Yes | Loaded by hand | Fast baseboard/ceiling bands | $ |
| Accubrush XT Ceiling Edger | Pole-mounted guided edger | Yes | Flat tray/plate | Whole-room ceiling perimeter | $$ |
| Purdy Clearcut Glide 2” | Premium cut-in brush | No (freehand) | Pail or grid | Sharpest freehand line, longevity | $$ |
1. Accubrush MX Jumbo Kit, Best Overall
The Accubrush is the tool that makes a clean cut line without asking you to have a steady hand. A small roller lays a band of paint along the edge, and a removable nylon brush rides right behind it to carve the actual line, while a thin metal shield runs along the ceiling or trim and keeps the whole thing straight. You’re not aiming a brush tip. You’re pushing a guided tool along a surface, and the surface does the steering.
In the living room, the MX cut the full ceiling perimeter in one pass that beat my taped control line under raking light. No bleed, no wobble, no taping afternoon. That’s the sell, and it delivers.
The catch is the feed. The roller is too wide to dip clean off a bucket grid, so you load it on the flat plate the kit includes or a shallow tray. So the “bucket edge” name is half true here: tape-free yes, straight-off-a-bucket no. The other catch is corners. The MX can’t reach into an inside corner or up against a window mullion, so the last inch of every tight spot goes to a brush you keep in your other hand.
| Spec | Value |
|---|---|
| Type | Guided roller-and-brush edger |
| Reach | Handheld; refill rollers and brushes included |
| Feed | Flat plate or shallow tray |
| Best for | Clean cut lines with no cut-in skill |
Buy it if: you’ve never cut a line freehand and you want the tool to do it for you, especially on a whole-house repaint. Skip it if: your room is mostly tight corners and casing, where a brush does more than the edger ever will.
2. Wooster Shortcut 2”, Best for Freehand Cut-In
The Shortcut is the six-dollar tool that does the most per dollar in this whole round-up. It’s a stubby angled sash brush with a soft flexible Shergrip handle, and the short handle is the point. Your hand sits right behind the bristles instead of six inches back, and that closeness is what lets you walk a straight freehand line along a ceiling. Wooster has made this brush since 1991 and the design hasn’t needed fixing.
The nylon/polyester tip is stiff enough to hold an edge without flooding paint over the line. It dips clean from a HANDy pail or a small cut bucket, which is the real bucket-edge workflow. Tap it on a grid, cut your line, refill.
It’s a brush, so the straight line is your job. Give it a wall of practice before you judge it. The 2-inch is the size that matters; the stubby handle is wrong for long open trim runs where a full-length brush is faster.
Buy it if: you want to learn to cut in, you’re on a budget, or you need a brush that works off a pail in tight quarters. About $6 at most home centers.
3. HANDy Paint Pail, Best Bucket Setup
This is the actual bucket in “bucket edge.” The HANDy pail holds a quart of paint with an adjustable strap that pins it against your palm, so you carry paint up a ladder without white-knuckling a tray that wants to dump. A magnet set into the inside rim parks a wet brush at the right angle, which keeps the drips off your line and off the floor.
It doesn’t cut anything. Pair it with a brush or it’s a nicer bucket, and I want to be clear about that so nobody buys it expecting a clean line to fall out of it. What it does is fix the worst part of cutting in from a bucket: the carry and the drips.
The strap-and-magnet combo on a ladder is the move. Snap-in liners turn a color change into a thirty-second swap instead of a wash at the sink. The quart capacity runs out faster than you’d like on a full-room perimeter, so keep the can nearby.
Verdict: the best paint-carrying setup for no-tape trim and ladder work. Buy it with a Shortcut or a Clearcut Glide, never alone.
4. Shur-Line Edger Pro, Best Pad Edger
The Edger Pro is the guided pad that takes almost no learning. A flat pad lays an even band of paint, and a pair of little guide wheels ride along the trim to hold the pad off whatever you don’t want painted. Run it along a baseboard and you get a fast, clean band with none of the aiming a brush asks for. The newer Edger Pro has directional fibers in the pad that pull paint toward the edge and away from the molding, which cut the stray marks the old pads were known for.
The swivel head takes an extension pole, so you cut a ceiling line from the floor instead of a ladder. On the long straight runs in the test, that’s a real time save.
The pad is the weak point. Let it dry out or pick up a dried fleck and it streaks the line, so keep it loaded and wipe it between walls. It also wants a true, straight edge to follow. Wavy old baseboards and uneven trim throw the guide wheels off, and the line follows the wobble.
Buy it if: you’ve got long straight baseboards and ceiling runs and you want a fast pad edge with almost no practice. Sold at Home Depot and Lowe’s, usually under $10.
5. Accubrush XT Ceiling Edger, Best for Ceilings
The ceiling perimeter is the most-hated cut-in on any job, and the XT exists to kill it. Same roller-then-brush idea as the MX, but it mounts on the included pole and reaches a ceiling line up to about twenty feet up. You cut the whole room’s ceiling edge standing on the floor, no ladder shuffle around the perimeter.
On the guest-bedroom ceiling, that line is the one that shows. The XT laid it clean on the first pass once I got the feel for the pole, which took a wall.
Overhead control on a long pole is the learning curve here. Your first ceiling line will wander before your arms figure out the angle. And this is a specialist: it cuts ceiling perimeters and high walls, not your everyday baseboard-and-casing cut-in. If ceilings are the job you dread, it’s worth the slot.
Buy it if: tall ceilings or a stairwell perimeter are the part of repainting you put off. The kit includes the pole.
6. Purdy Clearcut Glide 2”, Best Premium Brush
If you’d rather get good at the brush than buy a gadget, this is the brush. The Clearcut Glide runs a stiff Tynex nylon and Orel polyester blend, and that stiff tip lays the sharpest freehand line of anything in the test. Pulled along a ceiling, it cuts an edge that reads tape-clean under raking light once your hand knows the move. The tip springs back to its angle every dip, so you stop nudging it into shape the way you do with a softer brush.
It outlasts every other tool here. A pad edger wears out, a refill roller gets tossed, a brush like this cleans up and cuts lines for years.
The stiffness that cuts the clean line also fatigues the wrist on a long unbroken ceiling run more than a softer brush would. And it’s still a brush. The straight line is yours, where the Accubrush hands it to you. For a confident hand, that’s the trade you want.
Buy it if: you can already cut a passable line and you want the brush that makes it razor-sharp. About $13–$16 for the 2-inch.
Care, Cleanup, and How Long These Last
The brushes outlive everything else here, and they’re the cheapest to keep alive.
Cut-in brushes (Shortcut, Clearcut Glide). Rinse warm water from base to tip, work soap into the heel where paint hides, comb the bristle straight, hang handle-up. Four minutes. Done right, a Clearcut Glide lasts years and a Shortcut nearly as long. The death signal is permanent fanning at the tip that won’t comb out.
The HANDy pail. Snap the liner out and toss it, or rinse the pail itself. The magnet and strap last as long as the plastic. This is a buy-once tool.
Accubrush rollers and brushes. The refills pop off and rinse under the tap. Keep the metal shield clean, because a fleck of dried paint on the guide is what makes the next line wander. The kit’s refills mean the tool lasts across many rooms; you replace the consumable roller and brush, not the whole thing.
Shur-Line pad. The pad is the consumable. Rinse it after every session and eject it cleanly with the one-finger release; let it dry hard with paint in it and the next line streaks. Replacement pads are cheap. Plan to swap the pad every few rooms.
Mistakes I Still See
- Buying a guided edger and expecting it to reach corners. It won’t. Keep a 2-inch angled brush for the inside corners and tight casing the edger can’t touch.
- Trying to dip an Accubrush off a bucket grid. The roller’s too wide; it floods. Load it on the flat plate or a shallow tray.
- Letting the pad or roller dry between walls. A dry edger skips, you press harder to compensate, and the line wanders. Keep it loaded.
- Skipping the brush practice and blaming the brush. A Shortcut or Clearcut Glide cuts a clean line, but only after your hand learns it. Give it a wall before you judge.
- Tape-free on glass and finished floors. No-tape is the right call on walls and ceilings. It’s the wrong call where a slip is permanent. Keep a roll of painter’s tape for those spots.
- Ignoring the surface the guide rides on. Wavy old trim throws a pad edger’s wheels off and the line follows the wobble. Check the edge before you blame the tool.
A Kit That Earns Its Keep
For most people doing a room or two: a HANDy Paint Pail ($8) and a Wooster Shortcut ($6), about $14, cuts every line in the house once your hand learns it. Add a roll of tape for the windows and you’re done.
For someone who dreads cutting in or is repainting a whole house: the Accubrush MX Jumbo Kit for the walls, plus a Shortcut for the corners it can’t reach. The edger turns the cut-in from a skill into a chore you can finish.
For a confident hand that wants the best line: a Purdy Clearcut Glide in a HANDy pail. That’s the setup pros actually use, and it beats every gadget on the corners and outlasts all of them.
Most homeowners do fine with the brush and the pail. The gadgets earn their price when you hate cutting in or you’re painting a lot of straight wall. For more on the brush side of this, see the best cutting-in brushes round-up. For the times tape still wins, the painter’s tape guide covers it, and if your wall edges already went wrong, the fix for lap marks will help.
FAQ
What is a bucket edge tool? A loose name for any tool that cuts a clean paint line straight off a bucket or pail, no tape and no tray. It covers guided edgers like the Accubrush and Shur-Line that steer the line for you, and cut-in setups like a HANDy pail with a sharp angled brush where your hand steers.
Can you really paint a clean edge without tape? Yes, and most pros do. A guided edger gives you a straight line on the first try; a good brush gives you one once your hand learns the move. Keep tape only for glass and finished floors.
Do I still need a brush if I have an edger? Yes. No edger reaches an inside corner, behind a toilet, or against a window mullion. Keep a 2-inch angled sash for the last inch of every tight spot.
Why does my cut line look wavy even with an edger? The guide is riding on dried paint or rough trim, the pad is dry and skipping, or you’re moving too fast. Keep the tool loaded, move at a steady walking pace, and let the guide steer.